Advertisement
Quick Links
Advertisement

Related Manuals for Mercia Garden Products 04DTSTRDPN0804HGS-V1


Summary of Contents for Mercia Garden Products 04DTSTRDPN0804HGS-V1
- Page 1 2mm Drill bit...
-
Page 2: Any Questions
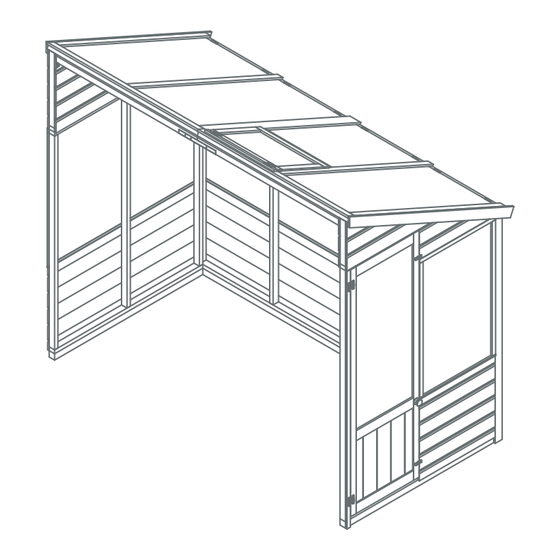
PLEASE SCAN HERE: ANY QUESTIONS? Scan code contact us via our customer portal. - Page 3 Before assembly Roof Strip -12x56x1218mm QTY 2 please make sure you have a S1256-1218mm suitable base ready to erect your building Fascia -12x70x1447mm QTY 2 S1270-G-1447mm (Angled) Side Door Strip -12x27x1711mm QTY 2 S1227-1711mm MADE IN GREAT BRITAIN Overall Dimensions: Base Dimensions: Ridge Bar - 27x70x1137mm QTY2 Width = 1322mm...
- Page 4 Nail Bag Strip - 12x27x610mm QTY 1 There may be extra screws present in the nail bag S1227-610mm Strip - 12x20x1193mm QTY 3 70mm Screws x 14 30mm Screws x 159 S1220-1193mm 60mm Screws x 18 20mm Screws x 14 Strip - 12x27x937mm QTY 11 16mm Screws x 24 50mm Screws x 38...
- Page 5 Step 1 Step 2 IMPORTANT: Pre-drill before xing screws. IMPORTANT: Pre-drill before xing screws. Parts needed - No. 16 QTY 4 Parts needed - No. 1 QTY 1 No. 17 QTY 2 No. 2 QTY 3 No. 28 QTY 1 On a rm and level base, ensure the base has suitable drainage is free from No.
- Page 6 Step 4 Step 3 IMPORTANT: Pre-drill before xing screws. IMPORTANT: Pre-drill before xing screws. Parts needed - No. 24 QTY 1 Parts needed - No. 32 QTY 7 No. 25 QTY 3 No. 26 QTY 11 On the Door Side Panel (No.1), Lay one styrene sheet (No.32) on top On the Door Side Panel (No.
- Page 7 Step 5 IMPORTANT: Pre-drill before xing screws. Step 7 IMPORTANT: Pre-drill before xing screws. Parts needed - No. 6 QTY 1 Parts needed - No. 14 QTY 1 Place the Plain Gable Top (No. 6) onto one Locate the Side Door Frame (No. 14) to Side Panel (No.
- Page 8 Step 10 Step 9 IMPORTANT: Pre-drill before xing screws. IMPORTANT: Pre-drill before xing screws. Parts needed - No. 20 QTY 1 Place the assembled Door Side Panel Fix the Outer Door Strip (No.20) onto (No. 1) onto the Base Frame and x to the door frame using 3x30mm screws the corners of the already standing Side as shown in the illustration.
- Page 9 Step 12 Step 14 IMPORTANT: Pre-drill before xing screws. IMPORTANT: Pre-drill before xing screws. Parts needed - No. 12 QTY 2 Parts needed - No. 7 QTY 1 No. 37 QTY 2 No. 8 QTY 1 No. 38 QTY 1 Place the two Roof panels together Connect two Ridge Bars (No.12) (No.7 &...
- Page 10 IMPORTANT: Pre-drill before xing screws. Step 16 Step 18 IMPORTANT: Pre-drill before xing screws. Parts needed - No. 9 QTY 2 Parts needed - No. 39 QTY 1 No. 18 QTY 1 No. 22 QTY 4 Fix the casement stay (No. 39) to No.
- Page 11 Step 20 IMPORTANT: Pre-drill before xing screws. Step 21 IMPORTANT: Pre-drill before xing screws. Parts needed - No. 13 QTY 1 No. 37 QTY 3 Once the roof has been secured, x the panels to the base frame using Locate the Roof Truss (No.13) to cover 3x50mm screws per panel.
- Page 12 Step 23 Step 22 IMPORTANT: Pre-drill before xing screws. IMPORTANT: Pre-drill before xing screws. Parts needed - No. 19 QTY 3 Parts needed - No. 4 QTY 1 No. 33 QTY 2 Locate the Cover Trims (No.19) in No. 35 QTY 1 position over the panel joins, as No.
-
Page 13: After Treatment
Step 25 IMPORTANT: Pre-drill before xing screws. Parts needed - No. 11 QTY 2 No. 21 QTY 1 Locate the Upper Door Strip (No. 21) and two Side Door Strips (No.11) internally to the framing around the door frame. Fix in place using 3x30mm screws for the Upper strip and 4x30mm screw per side It is ESSENTIAL that you apply wood door strip. - Page 14 PLEASE SCAN HERE: ANY QUESTIONS? Scan code contact us via our customer portal.
Need help?
Do you have a question about the 04DTSTRDPN0804HGS-V1 and is the answer not in the manual?
Questions and answers