Table of Contents
Advertisement
Quick Links
Edge Computer EC300 Series
User's Manual
(Applicable for Debian11)
Version1.2, October 2023
www.inhandnetworks.com
The software described in this manual is according to the license agreement,
can only be used in accordance with the terms of the agreement.
Copyright Notice
© 2023 InHand Networks All rights reserved.
Trademarks
The InHand logo is a registered trademark of InHand Networks.
All other trademarks or registered trademarks in this manual belong to
their respective manufacturers.
Advertisement
Table of Contents

Related Manuals for InHand Edge Computer EC300 Series


Summary of Contents for InHand Edge Computer EC300 Series
- Page 1 Copyright Notice © 2023 InHand Networks All rights reserved. Trademarks The InHand logo is a registered trademark of InHand Networks. All other trademarks or registered trademarks in this manual belong to their respective manufacturers.
- Page 2 Disclaimer The company reserves the right to change this manual, and the products are subject to subsequent changes without prior notice. We shall not be responsible for any direct, indirect, intentional or unintentional damage or hidden trouble caused by improper installation or use.
-
Page 3: Table Of Contents
Contents 1 Introduction ................................5 2 Hardware installation instructions ........................5 2.1 Introduction ..............................5 2.2 EC300 panel ..............................5 2.2.1 Front panel ............................. 5 2.2.2 Left panel ............................6 2.2.3 Right panel ............................. 6 2.3 EC300 external interface.........................6 2.3.1 Ethernet ............................6 2.3.2 Serial port............................ - Page 4 3.2.2 Creating and deleting user accounts .................. 18 3.2.3 Disable the default user account ..................18 3.3 Network administration and system administration ..............19 3.3.1 Web management based on IEOS..................19 3.3.2 Linux-based command-line management ............... 35 4 Advanced configuration of the peripheral interface ................41 4.1 Serial Ports ..............................41 4.1.1 Change the serial port Settings .....................41 4.1.2 View the serial port information ...................
-
Page 5: Introduction
1 Introduction This user's manual is for the Arm architecture based edge computer EC300 and covers a complete set of instructions for all supported models. Before referring to these chapters, verify that the hardware specifications of your computer model support the features/Settings covered. 2 Hardware installation instructions In this chapter, we will cover the external interface instructions of EC300, an edge computer based on Arm architecture. -
Page 6: Left Panel
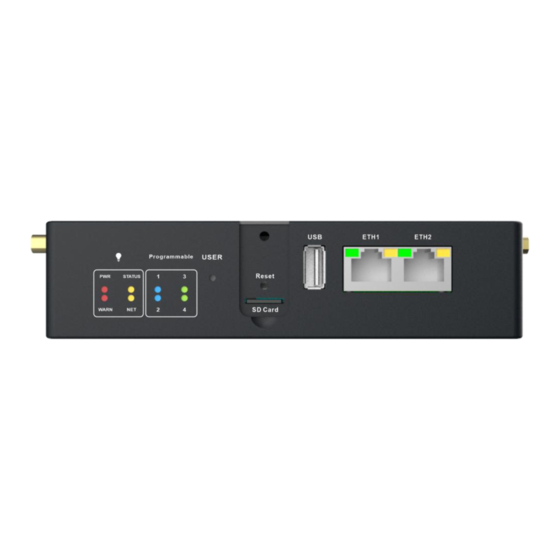
2.2.2 Left panel 2.2.3 Right panel 2.3 EC300 external interface 2.3.1 Ethernet This is a dual RJ45 connector for Ethernet connection The EC300 has 2 RJ45 Ethernet ports and supports 10M/100M adaptive rates. Yellow light: LINK indicator light, the end device is on when the interface is 1000M, and the end device is off when the interface is 10/100M. -
Page 7: Serial Port
2.3.2 Serial port The EC300 supports up to four serial ports. COM1: RS-232 / RS-485 (RX1 TX1 / A1 B1) COM2: RS-485 (A2 B2) COM3: RS232 / RS485 (extended interface PIN1 Extended interface PIN2) COM4: RS232 / RS485 (extended interface PIN5 extended interface PIN6) 2.3.3 CAN The EC300 has a 3-way CAN bus interface and supports the CAN 2.0A/B standard. -
Page 8: Switching Output Interface (Digital Output)
Isolate 3000VDC Digital input port number 2 Digital input port number 3 2.3.5 Switching Output Interface (Digital Output) Interface identification Features Description Digital output port 0 Digital output port number 1 Digital output port 2 4 DO OD output, isolated 3000VDC Digital output port No. -
Page 9: User Programmable Keys
to an exception in the system startup phase; Or when the factory recovery operation has not been completed, STATUS is long out. When a warning exception occurs in the system and the system WARN Warning indicator light upgrade or factory restoration has not been completed, the WARN light blinks. -
Page 10: Dc Input
2.3.9 DC input The EC300 supports 9 to 48V DC input 2.3.10 SIM card slot The EC300 supports 2 SIM card slots, and the SIM card needs to be installed with power off by pressing the SIM card into the slot. 2.3.11 MicroSD card slot The EC300 has a slot for the MircoSD card, SD does not support hotplugging and needs to be plugged in and out with power off. -
Page 11: Extended Interface
Wi-Fi WiFi antenna Lora Lora antenna 2.3.15 Extended interface The EC300 enables flexible interface expansion, which is freely combined by four independent expansion modules (module A, module B, module C and module D) according to requirements, allowing different combinations of isolated CAN, RS485, RS232, analog input and DI/DO. - Page 12 RS485 CAN FD 4-20mA NONE Module D 4DI+4DO CAN FD * Expansion module selection example: EC312-B-LQA3-L22D, indicating that the product supports additional LORA+RS232*1+RS232*1+4DI+4DO. * For extended functionality, please contact us to determine the model available for order. The extension interface is defined as follows: Extension Interface Definition module...
- Page 13 AIN1- B_232_TX/485_A/CAN2_H/AIN2+ B_232_RX/485_B/CAN2_L Extension Module B AIN2- CAN3_H CAN3_L Extension Module C...
-
Page 14: Getting Started
DI_COM 3 Getting Started In this chapter, we will cover the basic configuration of EC300, an edge computer based on Arm architecture. 3.1 Connect to the EC300 You will need a computer that you can use to connect to the EC300 and log in to the command line interface. -
Page 15: Connecting Via The Ssh Console
For security reasons, we recommend that you disable the default user account and create your own. 3.1.1 Connecting via the SSH Console The EC300 supports SSH connections over Ethernet. Connect to the EC300 using the following default IP address. Port Default IP ETH 1 192.168.3.100... - Page 16 3.1.1.2 Windows users Tips These steps apply if you are connecting the EC300 on a Windows PC. Please do not apply these steps to the EC300 device itself. Make the following steps on your Windows PC Click the link http://www.chiark.greenend.org.uk/~sgtatham/putty/download.html, download PuTTY (free) software, SSH command in Windows environment to establish a connection to the edge computer EC300.
-
Page 17: User Account Management
3.2 User Account management 3.2.1 Switch to the root user You can use the sudo -s command to switch to the root user. For security reasons, do not operate all commands as root. Tips Click on the link for more information on sudo commands. https://wiki.debian.org/sudo Pay attention to You may get a "permission denied"... -
Page 18: Creating And Deleting User Accounts
3.2.2 Creating and deleting user accounts You can use the useradd and userdel commands to create and delete a user's account. Be sure to use these commands in the home screen to set the relevant access rights for that account. Here is an example of how to create test1 in the sudo group (the default login environment for test1 users is bash and their home directory is /home/test1) To change test1's password, use the passwd command, enter the new password and... -
Page 19: Network Administration And System Administration
The EC300 is based on debian 11, so it can use native Linux commands for network management and system administration. In order to facilitate user configuration, InHand has developed a set of IEOS system programs, providing a web interface, users can easily through the web network management and system management, but it should be noted that when the IEOS function is enabled, IEOS will take over the network management and system management. - Page 20 configuration supported by IEOS be managed through IEOS web, and the configuration not supported by IEOS, such as VPN, can be combined with native Linux commands to achieve the configuration goal. 3.3.1.1 Login to the web Considering that the user's program may need to use the standard HTTP/HTTPS port number 80/443, IEOS uses the port number 9100 as the HTTPS connection port, and does not support access through HTTP;...
- Page 21 3.3.1.2 Network management 3.3.1.2.1 Configuring the Ethernet interface Configure the eth1 interface with a static IP address Configure the eth1 interface with a DHCP Client Start the dhcp server function on the eth1 interface and assign an address to the eth1 unhooked device...
- Page 22 DHCP Server configuration parameters description: Enable DHCP Server: The switch of DHCP Server function Starting Address: Starting base address of DHCP Server address pool, network segment + starting address = starting ip address of address pool. In the screenshot, the network segment of eth1 is 192.168.3.0/24, and the base address is 1, then the starting address of the address pool is 192.168.3.1/24.
- Page 23 Enabled: The switch of cellular function; Enabled by default. 10. Profiles: A set of dial parameters used to configure APN, username, password, and authentication methods when dialing a dedicated network card. If you are not a dedicated network card, you usually do not need to change the configuration here. You can add up to 10 records to the dial-up parameter set.
- Page 24 Max Number of Dials: When the dual-SIM single-dial function is enabled, the current sim card will be dialed to another sim card for dialing when the number of dials reaches a specified number. APN Profile: sim card selected dialing parameters set, the default value is automatic.
- Page 25 Detection Strict: Whether strict detection is enabled. When strict detection is turned off, the detection program will detect whether the packet received by the cellular interface has changed in each detection cycle. If there is a change, it means that the cellular network is working, and ICMP packets will not be sent for detection, so as to save some traffic;...
- Page 26 3.3.1.2.3 Configure the Wi-Fi Station Enable Wi-Fi: Enable the switch; Off by default Client SSID: The ssid you want to connect to, you can enter it manually; You can also use the scan button to get nearby SSIDs that you can connect to Enable Default Route: Enable the function of adding default route.
- Page 27 Static route configuration parameters: Interface: The outgoing interface of the static route Target: The target network Netmask: Target network mask Gateway: Next hop address Metric: The metric for the static route 3.3.1.2.5 Configuring the firewall Only the iptables command is currently supported for configuration.
- Page 28 3.3.1.2.6 Configuring DNS DNS Servers: DNS Server address, up to 4 can be configured Domain name hijacking: Domain name hijacking function, can realize the binding between IP address and domain name. 3.3.1.2.7 Network diagnostics Network diagnostics support ping, traceroute and nslookup functions.
- Page 29 Cloud management Enabled: the enable switch that connects to the DeviceLive platform; DeviceLive is the remote monitoring and management platform of InHand equipment; Cloud Server: DeviceLive platform has 2 addresses; One is the address of the domestic platform, the other is the address of the overseas platform; Here you choose which platform to connect to.
- Page 30 A maximum of 10 NTP Server addresses can be configured, and the program periodically sends synchronization requests to each server address in turn. After the synchronization is successful, the system time is written to the RTC and no longer continues to send synchronization requests to the later NTP servers. In addition to using NTP to synchronize the time, there is a synchronization button in the Device Info status page to synchronize the time manually, but only when the device time and the local time (the time of accessing the computer used...
- Page 31 3.3.1.3.2 Firmware upgrade The automatic restart option is turned off by default. After upgrading the firmware, you need to manually restart the system to take effect; When the automatic restart option is enabled, the system will be restarted automatically after the firmware upgrade is successful. 3.3.1.3.3 Others This page has 2 functions: restart the system and reset the system.
- Page 32 3.3.1.4 Status 3.3.1.4.1 Equipment information The device information status page shows hostname, device model, serial number, firmware version, kernel version, filesystem version, and an overview of CPU, memory, and disk space usage. 3.3.1.4.2 Cellular dialing status information The cellular dial status page shows the sim card, IMIE, IMSI, ICCID, signal strength used by the current dial, as well as the IP address, DNS and other information obtained by the dial.
- Page 33 3.3.1.4.4 DHCP Server status information The DHCP Server status page shows the assigned IP address of the device as a DHCP Server, the client hostname, the client host mac, and the expiration time. 3.3.1.4.5 Routing status information The route status page displays IPv4 direct route, static route and route neighbor information.
- Page 34 3.3.1.4.6 Firewall status information Firewall status information shows filtering rules, IP address mapping rules and other information. 3.3.1.4.7 Log information The log page can view the system log, user log and set the log level, including Error, Info, Debug and other levels. Logs can also be downloaded locally.
-
Page 35: Linux-Based Command-Line Management
3.3.2 Linux-based command-line management When using the Linux command line for network and system configuration, the first thing you need to do is close the IEOS program. IEOS is managed through systemctl, Shutting down IEOS is done as follows: systemctl stop ieos_daemon This shutdown only applies to this startup, and IEOS programs will still start after the system is rebooted. - Page 36 After changing the interface IP configuration, run /etc/init.d/networking restart to restart the network service for the configuration to take effect. 3.3.2.1.2 Set up a dynamic IP address If you want to set dynamic IP address for EC300, through the command vim/etc/network/interfaces.
- Page 37 After changing the interface IP configuration, run /etc/init.d/networking restart to restart the network service for the configuration to take effect. 3.3.2.3 System administration 3.3.2.3.1 Querying the firmware version To check the computer firmware version for the EC300, type: 3.3.2.3.2 Check available disk space To determine the amount of available drive space, use the df command with the -h option.
- Page 38 3.3.2.3.4 Adjust the time The EC300 has two time Settings. One is system time and the other is RTC (Real Time Clock) time, which is maintained by the EC300's hardware. Use the date command to query the current system time or to set a new system time. Use the hwclock command to query the current RTC time or set a new RTC time.
- Page 39 3.3.2.3.5 set time zone There are two ways to configure the time zone for the EC300. One is to use the command tzselect. The other is to use the /etc/localtime file. 3.3.2.3.6 Use the tzselect command When you type the tzselect command, you will be taken to the area selection screen. Select the approximate area (divided by continent and ocean) and enter the number in front of the continent or ocean Then select the continent or the country under the ocean...
- Page 40 3.3.2.3.7 Using a localtime file The localtime zone is stored in /etc/localtime and is used by the GNU library for C (glibc) if no value is set for the TZ environment variable. This file is either a copy of /usr/share/zoneinfo/file or a symbolic link to it. If EC300 cannot find/usr/share/zoneinfo/file, please download from the web site you need the time zone information file (https://www.iana.org/time-zones), and links to the local time in the EC300 file.
-
Page 41: Advanced Configuration Of The Peripheral Interface
4 Advanced configuration of the peripheral interface In this chapter, we will introduce the advanced configuration of peripheral interfaces for EC300, an edge computer based on Arm architecture. This chapter covers the following topics: 4.1 Serial Ports EC300 has four serial ports, one serial port supports RS485, three serial ports support RS-232 or RS-485 mode. -
Page 44: View The Serial Port Information
4.1.2 View the serial port information 4.1.3 Set the baud rate of COM1 serial port Note... -
Page 45: The Usb Interface
Details about the stty command are available at the following link http://www.gnu.org/software/coreutils/manual/coreutils.html 4.2 the USB interface The EC300 provides a USB 2.0 Host interface, which is mainly used to expand storage devices The EC300 supports USB storage device hotplugging. Note Remember to enter the sync sync command before disconnecting your USB mass storage... -
Page 46: Io Debugging
Where can* down is selected from can1, can2, or can3. Then configure the bit rate (here's a 50k bit rate example) : Finally turn the device back on 4.5 IO Debugging The EC300 supports 4-way IO input and 4-way IO output. Port number Device description file /sys/class/gpio/gpio454/value... -
Page 47: Security
Reading the DI status can be done using cat "Device profile"; DO status can be controlled by using echo 1 > "Device Profile" or echo 0 > "Device Profile" as root user 5 Security In this chapter, we will introduce the security mechanism of EC300, an edge computer based on ARM architecture. -
Page 48: Tpm2.0
5.3 TPM2.0 TPM stands for "Trusted Platform Module" and it is a hardware security module designed to provide security and encryption capabilities for computer systems. It is a secure microcontroller that can be embedded in a computer system or sold as a standalone hardware device. -
Page 49: Programming Guidelines
Device description file path: /tmp/ieos/etc/system_info.json, the content is as follows: "device_info": { "model_info": { "model": "EC312", "pn": "H-LQA3-LC4D", "sn ": "CL3124050000001", "oem": "inhand", "features ": "; std; cell-LQA3; wlan;" "software_info": {"boot_loader ": "V1.0.2", "kernel ": "5.10.168", "version ": "V1.0.1-beta1", "os ": "Debian GNU/Linux 11 (bullseye)"... - Page 50 ": "armv8", "soc ": "AM6231", "interface ": { "eth ": [ "iface_name": "eth1", "iface_mac": "00:08:5f:17:04:00" "iface_name": "eth2", "iface_mac": "00:18:5f:17:04:02" "wlan": [ "iface_name": "wlan0", "iface_mac ": "f4:3c:3b:ca:e9:36" "iface_name ": "wlan1", "iface_mac ": "f6:3c:3b:ca:e9:36" "gpio ": [ "gpio_name ": "cellular_power", "dev_node ": "/sys/class/gpio/gpio401" "gpio_name ": "sim_switch", "dev_node...
- Page 51 "uart_name": "com1", "dev_node": "/dev/ttyS4" "uart_name": "com2", "dev_node": "/dev/ttyS5" "led": [ "led_name": "user1", "dev_ node": "/sys/class/leds/user1" "led_name": "user2", "dev_node": "/sys/class/leds/user2" "led_name": "user3", "dev_node": "/sys/class/leds/user3" "led_name": "user4", "dev_node": "/sys/class/leds/user4" "led_name":...
- Page 52 "cell", "dev_node": "/sys/class/leds/cell" "led_name": "warn", "dev_node": "/sys/class/leds/warn" "led_name": "status", "dev_node": "/sys/class/leds/status" "io": { "di": "di_name": "di1", "dev_nod e": "/sys/class/gpio/gpio454" "di_name": "di2", "dev _node": "/sys/class/gpio/gpio455" "di_name": "di3", "dev_node": "/sys/class/gpio/gpio456" "di_name": "di4", "dev_node": "/sys/class/gpio/gpio457" "do": "do_name":...
-
Page 53: Io Programming Guide
"do1", "dev_node": "/sys/class/gpio/gpio323" "do_name": "do2", "dev _node": "/sys/class/gpio/gpio453" "do_name": "do3", "dev_node": "/sys/class/gpio/gpio465" "do_name": " do4", "dev_node": "/sys/class/gpio/gpio461" } }} 7.1 IO Programming Guide Currently, there are a total of 8 IO interfaces on the device: for example, there are 4 input pins from DI1 to DI4 on the device panel; DO1~DO4 are 4 output pins. According to the device description file /tmp/ieos/etc/system_info.json, the IO device nodes are: When you need to programming IO interface, direct manipulation background device... -
Page 54: Led Programming Guide
When DO1 need to output high electricity at ordinary times, can be directly to sys/class/write 1 gpio/gpio323 / value echo 1 > /sys/class/gpio/gpio323/value When you need to check the DI1 level is, the same can be directly to check the sys/class/gpio gpio454 / the value of the value cat /sys/class/gpio/gpio454/value The full shell script:... - Page 55 / sys/class/leds/user1 / trigger: leds trigger, can write the timer timer trigger, write none said cancel the trigger. / sys/class/leds/user1 / delay_on: it is time to file said led lights, is an unit with ms. / sys/class/leds/user1 / delay_off: it is time to file said led lights, is an unit with ms.
- Page 56 ="/sys/class/leds/user1/trigger"USER1_DELAY_ON = "/ sys/class/leds/user1 / delay_on" USER1_DELAY_OFF = "/ sys/class/leds/user1 / delay_off" # light user lamps if [-f "$ USER1_BRIGTHNESS" ]; then echo 1 > $U SER1_BRIGTHNESSelse echo "no file exit "$USER1_BRIGTHNESSfi# Set the USER1 light to flash if [-f "$USER1_TRIGGER"]; then echo timer >...
-
Page 57: Cross-Compiling
ER1_TRIGGERelse echo "no file exit "$US ER1_TRIGGERfi 7.3 Cross-compiling A user's own c/ C ++ program can be cross-compiled by using the cross-compilation toolchain on the development machine, and then the object file is uploaded to the EC300 device for execution. Cross-compilation tool zip package: gcc-linaro-6.3.1-2017.05-x86_64_aarch64-linux- gnu.tar.gz Here's how to configure the environment variables for the cross-compilation... - Page 58 #include <stdio.h> int main(void) printf("hello, world! \n"); return 0; The contents of the ~/example/Makefile are as follows: # Define TARGET and source filenames target := hellworld DIRS := $(shell find.-maxdepth 3-type d) SRCS := $(foreach dir,$(DIRS),$(wildcard $(dir)/*.c)) OBJS := $(SRCS:.c=.o) CC=aarch64-linux-gnu-gcc # Define compiler and compile options CFLAGS := -Wall-Wextra -g-wno-unused-parameters...
- Page 59 # declare pseudo target ".PHONY" .PHONY: all clean Run make in the ~/example directory to generate the object file helloworld...
- Page 60 FCC STATEMENT This device complies with Part 15 of the FCC Rules. Operation is subject to the following two conditions: (1) This device may not cause harmful interference, and (2) this device must accept any interference received, including interference that may cause undesired operation.
- Page 61 between the radiator & your body. This transmitter must not be co-located or operating in conjunction with any other antenna or transmitter. The availability of some specific channels and/or operational frequency bands is country dependent and firmware programmed at the factory to match the intended destination. The firmware setting is not accessible by the end user.
- Page 62 IC STATEMENT This device complies with Industry Canada license-exempt RSS standard(s): Operation is subject to the following Two conditions: (1) this device may not cause interference, and (2) This device must accept any interference, including interference that may cause undesired operation of the device.
- Page 63 Cet équipement est conforme aux limites d'exposition aux rayonnements IC établies pour un environnement non contrôlé. Cet équipement doit être installé et utilisé avec un minimum de 20cm de distance entre la source de rayonnement et votre corps.
Need help?
Do you have a question about the Edge Computer EC300 Series and is the answer not in the manual?
Questions and answers