Table of Contents
Advertisement
Available languages
Available languages
Quick Links
MULTIATTREZZO 4 IN 1 A MOTORE FBK 4 C2
MULTIATTREZZO 4 IN 1 A MOTORE
Traduzione delle istruzioni d'uso originali
Leggere attentamente prima di utilizzare la macchina!
4-IN-1 PETROL MULTI-TOOL
Translation of the original instructions
Read carefully before using machine!
IAN 296309
APARELHO COMBINADO A
GASOLINA 4 EM 1
Tradução do manual de instruções original
Ler com atenção antes da utilização da máquina!
BENZIN-KOMBIGERÄT 4 IN 1
Originalbetriebsanleitung
Vor dem Gebrauch der Maschine sorgfältig lesen!
Advertisement
Chapters
Table of Contents

Related Manuals for FLORABEST 296309


Summary of Contents for FLORABEST 296309
- Page 1 Tradução do manual de instruções original Ler com atenção antes da utilização da máquina! BENZIN-KOMBIGERÄT 4 IN 1 4-IN-1 PETROL MULTI-TOOL Translation of the original instructions Originalbetriebsanleitung Read carefully before using machine! Vor dem Gebrauch der Maschine sorgfältig lesen! IAN 296309...
- Page 2 Prima di leggere aprire le due pagine con le immagini e prendere confidenza con le diverse funzioni dell’apparecchio. Antes de começar a ler abra as duas páginas com as imagens e, de seguida, familiarize-se com todas as funções do aparelho. Before reading, unfold both pages containing illustrations and familiarise yourself with all functions of the device.
- Page 3 5a 5...
-
Page 6: Table Of Contents
Indice Introduzione ....... . 2 Trasporto ........14 Uso conforme . -
Page 7: Introduzione
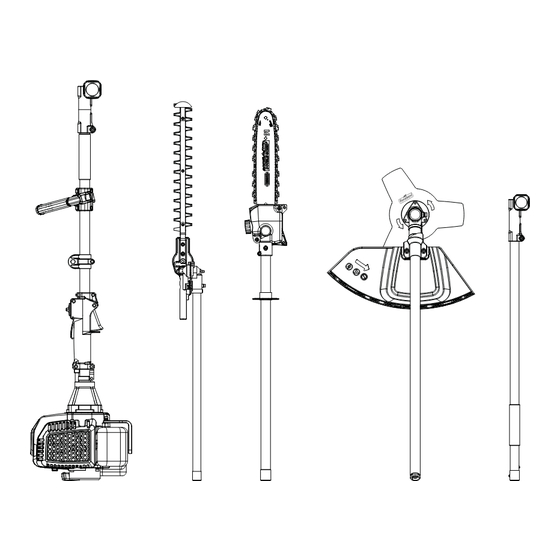
MULTIATTREZZO 4 IN 1 A MOTORE Dotazione Unità motore FBK 4 C2-1 FBK 4 C2 Blocco di accensione Introduzione Interruttore On/Off Occhiello di trasporto Congratulazioni per l'acquisto del nuovo apparecchio. È stato scelto un 4 viti di fissaggio (con anello elastico, rondella e dado) prodotto di alta qualità. -
Page 8: Volume Della Fornitura
2,4 mm 1 Chiave a brugola 4 mm 1 Chiave a brugola 5 mm Lama da taglio a tre denti (IAN 296309): 1 Chiave per candela di accensione/cacciavite a lama Ø lama da taglio-circonferenza di taglio: 255 mm 1 Chiave a forchetta SW 8/10... -
Page 9: Spiegazione Dei Cartelli Di Indicazione Utilizzati
Informazioni relative a rumore e vibrazioni: NOTA Valore di misurazione per rumore rilevato a norma ISO 22868, EN ► Il livello di vibrazione indicato nelle presenti istruzioni è stato misura- ISO 10517. La soglia di rumore valutata con A normalmente è pari a: to secondo un metodo di misurazione conforme alle norme EN ISO Tagliasiepi: 11806-1, EN ISO 10517, EN ISO 11680-1 e può... - Page 10 Cautela! Vapori CO velenosi (vapori di monossido di Premere 6 volte la pompa del carburante (primer) carbonio)! Non utilizzare l'apparecchio in ambienti chiusi! Rapporto di miscelazione: 40 parti di benzina per 1 parte Avvertenza! Non utilizzare lame per seghe circolari come di olio lame da taglio.
-
Page 11: Indicazioni Di Sicurezza
– Non fumare. Indicazioni di sicurezza – Rabboccare il serbatoio solo all'aperto. – Non conservare mai il tagliasiepi o il contenitore del carburante in IMPORTANTE! LEGGERE ATTENTAMENTE PRIMA DELL'USO. luoghi dove sono presenti fiamme libere, ad esempio in prossimità di un CONSERVARE NELLA DOCUMENTAZIONE. -
Page 12: Indicazioni Di Sicurezza Integrative Per Tagliasiepi
b) Conservare il tagliasiepi in luoghi dove i vapori di benzina non entrino ■ Conservare il tagliasiepi in luogo asciutto, in posizione elevata o al chiuso, fuori dalla portata dei bambini. in contatto con fiamme libere o scintille. Lasciare sempre raffreddare il ■... -
Page 13: Misure Di Prevenzione Contro I Contraccolpi
■ Se la potatrice ad asta viene fermata a fini di manutenzione, ispezione ■ Ciascuna di queste reazioni può causare la perdita di controllo sulla o conservazione, spegnere il motore, rimuovere la spina dalla candela sega, arrecando lesioni eventualmente anche gravi. Non affidarsi di accensione e assicurarsi che tutte le parti rotanti siano ferme. -
Page 14: Indicazioni Di Sicurezza Sul Lavoro Per Lama Da Taglio
■ Postura di lavoro: non utilizzare mai l'apparecchio in posizione sco- Sicurezza delle persone moda, in mancanza di equilibrio, con le braccia tese o con una sola ■ Le persone presenti nei dintorni potrebbero subire accecamento o lesioni. mano. Mantenere una distanza di almeno 15 metri in tutte le direzioni tra sé e ■... -
Page 15: Prima Della Messa In Funzione
Prima della messa in funzione Montaggio del tagliasiepi ♦ Innanzitutto allentare l'impugnatura a vite sul braccio dell'unità ATTENZIONE! motore. ■ Durante la falciatura, indossare sempre scarpe antinfortunistiche ♦ Inserire fino all'arresto il perno del braccio antiscivolo e abbigliamento di protezione adeguato, ad es. guanti di protezione, casco di protezione, maschera di protezione, occhiali di anteriore del tagliasiepi nella scanalatura... -
Page 16: Messa In Tensione E Controllo Della Sega A Catena
Messa in tensione e controllo della sega a catena ♦ Montare la prolunga / braccio fra l'unità motore e il tagliasiepi / la potatrice ad asta. Il montaggio ha luogo nella stessa procedura AVVERTENZA! descritta precedentemente per gli accessori. ► Indossare guanti di protezione! Pericolo di lesioni a causa dei denti da taglio affilati! Montaggio/smontaggio della calotta di protezione... -
Page 17: Montaggio/Sostituzione Della Bobina Di Filo
Carburante e olio ATTENZIONE! BORDI VIVI, INDOSSARE GUANTI DI ■ Utilizzare solo una miscela di benzina senza piombo (min. ROZ 95) e PROTEZIONE olio speciale per motore a 2 tempi (JASO FD/ISO - L - EGD). Preparare ■ Per smontare la calotta di protezione del filo da taglio dalla calot- la miscela di carburante secondo la tabella di miscelazione del carbu- ta di protezione... -
Page 18: Avvio Con Motore Caldo
Taglio su albero / recinto / fondamenta (con bobina di filo) Avvio con motore caldo NOTA (l'apparecchio è fermo da meno di 15–20 minuti) 1.) Portare l'interruttore On /Off su "I". ■ Se il filo entra in contatto con alberi, pietre, muretti di pietra o basa- menti, si usura o si sfrangia. -
Page 19: Lavoro In Sicurezza
Taglio di un ramo piccolo Trasporto ♦ Segare i rami piccoli (Ø 0-8 cm) dall'alto verso il basso (vedere figura). ■ Durante il trasporto, utilizzare le guaine di protezione ■ Per evitare lesioni, verificare che l'apparecchio non si accenda durante il trasporto (vedere figura). -
Page 20: Conservazione E Trasporto
Conservazione e trasporto 7.) Staccare ora il filo da taglio dal piatto bobina e condurlo attraverso gli occhielli in metallo nel coperchio. ■ Conservare l'apparecchio in un luogo sicuro. ■ Conservare l'apparecchio e gli accessori in un luogo sicuro e protetto 8.) Ricomporre le due metà... -
Page 21: Ricerca Dei Guasti
Ricerca dei guasti Intervalli di manutenzione Blocco motore Potatrice ad asta I dati qui riportati si riferiscono al normale utilizzo. In caso di condizioni Problema Possibile causa Eliminazione dei guasti più difficili, come ad esempio un forte sviluppo di polvere e tempi di lavoro più... -
Page 22: Smaltimento
Ambito della garanzia NOTA L’apparecchio è stato prodotto con cura secondo severe direttive qualitative ■ I pezzi di ricambio non indicati (come ad es. bobina di filo, filo da taglio) possono essere ordinati tramite la nostra hotline di assistenza. e debitamente collaudato prima della consegna. La garanzia viene prestata in caso di vizi del materiale o di fabbricazione. -
Page 23: Assistenza
Tipo / denominazione dell'apparecchio: Multiattrezzo 4 in 1 a motore FBK 4 C2 DE - 44867 BOCHUM GERMANIA Anno di produzione: 09 - 2017 Numero di serie: IAN 296309 www.kompernass.com Bochum, 20.09.2017 Semi Uguzlu - Direttore qualità - Con riserva di modifiche tecniche volte al miglioramento del prodotto. - Page 24 Índice Introdução ....... . . 20 Transporte ....... . . 32 Utilização correta .
-
Page 25: Introdução
APARELHO COMBINADO A GASOLINA Equipamento Unidade do motor FBK 4 C2-1 4 EM 1 FBK 4 C2 Bloqueio de ativação Introdução Interruptor Ligar/desligar Olhal de suporte Parabéns pela compra do seu novo aparelho. Optou por um produto 4 parafusos de fixação (com anel de retenção, arruela plana e porca) de elevada qualidade. -
Page 26: Conteúdo Da Embalagem
1 Capa de proteção da lâmina fio/lâmina de corte: FBK 4 C2-2 1 Recipiente de mistura de óleo/gasolina Bobina com fio de corte (IAN 296309): 1 100 ml de bio-óleo para correntes Diâmetro do fio do círculo de corte: 430 mm 1 Bolsa de ferramentas Comprimento do fio:... -
Page 27: Explicação Dos Avisos Utilizados
Informações sobre ruído e vibração: NOTA Valor de medição de ruído, determinado em conformidade com as normas ► O nível de vibração indicado nestas instruções foi medido por meio ISO 22868 e EN ISO 10517. O nível sonoro ponderado A é em geral: de um processo de medição normalizado em conformidade com as Corta-sebes: normas EN ISO 11806-1, EN ISO 10517 e EN ISO 11680-1,... - Page 28 Cuidado! Vapores de CO tóxicos (vapores de monóxido Carregar 6 vezes a bomba de combustível (Primer) de carbono)! Não utilizar o aparelho em espaços fechados! Relação da mistura: 40 partes de gasolina para 1 parte de Aviso! Não utilize, em caso algum, discos de serra para óleo a função de lâmina de corte.
-
Page 29: Instruções De Segurança
– Nunca retire a tampa do depósito nem abasteça gasolina com o motor Instruções de segurança ligado ou quente. Deixe o motor e as peças de escape arrefecerem antes de reabastecer. IMPORTANTE! LER COM ATENÇÃO ANTES DA UTILIZAÇÃO. GUARDAR PARA CONSULTA. –... -
Page 30: Instruções De Segurança Adicionais Para Corta-Sebes
■ Verifique, após o ajuste do ângulo de trabalho, se ambas as alavancas Manutenção e armazenamento de ajuste estão bem encaixadas. Se uma alavanca de ajuste ficar aberta, a) Se o corta-sebes for parado para realização da manutenção, inspeção o segundo dispositivo de fixação pode soltar-se involuntariamente ou do armazenamento, desligue o motor, retire o cachimbo da vela de durante o trabalho devido a um ramo e a barra porta-lâminas pode... -
Page 31: Medidas De Precaução Contra Contragolpe
■ Evite o arranque involuntário do aparelho. ■ O encravamento da corrente de serra na aresta superior da calha de guia pode projetar a calha fortemente no sentido do operador. ■ Guarde o aparelho fora do alcance das crianças. Apenas as pessoas que estão familiarizadas com o manual de instruções e o aparelho ■... -
Page 32: Indicações De Segurança Para Lâminas De Corte
■ Agarre o aparelho sempre com as duas mãos. Os polegares e os Segurança de pessoas dedos devem envolver bem os punhos do aparelho. ■ As pessoas presentes podem sofrer cegueira ou ferimentos. Mantenha ■ Posição de trabalho: Não opere o aparelho numa posição descon- uma distância de 15 metros, em todos os sentidos, entre si e outras fortável, em caso de falta de equilíbrio, com os braços esticados ou pessoas ou animais. -
Page 33: Antes Da Colocação Em Funcionamento
Antes da colocação em funcionamento Montar o corta-sebes ♦ Solte primeiro o punho de enroscar na haste da unidade do ATENÇÃO! motor. ■ Durante o corte da relva têm de ser usados sempre calçado de se- ♦ Na haste dianteira do corta-sebes, intro- gurança antiderrapante e o respetivo vestuário de segurança, como luvas de proteção, capacete de proteção, máscara de proteção,... -
Page 34: Desmontar A Corrente De Serra
Desmontar a corrente de serra Montar o adaptador para extensão ♦ A tensão da corrente de serra tem de ser eventualmente aliviada ATENÇÃO! antes, para permitir retirar a lâmina e a corrente de serra (ver ■ O adaptador para extensão/a haste não pode ser utilizado(a) capítulo "Tensionar e verificar a corrente de serra"). -
Page 35: Colocar O Arnês
Combustível e óleo ■ Certifique-se de que a capa de proteção do fio de corte encaixa corretamente. Na parte interior da capa de proteção do fio de corte ■ Utilize apenas uma mistura composta por gasolina sem chumbo (no mín. encontra-se uma lâmina . -
Page 36: Trabalhar Com O Corta-Sebes
3.) Segure bem no aparelho e extraia o cabo de arranque até à pri- Usar óculos de proteção! meira resistência. Puxe agora rapidamente o cabo de arranque O aparelho liga-se após 1-2 puxões. Se o aparelho não pegar após Bloquear 6 puxões, repita os passos 1-7 em "Arranque do motor a frio". -
Page 37: Trabalhar De Forma Segura
Limpeza ♦ Serre agora totalmente de cima para baixo Limpeza da unidade do motor NOTA ■ O aparelho deve ser limpo após cada utilização. ■ Desligue sempre o aparelho antes dos trabalhos de limpeza e retire o cachimbo da vela de ignição ■... -
Page 38: Armazenamento E Transporte
Manutenção do filtro de ar Armazenamento e transporte Os filtros de ar contaminados reduzem a capacidade do motor, devido à ■ Guarde o aparelho num local seguro. entrada de ar reduzida para o carburador. ■ Armazene o aparelho e os acessórios num local seguro e protegido contra chamas desprotegidas e fontes de calor/faíscas, como aque- O controlo regular é, por isso, indispensável. -
Page 39: Deteção De Falhas
Deteção de falhas Intervalos de manutenção Unidade do motor Podadora em altura Os dados indicados referem-se a condições de utilização normais. Em Problema Causa possível Resolução de falhas caso de condições mais difíceis, como p. ex. forte formação de pó e pe- O motor não Procedimento errado Siga as instruções... -
Page 40: Encomenda De Peças Sobresselentes
Encomenda de peças sobresselentes Prazo de garantia e direitos legais O período de garantia não é prolongado pelo acionamento da mesma. Encomendar peças sobresselentes Isto também se aplica a peças substituídas e reparadas. Danos e defeitos Na encomenda de peças sobresselentes devem ser prestadas as seguintes que possam eventualmente já... -
Page 41: Assistência Técnica
ALEMANHA Aparelho combinado a gasolina 4 em 1 FBK 4 C2 www.kompernass.com Ano de fabrico: 09 - 2017 Número de série: IAN 296309 Bochum, 20.09.2017 Semi Uguzlu - Gestor de qualidade - Reservado o direito a alterações técnicas no âmbito do desenvolvimento. - Page 42 Contents Introduction ....... . 38 Transport ........50 Intended use .
-
Page 43: Introduction
4-IN-1 PETROL MULTI-TOOL FBK 4 C2 Features Engine unit FBK 4 C2-1 Introduction Safety lock-out On/Off switch Congratulations on the purchase of your new appliance. You have chosen Carrying lug a high-quality product. The operating instructions are a part of this product. 4 x mounting bolts (with snap ring, washer and nut) They contain important information about safety, usage and disposal. -
Page 44: Package Contents
Oregon 91P040X 1 3-section cutting blade Strimmer/cutting blade 1 Carrying harness attachment: FBK 4 C2-2 1 chain guard Strimmer with cutting filament (IAN 296309): 1 blade guard Filament cutting circle Ø: 430 mm 1 oil/petrol mixing canister Filament length: 6.0 m 1 100 ml organic chain oil Filament Ø:... -
Page 45: Explanation Of The Symbols Used
Noise and vibration information: NOTE Noise measurement value determined in accordance with ISO 22868, ► The vibration level specified in these instructions has been measured EN 10517. The A-rated noise level of the power tool is typically as follows: in accordance with the standardised measuring procedure specified Hedge trimmer: in EN ISO 11806-1, EN ISO 10517, EN ISO 11680-1 and can be Sound pressure level L... - Page 46 Caution! Poisonous CO vapours (carbon monoxide vapours)! Press the fuel pump (primer) 6x Do not use the appliance in confined spaces! Warning! Do not use circular saw blades for the cutting Mixing ratio: 40 parts petrol to 1 part oil blade function.
-
Page 47: Safety Instructions
– Do not smoke. Safety instructions – Refuel outside only. – Never store the hedge trimmer or the fuel tank in a room where there is IMPORTANT! READ CAREFULLY BEFORE USE! an open flame, for example in a hot water boiler. KEEP FOR YOUR RECORDS. -
Page 48: Supplementary Safety Instructions For Hedge Trimmers
■ Carry the hedge trimmer by the front handle when switched off, Maintenance and storage with the cutter bar facing away from your body. When transporting a) If the hedge trimmer is shut down for maintenance, inspection or storage, or storing the trimmer, always put on the protective cover. Careful switch off... -
Page 49: Precautions Against Kickback
■ Any such reaction can lead to you losing control over the saw and Use and handling possibly injuring yourself. Do not rely solely on the chainsaw's built-in ■ Never start the appliance before the blade, saw chain and sprocket safety devices. -
Page 50: Operational Safety Instructions For Cutting Blades
■ Work posture: Do not operate the appliance in an uncomfortable pos- Personal safety ition, when you are unbalanced, with arms fully stretched or with only ■ The appliance can blind and cause injuries to bystanders. Maintain a one hand. minimum distance of 15 metres in all directions between the appliance ■... -
Page 51: Before Use
Before use Assembling the hedge trimmer ♦ Start by undoing the screw grip on the boom of the engine unit. CAUTION! ♦ Push the pin on the front boom of the ■ Always wear non-slip footwear and appropriate safety clothing hedge trimmer into the groove on the engine such as protective gloves, a hard hat, a protective mask and safety goggles as well as hearing protection. -
Page 52: Tightening And Checking The Saw Chain
Tightening and checking the saw chain Fitting/removing the protective guard WARNING! WARNING! ► Wear protective gloves! There is a danger of injury from the sharp ■ When working with the 3-section cutting blade , the blade guard cutting teeth! must be fitted. The blade guard is positioned under the metal panel of the boom . -
Page 53: Installing/Replacing The Strimmer
Installing/replacing the strimmer Fuel and oil ■ Only use a mixture of unleaded petrol (at least RON 95) and special ■ Install/replace the strimmer as displayed in figure 2c. 2-stroke engine oil (JASO FD/ISO-L-EGD). Mix the fuel mixture in ac- ■... -
Page 54: Working With The Hedge Trimmer
Turning the engine off Prevent kickback Emergency stop sequence When working with the 3-section cutting blade there is a risk of kickback if the blade strikes against solid obstacles (tree trunks, branches, tree stumps, If the appliance needs to be stopped immediately, turn the On/Off switch rocks or similar). -
Page 55: Working Safely
Saw in sections Cleaning Trim long or thick branches before you make the final cut (see figure). Cleaning the engine unit NOTE ■ Clean the appliance thoroughly after every use. ■ Always switch off the appliance before cleaning and then disconnect the spark plug connector ■... -
Page 56: Storage And Transportation
Air filter maintenance Storage and transportation Contaminated air filters reduce the engine performance due to low air ■ Store the appliance in a safe location. supply to the carburettor. ■ Store the appliance and accessories in a safe location which is pro- tected against naked flames and sources of heat/sparks, such as gas- Regular inspection is essential. -
Page 57: Troubleshooting
Troubleshooting Maintenance intervals Engine unit Pole pruner The figures given here are based on normal operating conditions. In the Problem Possible cause Troubleshooting event of more difficult conditions, such as strong dust generation and The engine does Incorrect start-up process. Follow the instructions longer daily operating hours, the given intervals are to be reduced corres- not start. -
Page 58: Disposal
Disposal Scope of the warranty This appliance has been manufactured in accordance with strict quality The packaging is made from environmentally friendly material guidelines and inspected meticulously prior to delivery. and can be disposed of at your local recycling plant. The appli- The warranty covers material faults or production faults. -
Page 59: Service
Type/appliance designation: 4-in-1 Petrol Multi-Tool FBK 4 C2 DE - 44867 BOCHUM GERMANY Year of manufacture: 09 - 2017 Serial number: IAN 296309 www.kompernass.com Bochum, 20/09/2017 Semi Uguzlu - Quality Manager - We reserve the right to technical changes in the context of further product development. - Page 60 Inhaltsverzeichnis Einleitung ........56 Transport ........68 Bestimmungsgemäßer Gebrauch .
-
Page 61: Einleitung
BENZIN-KOMBIGERÄT 4 IN 1 Ausstattung Motoreinheit FBK 4 C2-1 FBK 4 C2 Einschaltsperre Einleitung Ein-/ Ausschalter Trageöse Wir beglückwünschen Sie zum Kauf Ihres neuen Gerätes. Sie haben sich 4 x Befestigungsschrauben (mit Sprengring, Unterlegscheibe und Mutter) damit für ein hochwertiges Produkt entschieden. Die Betriebsanleitung ist Rundgriff... -
Page 62: Lieferumfang
1 Schnittfaden (Faden-Ø: 2,4 mm / Fadenlänge: 6 m) Sägekette: Oregon 91P040X 1 3 Zahn Schnittmesser Fadenspulen-/ 1 Tragegurt Schnittmesservorsatz: FBK 4 C2-2 1 Kettenschutzhülle Fadenspule mit Schnittfaden (IAN 296309): 1 Schwertschutzhülle Schnittkreis-Faden Ø: 430 mm 1 Öl- / Benzinmischflasche Fadenlänge: 6,0 m 1 100 ml Bio-Kettenöl Faden-Ø:... -
Page 63: Erläuterung Der Verwendeten Hinweisschilder
Geräusch- und Vibrationsinformationen: HINWEIS Messwert für Geräusch ermittelt entsprechend ISO 22868, ► Der in diesen Anweisungen angegebene Schwingungspegel ist EN ISO 10517. Der A-bewertete Geräuschpegel beträgt typischerweise: entsprechend einem in EN ISO 11806-1, EN ISO 10517, EN ISO 11680-1 genormten Messverfahren gemessen worden und kann für Heckenschere: den Gerätevergleich verwendet werden. - Page 64 Vorsicht! Giftige CO-Dämpfe (Kohlenmonoxid-Dämpfe)! 6x Kraftstoffpumpe (Primer) drücken Gerät nicht in geschlossenen Räumen verwenden! Warnung! Verwenden Sie auf keinen Fall Kreissägeblätter Mischverhältnis: 40 Teile Benzin auf 1 Teil Öl für die Funktion als Schnittmesser. Ergänzen Sie alle 20 Betriebsstunden etwas Fett 20 h Benzin: ROZ 95 / ROZ 98 (Getriebefließfett)
-
Page 65: Sicherheitshinweise
– Rauchen Sie nicht. Sicherheitshinweise – Tanken Sie nur im Freien. – Lagern Sie die Heckenschere oder den Kraftstoffbehälter niemals in WICHTIG! VOR GEBRAUCH SORGFÄLTIG LESEN. einem Raum in dem sich eine offene Flamme, wie z. B. in einem Warm- FÜR IHRE UNTERLAGEN AUFBEWAHREN. -
Page 66: Ergänzende Sicherheitshinweise Für Heckenscheren
■ Prüfen Sie nach der Einstellung des Arbeitswinkels, ob beide Einstellhe- Wartung und Aufbewahrung bel sicher eingerastet sind. Bleibt ein Einstellhebel offen, kann bei der a) Wenn die Heckenschere zwecks Wartung, Inspektion oder Lagerung still- Arbeit die zweite Arretierung durch einen Ast ungewollt gelöst werden gesetzt wird, schalten Sie den Motor aus, ziehen Sie den Zündkerzenste- und der Messerbalken nach unten klappen. -
Page 67: Vorsichtsmaßnahmen Gegen Rückschlag
■ Jede dieser Reaktionen kann dazu führen, dass Sie die Kontrolle über Verwendung und Behandlung die Säge verlieren und sich möglicherweise schwer verletzen. Verlassen ■ Starten Sie das Gerät nie, bevor Schwert, Sägekette und Kettenradab- Sie sich nicht ausschließlich auf die in der Kettensäge eingebauten deckung korrekt montiert sind. -
Page 68: Arbeitssicherheitshinweise Für Schnittmesser
■ Arbeitshaltung: Das Gerät nicht in unbequemer Stellung, nicht bei Sicherheit von Personen fehlendem Gleichgewicht, mit ausgestreckten Armen oder nur mit einer ■ Umstehende Personen können Erblindung oder Verletzungen erleiden. Hand bedienen. Halten Sie in allen Richtungen einen Abstand von 15 Metern zwischen ■... -
Page 69: Vor Der Inbetriebnahme
Vor der Inbetriebnahme Heckenschere montieren ♦ Lösen Sie zunächst den Schraubgriff am Ausleger der Motoreinheit. ACHTUNG! ♦ Schieben Sie den Zapfen am vorderen ■ Während des Mähens sind immer rutschfeste Sich erheitsschuhe und ent- Ausleger der Heckenschere bis zum sprechende Sicherheitskleidung wie Schutzhandschuhe, Schutzhelm, Schutzmaske, Schutzbrille und Gehörschutz zu tragen. -
Page 70: Sägekette Spannen Und Prüfen
Sägekette spannen und prüfen Schutzhaube montieren / demontieren WARNUNG! WARNUNG! ► Schutzhandschuhe anziehen! Verletzungsgefahr durch die scharfen ■ Beim Arbeiten mit dem 3 Zahn Schnittmesser muss die Schutzhaube Schneidezähne! montiert sein. Die Schutzhaube wird unter dem Metallblech des Auslegers positioniert. Die Schutzhaube wird jetzt mit 2 Schrau- ♦... -
Page 71: Fadenspule Montieren / Ersetzen
Fadenspule montieren / ersetzen Treibstoff und Öl ■ Benutzen Sie nur ein Gemisch aus bleifreiem Benzin (min. ROZ 95) und ■ Montieren/Ersetzen Sie die Fadenspule wie in der Abbildung 2c speziellem 2-Takt-Motoröl (JASO FD/ISO - L - EGD). Mischen Sie das dargestellt. -
Page 72: Arbeiten Mit Der Heckenschere
Motor abstellen Vermeiden von Rückschlag Beim Arbeiten mit dem 3 Zahn Schnittmesser besteht die Gefahr des Not-Aus Schrittfolge Rückschlages, wenn dieses auf feste Hindernisse (Baumstamm, Ast, Baum- Falls es notwendig ist, das Gerät sofort zu stoppen, stellen Sie hierzu den stumpf, Stein oder dergleichen) trifft. -
Page 73: Sicheres Arbeiten
Absägen in Teilstücken Reinigung Kürzen Sie lange bzw. dicke Äste, bevor Sie den finalen Trennschnitt Reinigung Motoreinheit vornehmen (siehe Abbildung). HINWEIS ■ Nach jedem Gebrauch sollte das Gerät gründlich gereinigt werden. ■ Schalten Sie das Gerät vor Reinigungsarbeiten immer aus und ziehen den Zündkerzenstecker ■... -
Page 74: Lagerung Und Transport
Luftfilter warten Lagerung und Transport Verschmutzte Luftfilter verringern die Motorleistung durch zu geringe Luftzu- ■ Bewahren Sie das Gerät an einem sicheren Platz auf. fuhr zum Vergaser. ■ Lagern Sie das Gerät und Zubehör sicher und geschützt vor offenen Flammen und Hitze- /Funkenquellen, wie Gasdurchlauferhitzer, Wäsche- Regelmäßige Kontrolle ist daher unerlässlich. -
Page 75: Fehlersuche
Fehlersuche Wartungsintervalle Motoreinheit Hochentaster Die hier aufgeführten Angaben beziehen sich auf normale Einsatzbedin- Problem Mögliche Ursache Fehlerbehebung gungen. Bei erschwerten Bedingungen, wie z. B. starke Staubentwicklung Der Motor Fehlerhaftes Vorgehen Folgen Sie den Anwei- und längeren täglichen Arbeitszeiten sind die angegebenen Intervalle springt nicht an. -
Page 76: Entsorgung
Entsorgung Garantieumfang Das Gerät wurde nach strengen Qualitätsrichtlinien sorgfältig produziert Die Verpackung besteht aus umweltfreundlichen Materialien, die Sie und vor Auslieferung gewissenhaft geprüft. über die örtlichen Recyclingstellen entsorgen können. Das Gerät Die Garantieleistung gilt für Material- oder Fabrikationsfehler. Diese und dessen Zubehör bestehen aus verschiedenen Materialien, Garantie erstreckt sich nicht auf Produktteile, die normaler Abnutzung wie z. -
Page 77: Service
Bitte beachten Sie, dass die folgende Anschrift keine Serviceanschrift ist. Typ / Gerätebezeichnung: Kontaktieren Sie zunächst die benannte Servicestelle. Benzin-Kombigerät 4 in 1 FBK 4 C2 Herstellungsjahr: 09 - 2017 KOMPERNASS HANDELS GMBH Seriennummer: IAN 296309 BURGSTRASSE 21 DE - 44867 BOCHUM Bochum, 20.09.2017 DEUTSCHLAND www.kompernass.com Semi Uguzlu - Qualitätsmanager -... - Page 78 KOMPERNASS HANDELS GMBH BURGSTRASSE 21 DE - 44867 BOCHUM GERMANY www.kompernass.com Versione delle informazioni · Estado das informações Last Information Update · Stand der Informationen: 09 / 2017 · Ident.-No.: FBK4C2-092017-2 IAN 296309...
Need help?
Do you have a question about the 296309 and is the answer not in the manual?
Questions and answers