EOS Invisio Midi Installation And Operating Instructions Manual
Heater for sauna cabins
Hide thumbs
Also See for Invisio Midi:
- Installation and operation manual (18 pages) ,
- Assembly and operating instruction (57 pages)

Related Manuals for EOS Invisio Midi


Summary of Contents for EOS Invisio Midi
- Page 1 EOS Invisio Midi Heater for Sauna Cabins Installation and Operating Instructions Made in Germany Druck-Nr.: 2902 4839 Stand: 46/2023...
-
Page 2: Documentation
Less than or equal to, greater than or equal to Revision history Date Version Description 13 Nov. 2023 01.20 Switch to DIN A5, edits 26 Jan. 2022 01.10 UKCA added, edits 27 April 2020 01.00 First version EN-2 Installation and Operating Instructions - EOS Invisio Midi... -
Page 3: Table Of Contents
Connection diagram ................EN-32 4.2.1 Connecting to 400 V 3N ~..........EN-32 4.2.2 Connecting to 230 V 1N ~..........EN-33 Internal wiring ..................EN-34 Establishing an electrical connection ..........EN-36 Heating period limitation..............EN-36 EOS Invisio Midi - Installation and Operating Instructions EN-3... - Page 4 Starting the heater ................EN-37 Water splash ....................EN-38 6 Service and maintenance ................EN-39 Cleaning ....................EN-39 Sauna stones....................EN-40 Replacing the tubular heating elements........EN-41 Troubleshooting..................EN-44 7 General terms and conditions of service ..........EN-46 8 Disposal.......................EN-49 EN-4 Installation and Operating Instructions - EOS Invisio Midi...
-
Page 5: General Safety Instructions
Fire hazard from overheating Insufficient ventilation can lead to device overheating and fire. Install air inlets and outlets in the cabin. Observe the cabin manufacturer’s safety and installation inst- ructions. EOS Invisio Midi - Installation and Operating Instructions EN-5... - Page 6 In this case, depen- ding on the position, an additional safety temperature limiter must be installed for each additional heater. Receptacles may not be installed inside the sauna cabin. EN-6 Installation and Operating Instructions - EOS Invisio Midi...
- Page 7 The cabin door must open outward and must not have a lock that cannot be opened in the case of failure. We recommend magnetic or spring locks. EOS Invisio Midi - Installation and Operating Instructions EN-7...
-
Page 8: Operator Instruction
Inspect the sauna cabin prior to each switching. If you switch on the heater using pre-set timers or remotely, at- tach a protective cover to the heater or install a suitable safety system. EN-8 Installation and Operating Instructions - EOS Invisio Midi... - Page 9 Leave the sauna cabin if your body responds abnormally to the heat or if you do not feel well. Avoid alcohol, drugs, and medications when you are using the sauna. EOS Invisio Midi - Installation and Operating Instructions EN-9...
- Page 10 Children and persons who have not received proper instruction must not clean or service the system. EN-10 Installation and Operating Instructions - EOS Invisio Midi...
-
Page 11: Safety Levels
For an overview of the standards that were observed during design and construction of the sauna heater, please refer to the individual product’s technical data sheet that can be downloaded from www.eos-sauna.com. Local regulations also apply to the installation and operation of heating, sauna, and steam room systems. -
Page 12: Identification
Identification Identification EOS Invisio Midi is an electrically heated sauna heater for Finnish mode available in a variety of output capacities. Requirements for operation The heater must be operated with one of the following control units: Econ D series (Econ D1 – up to 9 kW only) ... -
Page 13: Scope Of Delivery
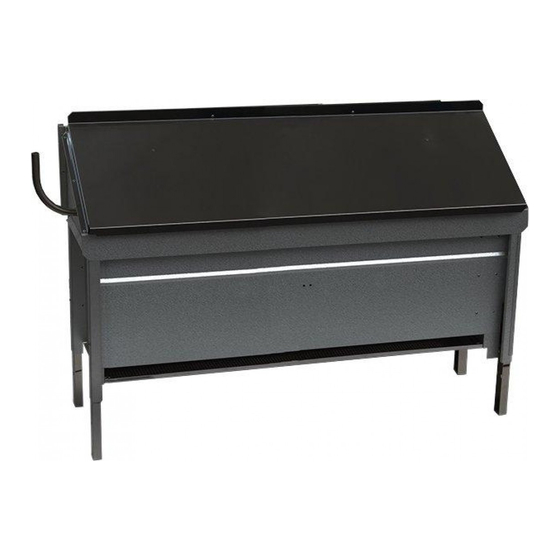
A Trough with connection hose E 4 adjustable legs B Protective grill F Installation and Operating Instructions C Angled tube of stainless steel G Mounting material and warning sign D Sauna heater EOS Invisio Midi - Installation and Operating Instructions EN-13... -
Page 14: Technical Data
Fuse protection for control unit 3 x 16 A LSG fuse 3 x 16 A All line cross-section specifications are the minimum cross-sections of a copper line. *) Not required for Compact D18/H18 control units. EN-14 Installation and Operating Instructions - EOS Invisio Midi... -
Page 15: Intended Use
A power extension unit (PEB 10) is also required for the output capacity 12 kW. Invisio Midi is a heater that is installed concealed, e.g. partially under a bench, and is suitable for cabins used in commercial and private settings. - Page 16 See 3.1.4 Temperature sensor, EN-22 The manufacturer is not responsible for unauthorised modifications and damages resulting from these modifications; the person modifying the equipment alone shall bear the associated risk. EN-16 Installation and Operating Instructions - EOS Invisio Midi...
- Page 17 The first time the cabin is heated, you may notice a slight odour resul- ting from the evaporation of consumables used in the manufacturing processes. Air out your cabin once it has been heated and before using the sauna. EOS Invisio Midi - Installation and Operating Instructions EN-17...
-
Page 18: Installation
EOS Invisio Midi - Installation and Operating Instructions EN-18... -
Page 19: Specifications For The Cabin
This prevents objects from falling onto the heater. The required heater power depends on the cabin volume. See 2.4 Technical data, EN-14. EOS Invisio Midi - Installation and Operating Instructions EN-19... - Page 20 > 4 cm >3 cm 4,5 cm 31,5 cm A Protective grill D Trough B Dividing wall E Heater C Temperature sensor/safety tempe- F Air inlet rature limiter Dimensions in the cabin EN-20 Installation and Operating Instructions - EOS Invisio Midi...
-
Page 21: Air Inlets And Outlets
This means that the cable must be routed under a suitable protective cover (e.g. in a cable duct or empty conduits). See the connection diagram Connection diagram, EN-32 EOS Invisio Midi - Installation and Operating Instructions EN-21... -
Page 22: Temperature Sensor
NOTICE Malfunction due to damaged sensor The temperature sensor is protected by its housing. Ensure that the housing and the temperature sensor are not da- maged during operation. EN-22 Installation and Operating Instructions - EOS Invisio Midi... -
Page 23: Installing The Heater
Use an underlay to protect the heater from scratches. Remove the bottom two screws on the side panels. The legs are also fixed by screws on the side panels. EOS Invisio Midi - Installation and Operating Instructions EN-23... - Page 24 Adjust all legs so they are the same height. There are 3 available heights: 3 cm, 9 cm and 15 cm. Once all four legs have been attached, attach the side panels as well. Set the heater upright again. EN-24 Installation and Operating Instructions - EOS Invisio Midi...
- Page 25 Remove the top 4 screws (C) in the side panels and the screw (A) in the middle of the hood (B). A Middle retaining screw C Top side panel retaining screw B Hood Remove the hood (B) upward. EOS Invisio Midi - Installation and Operating Instructions EN-25...
- Page 26 Fill the store with stones only to the upper edge. Do not place the stones on the edge. The air must flow freely. EN-26 Installation and Operating Instructions - EOS Invisio Midi...
- Page 27 Mounting the hood Place the hood with the mounted water channel on the heater. Mount the hood with 5 retaining screws. Completely remove the protective film from the hood (if present). EOS Invisio Midi - Installation and Operating Instructions EN-27...
- Page 28 Connect the trough (B) and angled tube (D) to the heater using the sili- cone hose (C) supplied. Ensure that the tube has no kinks. The tube must slope down to the angled tube. EN-28 Installation and Operating Instructions - EOS Invisio Midi...
-
Page 29: Dividing Wall And Protective Grill
Installing the dividing wall and protective grill Install the dividing wall so that the specified minimum clearance distan- ces are observed. See Dimensions in the cabin, EN-20. A Protective grill B Dividing wall (example) EOS Invisio Midi - Installation and Operating Instructions EN-29... -
Page 30: Affix Warning Plates In The Cabin
The warning signs must be clearly visible at eye level. Attaching the warning sign Attach the warning sign with 4 screws near the shaft on the inside wall of the cabin so it is clearly visible at eye level. EN-30 Installation and Operating Instructions - EOS Invisio Midi... -
Page 31: Electrical Installation
If, during switching, the RCD is triggered, the electrical installation must be checked again. The electrician is responsible for properly connecting the heaters; thus, the manufacturer does not assume liability. EOS Invisio Midi - Installation and Operating Instructions EN-31... -
Page 32: Connection Diagram
*) Only for connecting to Compact D18/H18 control units. 12* kW heater output A Sauna control unit C Mains B Sauna heater D Power extension unit *) Not for connecting to Compact D18/H18 control units. EN-32 Installation and Operating Instructions - EOS Invisio Midi... -
Page 33: Connecting To 230 V 1N
* Cable cross-sections must correspond to the sauna heater output: 6.0 kW – 4 mm² 9.0 kW – 6 mm² A distributor for the 1-phase connection can be purchased separately: Item no. 94.2689 EOS Invisio Midi - Installation and Operating Instructions EN-33... -
Page 34: Internal Wiring
All line cross-section specifications are the minimum cross-sections for copper lines. Internal wiring 6 and 9 kW heater output 6 kW 9 kW U V W N U V W N A To sauna control unit EN-34 Installation and Operating Instructions - EOS Invisio Midi... - Page 35 U V W N PE A To sauna control unit B To power extension unit 12 kW heater output – connection to Compact D18/H18 U V W N PE A To sauna control unit EOS Invisio Midi - Installation and Operating Instructions EN-35...
-
Page 36: Establishing An Electrical Connection
24-hour period before an independent restart can take place. Units used in private saunas must be limited to an operating time of 6 hours, and an automatic restart is not permitted. EN-36 Installation and Operating Instructions - EOS Invisio Midi... -
Page 37: Commissioning
The odour ceases upon conti- nued operation of the heater. Switching the system on Switch on the sauna heater at the control unit. Use the control unit to select a suitable program. EOS Invisio Midi - Installation and Operating Instructions EN-37... -
Page 38: Water Splash
After each water splash, wait approx. 10 minutes before starting the next one. This time is needed for the sauna stones to reheat. EN-38 Installation and Operating Instructions - EOS Invisio Midi... -
Page 39: Service And Maintenance
The sauna heater must be cleaned regularly. The cleaning frequency depends on how often it is used. CAUTION Risk of injury from sharp edges Use suitable personal protective equipment, e.g. gloves, when cleaning parts with sharp edges. EOS Invisio Midi - Installation and Operating Instructions EN-39... -
Page 40: Sauna Stones
45 minutes before you remove the old stones. Remove each stone individually. Check each stone for damage. Remove the stone if damaged and replace it with a new one. Rinse all stones with cold water. EN-40 Installation and Operating Instructions - EOS Invisio Midi... -
Page 41: Replacing The Tubular Heating Elements
Switch off the fuses to disconnect the heater from the mains supply. CAUTION! Allow the heater to cool for at least 45 minutes before it is ser- viced. Provide access to the heater. EOS Invisio Midi - Installation and Operating Instructions EN-41... - Page 42 G Terminal box cover D Support plate Replacing the tubular heating elements Remove the 5 screws from the hood (B). 2 screws on each side, one screw in the lower middle. EN-42 Installation and Operating Instructions - EOS Invisio Midi...
- Page 43 Place the heater in the correct installation position again, if necessary. Observe the minimum clearance distances; see Dimensions in the cabin, EN-20. Switch on the fuses of the heater. EOS Invisio Midi - Installation and Operating Instructions EN-43...
-
Page 44: Troubleshooting
See 3.1.4 Temperature sensor, EN-22 The heater is very hot but There is not enough Reshuffle the stones. cannot distribute the space between the sto- heat throughout the nes. cabin. EN-44 Installation and Operating Instructions - EOS Invisio Midi... - Page 45 The position of the safety Check the position of the temperature sensor is not safety temperature sen- optimal. sor and adjust as needed. 3.1.4 Temperature sensor, EN-22. EOS Invisio Midi - Installation and Operating Instructions EN-45...
-
Page 46: General Terms And Conditions Of Service
The customer shall provide assistance free of charge to the manufacturer in rendering services. In the case of a warranty claim, the manufacturer shall provide spare parts necessary for servicing free of charge. EN-46 Installation and Operating Instructions - EOS Invisio Midi... - Page 47 Wear parts shall include, for example, light sour- ces, glass elements, tubular heating elements and sauna heater stones. Only original spare parts may be used within the warranty period. EOS Invisio Midi - Installation and Operating Instructions EN-47...
- Page 48 Complaints in respect of our products shall be reported to the responsible distributor and shall be handled exclusively by said distributor. The manufacturer’s General Terms and Conditions of Business, in the ver- sion available at www.eos-sauna.com/agb, shall apply in addition to the foregoing terms and conditions of service. EN-48...
-
Page 49: Disposal
The following materials are used in the packaging: Used paper/cardboard Plastic foil Electronic waste Electronic waste must be disposed of at the designated local collection point for electronic waste. EOS Invisio Midi - Installation and Operating Instructions EN-49... - Page 50 EN-50 Installation and Operating Instructions - EOS Invisio Midi...
- Page 51 EOS Invisio Midi - Installation and Operating Instructions EN-51...
- Page 52 Store this address with the installation and operating instructions in a safe place. Please always provide us with nameplate data, such as model, item num- ber and serial number so we can provide fast and efficient support. Date of sale Stamp/retailer signature: © EOS Saunatechnik GmbH - All rights reserved.
Need help?
Do you have a question about the Invisio Midi and is the answer not in the manual?
Questions and answers