Advertisement
YABER Lifetime Professional Support
Do you have any questions on how it works? Please read this manual thoroughly before using the projector.
Are you satisfied with your projector? If you have any issues, email your order number and description of your issue to: service@yabertech.com. Send your email ASAP, as we want to fix your issues the first time you have them.
Customers sometimes can experience some confusion when using the projector. Rather than trying to communicate directly with us, many buyers instead just leave a review on the product page. However, most negative reviews are caused by non-standardized use rather than a defect in the product itself.
Actually, many problems can be easily solved by setting, such as no signal, no sound, cannot connect with WiFi etc. We promise all the projectors have been carefully checked and packaged before shipping.
Therefore, if you have any questions, please contact us and give us an opportunity to improve. We guarantee that we will provide you more satisfactory solution.
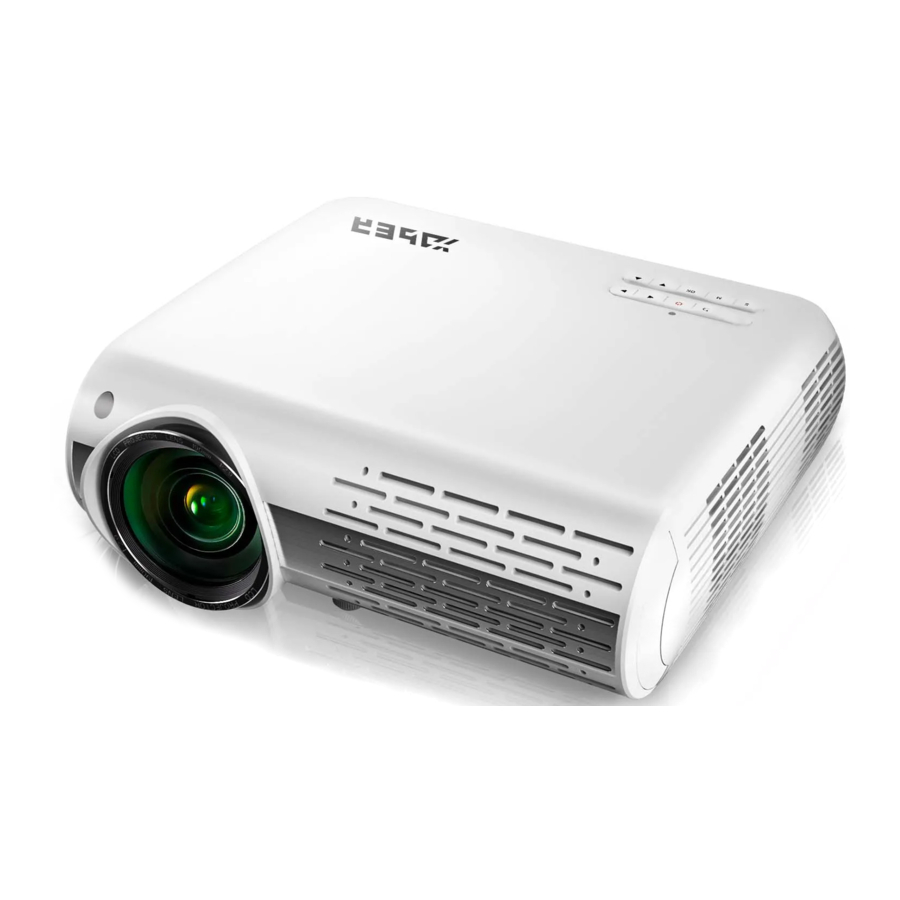
Product description

- (AV) Audio input
- Audio output
- VGA input connector
- Power supply
- Arrow keys
- OK button
- Menu button
- Source button
- Back button
- HDMI 1 / HDMI 2 input button
- USB1 / USB2 input button
- Remote control receivers
- Current consumption (10 - 240 V)
- Main switch
- Rotating lens to adjust sharpness
Notes: Please refer to the actual projector, the photo is illustrative only.
| 1080P Full hd projector Y30 | |
| Imaging System: LCD | Power: 110-240V~50/60HZ |
| Light source: LED | Resolution: 1080P Full HD |
| Color: 16.7M full color | Interface Input: HDM*2/ VGA/ AV/ USB*2/ AUDIO IN |
| Projection distance: 1.5-5.5m | Output interface: audio out |
| Projection size: 45"-200" | Projection size: 45"-200" |
| Aspect Ratio: 16:9/ 4:3 | Projector weight: 2.9kg |
Remote controller

- Power button: Switch the standby mode to use
- Mute key: Turns the projector sound on or off
- Flip key: Turn the image upside down
- Rewind key: backward
- Rewind key: fast forward
- Rewind key: previous
- Rewind key: next track
- Play Pause Button: Play / Pause
9/10/11/12. Arrows: Parameters of the menu mode used to fix the projector
- OK button: OK
- Menu Button: To call or exit the projector main menu
- Signal selection key: To change the signal source
- Exit function key: Exit
- Volume keys: volume down
- Volume keys: volume up
Replace the remote control battery
- Push to open the battery cover.
- Remove both old batteries and install new ones (AA). Make sure that the polarity of the batteries (+/-) is correctly aligned.
Included
| Main unit of the projector * 1 | Remote control * 1 |
| Instruction manual * 1 | Power cord * 1 |
| 3 in 3 * 1 AV cable | Lens cleaning * 1 |
| 3-in-1 * 1 AV cable | VGA cable * 1 |
| HDMI cable * 1 |
Please read this instruction manual carefully before use. Also, please keep it handy so you can check it at any time.
If in doubt, do not hesitate to contact YABER_Service@outlook.com. We can provide after-sales service until satisfaction.
Observation
Part of the video in Netflix and the main video formats can not be exported externally due to copyright protection (HDCP protocol). But since Amazon Fire TV is HDCP compatible, you can play Netflix and the first video via Amazon fire.
Important safeguards
These safety instructions are to ensure the long life of the projector and to prevent fires and shocks. Read them carefully and pay attention to all warnings.
Installation
- For best results, use the projector in a dark room.
- Place the projector on a flat, level surface in a dry area away from dust and moisture.
- Exposure to direct sunlight, smoke or steam may damage internal components.
- Handle the projector carefully. Falling or shaking can damage internal components.
- Do not place heavy objects on top of the projector.
Supply
- The projector is designed to operate with a 110-240 V ~ 50/60 Hz AC adapter. Ensure that the power supply meets this requirement before attempting to use the projector.
- Handle the power cord carefully and avoid bending it too much. A damaged cord can cause electric shock or fire.
- If the projector will not be used for a long time, unplug the power cord from the outlet.
Cleaning
- Unplug the projector before cleaning it.
- Periodically clean the cabinet with a damp cloth. If it is very dirty, use a mild detergent. Never use strong detergents or solvents such as alcohol or thinners.
- Use a blower or lens paper to clean the lens and be careful not to scratch or damage the lens.
Connect device
Connecting a PC

- Use the supplied VGA cable to connect the PC to the projector.
- Turn on the projector and the computer.
* NOTE: You can also connect an HDMI cable, remember that VGA connections do not transmit audio, so the sound will be output from the computer. If you connect an HDMI cable, the audio will be output to the projector.
Connecting a smartphone
Connect a phone with Android system:
(Note: check if your Android phone supports MHL function. MHL-HDMI cable not included)
- Connect the projector and the Android smartphone with theMHL-HDMI cable.
- Choose the signal source: "HDMI".
Connecting an iPhone:
- Connect the projector and iPhone with Lightning to HDMI cable (not included)
- Choose the signal source: "HDMI".
Connecting a DVD player

- Use the supplied AV cable to connect the DVD player to the projector.
- Turn on the projector and DVD player.
If your player has an HDMI output, it is best to use it over the analog (AV) option. Audio output must be configured from the DVD player menu if external speakers are installed.
Connect the soundbar

- Use the supplied AV cable to connect the soundbar to the projector.
- Turn on the projector and the sound bar.
Adjust the tilt base
- Press and hold the tilt button on the back of the projector.

- Lift the front edge of the projector to the desired height, turn the presser foot and release the button to lock the tilt base to the position it deems appropriate.

Please purchase the projector stands and some 10 mm M4 screws.

Open the 4 buttons on the back of the projector and use the M4 * 10mm screws to hang the projector on the stand.


Starting the projector
Turn on the projector by connecting the supplied power cord to the outlet, and then pressing the main power switch. The projector will go into standby mode and the power indicator will light red.
Only after pressing the "POWER" button on the projector or remote control will the power indicator turn green and the projector will become ready to use.
Select the signal source
Press the "S" button on the remote control or the projector and choose between: "AV", "PC-RGB", "HDMI 1", "HDMI 2", "USB".
- Adjust the image size to get the best image size by moving the projector back and forth, then use the focus ring to get the best focus.
Select the language menu
Language menu you have to select it when you turn on the projector for the first time, you will see the interface in English. You can select one of the menu languages: German, French, Italian, Spanish, Japanese and so on.
Please follow these steps:
- Press the "M" button and find the "OPTION" interface, then find the "OSD Language English".
- Press the ENTER button to execute the selection.
Setting the main menu
Press the "M" button on the projector or remote control, there are 4 menu options: "Picture", "sound", "time", "option"

PICTURE MENU

| PICTURE | Menu included | Function |
| Picture Mode | Standard, Soft, User, Dynamic | 4 image modes |
| Color Temperature | Medium, Warm, User, Cool | Adjusts the color temperature |
| Aspect Ratio | Auto/ 4:3/ 16:9 | Aspect Ratio lets you configure how images are displayed. |
| X_ZOOM | +1~50 | Shrink from axis X. |
| Y_ZOOM | +1~50 | Scale from axis Y. |
| Noise Reduction Low | Off, Low, Middle, High, Default | Trapezoidal adjustment |
| Projective Mode | Front | Cast, rear projection |
| 4D Keystone Correction | Vertical: -50~50, Horizontal: -50~50 | Keystone adjustment |
Important function
<Innovative 4D Keystone Correction> there are two ways to correct the trapezoid: "vertical" and "horizontal", you can directly use the remote control for trapezoidal correction.
- vertical adjustment range: -50 ~ + 50. When the vertical coefficient is gradually increased upward, the top of the projected screen gradually becomes smaller; When the vertical coefficient is gradually lowered, the lower part of the projected screen gradually becomes smaller.
- horizontal adjustment range: -50 ~ + 50, when the horizontal coefficient is gradually increased upward, the left side of the projected screen does not change, the right side of the screen gradually remains and the left side of the screen does not change; When the horizontal coefficient is gradually lowered, the left side of the screen is gradually reduced, the right side of the screen constant.
"Vertical" Range: -50 ~ +50
If the projection image is tilted vertically, as shown in (1), press the "M" button on the remote control, select "Trapezoidal Adjustment", then press the "OK" button and set the vertical value to "+", until to achieve the projection effect (2).

If the projection image is tilted vertically, as shown in (3), press the "M" button on the remote control, select "Keystone adjustment", then press the "OK" button and set the vertical value to "-", until to achieve the projection effect (4).

"Horizon" Range: -50 ~ +50
If the projection image is tilted horizontally, as shown in (5), press the "M" key on the remote control, select "Keystone adjustment", then press the "OK" button and set the horizon value to "+" ", Reach the projection effect (6).

If the projection image is tilted horizontally, as shown in (7), press the "M" button on the remote control, select "Keystone adjustment", press the "OK" button and set the horizon value to "-", Reach the projection effect (8).

<X_Zoom / Y_Zoom>
When playing back an image or video, if you want to change the size of the projected image or video, you can use the remote control to select the next option and adjust the projection size:
- Click "X_ZOOM" to adjust the horizontal size of the projection.
- Click "Y_ZOOM" to adjust the vertical of the projection.
You can reduce the original height and width provided by the video source up to 50%.

Menu Sound

| Sound Mode | Menu included | Function |
| Balance | -50~50 | Adjusting the balance |
| Auto Volume | On, Off | Automatic volume adjustment |
| Surround Sound | Off, SRS, TraSurround XT, Surround | Automatic volume adjustment |
| EQ | OFF, SRS, TruuSurround XT, Surround | Stereo setting |
| Sound Surround | 120Hz, 500Hz, 1.5KHz, 5KHz, 10KHz | Hz setting |
| Fonte sound | Normal, Line, Sound box | Setting the connection of external devices. |
Tips:
(Note: if you connect an external speaker for audio output, pay attention to the following instructions).
- Normal: in this mode, all devices can output a sound
- Sound box: in this mode, only the projector emits a sound
- Line: in this mode, the projector will not emit any sound
Option Menu

| OPTION | Menu included | Function |
| OSD Language English | English, France, Italian, Spanish 20 several languages | Choose a language |
| Restore Factory Default | Reset | Whether to update the software |
| Blending | Off, Low, Middle, High | Adjust the sound quality |
| HDMI CEC | HDMI CEC, HDMI ARC, Auto Standby, Device control, Device List | Adjust the transparency of the menu. |
| OSD Duration | Off, 5Sec, 10Sec, 15Sec | Via, 5 seconds, 10 seconds, 15 seconds, duration of the menu |
| Software Update(USB) | Update software | Update software |
| High Fan Speed (ON, OFF) | ON, OFF | Adjust sound quality |
<High Fan speed>
You can reduce noise by changing the fan speed
- High fan speed OFF
- High fan speed activated
Projector-to-wall distance projected screen size
| Distance | Screen size |
| 1.5m | 45" |
| 1.6m | 60" |
| 2.4m | 80" |
| 3.2m | 20" |
| 4.0m | 160" |
| 5.5m | 200" |
FAQ
- At the time of switching on, the indicative light does not work
- The power supply may not be well connected
- Check the overheating protection system
- Pressing the power button on the remote control does not turn on the projector
- The remote control batteries are empty
- The signal between the remote control and the IR sensor is obstructed
- Strong direct light on the IR sensor?
- No image on the screen
- Is the channel setting correct?
- Is there an input signal?
- Is the input cable inserted correctly or is it in the wrong position?
- In PC mode the refresh rate is> 75KHz?
- The image works but there is no sound
- Are the input cables connected correctly?
- Volume at minimum or silent
- Check that the audio format of the video is in the supported list
- Turns off automatically after being turned on for a while
- Is there a barrier around the fan?
- Small or large voltage fluctuations
- Check the overheating protection system
- I can not find devices connected with hard drives or flash drives
- Re-insert the device
- Check if the device is working
- Unable to play video
- Is the video format correct?
- The file is corrupted?
- The device is damaged

Documents / ResourcesDownload manual
Here you can download full pdf version of manual, it may contain additional safety instructions, warranty information, FCC rules, etc.
Advertisement


Need help?
Do you have a question about the Y30 and is the answer not in the manual?
Questions and answers