
Related Manuals for Kaadas K20 Pro Max


Summary of Contents for Kaadas K20 Pro Max
- Page 1 Unified Hotline: 400-800-5919 Model: K20 Pro Max 3D Face Recognition Smart Lock with Camera and Display Screen(V2) User Manual www.kaadas.com...
- Page 2 Note: Dear customers, thank you for using our smart lock,Please check the package content and read the installation instruction carefully before you install this lock, and then install the product according to the instruction. Our company will not assume any responsibility for direct or indirect product problems, other hazards and losses if you don't follow the instruction to install.
-
Page 3: Table Of Contents
Before set up Emergency power supply Disposal of used battery and lock Replace battery 2. Install the smart lock 5. Use the smart lock 7. Kaadas Services Package list Unlock from outside Explosive view Unlock by mechanical key Before installation... -
Page 4: Important Information
Making sure replacement or maintenance are done by Do not forcibly disassemble the product to avoid alarm or professional person authorized by Kaadas damage to the product. Do not scratch the fingerprint sensor with sharp objects, it Your warranty may invalidate if you used accessories could cause permanent damage. -
Page 5: Install The Smart Lock
Install the smart lock Package list This Package list is for reference only, and all contents are subject to the actual packaging contents. Front panel Back panel Drilling Mortise strike plate Mechanical key (with rubber gasket) (with rubber gasket) template Screw pack Mounting plate... - Page 6 Lock explosive view The explosive view helps you understand better the construction the lock. 1. Battery cover 2. Lithium battery 3. M6 screws (2pcs) 4. Back panel components 5. M5 screws (2pcs) 6. Mounting plate 7. Mortise 8. Tailpiece 9. M5 connecting screw post (2pcs) 10.
-
Page 7: Before Installation
Before installation Latch bolt reversing 2. Take out latch bolt, turn it Check the door opening direction before 1. Use hex key to loosen the installation screws counterclockwise 180° to change latch bolt and remove the face plate. direction and put it back. Right Outward Right Inword opening... -
Page 8: Installation Steps
Installation steps Front WiFi connection Front cable WiFi connection cable connecting Tailpiece screw Front post Mortise panel connecting connection connection Front screw cable cable panel post connection (2pcs) cable connecting screw break-off post screw Note: Cut proper length tailpiece Note: Cut the proper length of break-off screw according to door thickness. - Page 9 Front Back panel connection connection cable cable interface Mortise connection cable interface Note: Cut the proper length of break-off screw for the thickness of the door Insert front panel connection cable Check front panel and back Put back surplus length connection cables and mortise connection cable to into the hole on the door and insert tailpiece panel after installation and...
-
Page 10: Overview
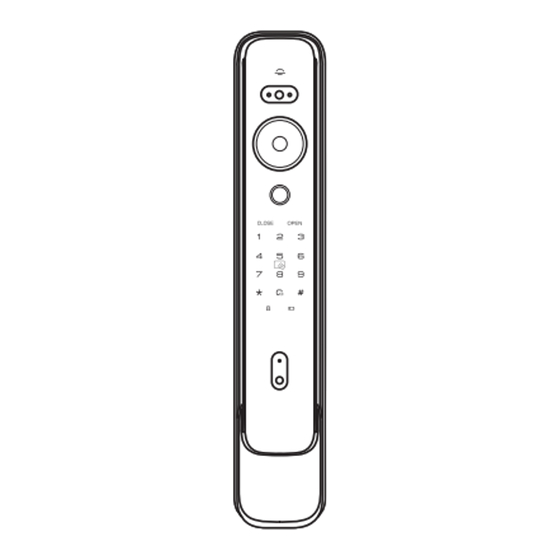
3 Overview Front panel Back panel Doorbell 3D face recognition Video intercom camera Inside display screen Fingerprint sensor Open/Closed indicator Awaken button Touchscreen keypad Open button Close button Card reader area Set button Reset button Privacy mode Low battery indicator indicator Emergency thumb turn Unlocking sensor... -
Page 11: Set Your Smart Lock
PIN “manual add" ,then Select the searched device or code. enter K20 Pro Max(V2) at the top to go to the NOTE: Only one master PIN code and one master corresponding add boot page. -
Page 12: Before Set Up
Before you set up The lock system can enable/disable dual-verification. When dual-verification is enabled, it is required to verify two type of credentials at same time to unlock, while it only need to verify one type of credential to unlock when dual-verification is disabled. -
Page 13: Use The Smart Lock
5 Use the smart lock Unlock from outside(normal mode) Unlock by face recognition Unlock by PIN code Unlock by card Unlock by fingerprint 3D face recognition Fingerprint sensor Enter PIN code Card reader area Push or Pull Push or Pull Push or Pull Push or Pull handle to unlock... -
Page 14: Unlock By Mechanical Key
Unlock by mechanical key Unlock/lock from inside You can unlock by mechanical key if you forget PIN code, the battery run out or system error occurs. Mechanical keyhole Insert the mechanical key and then rotate 180° to unlock. 1. CLOSE button If your door is right opening direction, please turn the key Press CLOSE button once to lock. -
Page 15: Volume Adjustment
Volume adjustment Emergency thumb turn When system is in voice mode, you can long When system functions is in abnormal, you press button to enable mute mode after can rotate emergency thumb turn to unlocking keypad is waked up. position to unlock from inside. Mute button Doorbell function Doorbell... -
Page 16: Inside Display Screen
6 Other functions Inside display screen Press awaken button once to wake up display screen to see outside Factory reset situation, press awaken button again can close display screen and awaken button light. If you forget master PIN code, When the battery is working properly, 1. -
Page 17: System Reboot
System reboot Emergency power supply If you need to reboot the system, you can use a 5V power bank When the battery voltage is too low to open the lock from outside, as an emergency power supply and power the door lock through you can use 5V power bank to charge the door lock via Type-C port. -
Page 18: Kaadas Services
7 Kaadas services The official customer service center of Kaadas provides users with services such as installation appointment, maintenance and repair, smart lock activation, and extended warranty inquiry. Please scan the WeChat QR code below, log in and follow the instructions of...
Need help?
Do you have a question about the K20 Pro Max and is the answer not in the manual?
Questions and answers
I have installed Kaadas lock and have downloaded the app on my phone I **** unable to view the front door view on my phone
The Kaadas K20 Pro Max includes a camera and display screen, but the context does not confirm if it supports remote video viewing through a smartphone app. Therefore, if you cannot view the front door on the app, it may be because the model does not support video streaming to the app or the feature is not properly configured. Check the WiFi network configuration and ensure the lock is connected. If the issue persists, consult the user manual or support.
This answer is automatically generated