Crestron DIN Rail Universal Dimmer DIN-1DIMU4 Operations & Installation Manual
Din rail universal dimmer
Hide thumbs
Also See for DIN Rail Universal Dimmer DIN-1DIMU4:
- Design manual (84 pages) ,
- Operations & installation manual (36 pages)

Related Manuals for Crestron DIN Rail Universal Dimmer DIN-1DIMU4


Summary of Contents for Crestron DIN Rail Universal Dimmer DIN-1DIMU4
- Page 1 Crestron Green Light™ DIN-1DIMU4 DIN Rail Universal Dimmer Operations & Installation Guide...
- Page 2 This document was prepared and written by the Technical Documentation department at: Crestron Electronics, Inc. 15 Volvo Drive Rockleigh, NJ 07647 1-888-CRESTRON All brand names, product names and trademarks are the property of their respective owners. ©2008 Crestron Electronics, Inc.
-
Page 3: Table Of Contents
Crestron DIN-1DIMU4 Contents Crestron Green Light™ DIN Rail Universal Dimmer: DIN-1DIMU4 Introduction ... 1 Features and Functions ... 1 Applications... 4 Specifications ... 5 Physical Description... 7 Industry Compliance ... 12 Setup ... 13 Network Wiring... 13 Identity Code ... 13 Installation ... -
Page 5: Crestron Green Light™ Din Rail Universal Dimmer: Din-1Dimu4
Crestron DIN-1DIMU4 Crestron Green Light™ DIN Rail Universal Dimmer: DIN-1DIMU4 Introduction The DIN-1DIMU4 is a four channel universal lighting control module designed to support dimming of both forward and reverse phase type loads. A single model supports both 120 and 220-240 Volt electronic and magnetic low-voltage, incandescent, neon/cold cathode, two wire dimmable fluorescent and non-dimmable lighting loads up to 5 Amps per channel, 10 Amps total. - Page 6 DIN Rail Universal Dimmer Auto Load Detection Each channel of the DIN-1DIMU4 is capable of auto-detecting the dimmable load type connected to it and selecting the appropriate operating mode to control that load. Reverse phase (trailing edge) mode supports incandescent and electronic low-voltage load types, while forward phase (leading edge) mode handles magnetic low-voltage, neon and other inductive load types.
- Page 7 Crestron DIN-1DIMU4 ® Cresnet The DIN-1DIMU4 communicates with a DIN-AP2 2-Series Automation Processor or other Crestron 2-Series control system via the Cresnet control network. A pair of Cresnet ports is provided on the DIN-1DIMU4 allowing for easy daisy chaining of several DIN Rail Series automation control modules.
-
Page 8: Applications
DIN Rail Universal Dimmer Applications The following diagram shows a DIN-1DIMU4 in a typical application. DIN-1DIMU4 in a Typical Application 4 • DIN Rail Universal Dimmer: DIN-1DIMU4 Crestron DIN-1DIMU4 Operations & Installation Guide – DOC. 6668A... -
Page 9: Specifications
Crestron DIN-1DIMU4 Specifications Specifications for the DIN-1DIMU4 are listed in the following table. DIN-1DIMU4 Specifications SPECIFICATION Load Ratings Dimmer Channels Maximum Per Channel Module Total Load Types Input Voltages Line Power Power Requirements Cresnet Power Usage Default Net ID Minimum 2-Series Control System Update 1, 2 File... - Page 10 DIN Rail Universal Dimmer DIN-1DIMU4 Specifications (Continued) SPECIFICATION Environmental Temperature Humidity Heat Dissipation Enclosure Dimensions Height Width Depth Weight Available Accessories DIN-BLOCK DIN-HUB DIN-PWS50 1. The latest software versions can be obtained from the Crestron website. Refer to the NOTE following these footnotes. 2.
-
Page 11: Physical Description
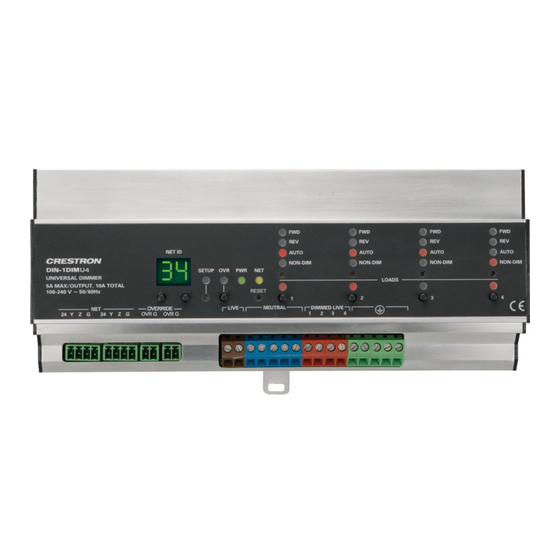
Crestron DIN-1DIMU4 Operating the module above its maximum operating temperature may result in the unit overheating and shutting down. NOTE: Crestron software and any files on the website are for authorized Crestron dealers and Crestron Authorized Independent Programmers (CAIP) only. New users may be required to register to obtain access to certain areas of the site (including the FTP site). - Page 12 DIN Rail Universal Dimmer DIN-1DIMU4 Overall Dimensions 90 mm (3.55 in) 94.2 mm (3.71 in) Connectors, Controls & Indicators CONNECTORS CONTROLS & INDICATORS NET ID DISPLAY and CONTROL SETUP (LED and BUTTON) (Continued on following page) 8 • DIN Rail Universal Dimmer: DIN-1DIMU4 215.5 mm (8.49 in) DESCRIPTION...
- Page 13 Crestron DIN-1DIMU4 Connectors, Controls & Indicators (Continued) CONNECTORS CONTROLS & INDICATORS OVERRIDE with LEDs and BUTTON RESET FWD (1 – 4) (Continued on following page) Operations & Installation Guide – DOC. 6668A DIN Rail Universal Dimmer DESCRIPTION (2) 2-pin 3.5 mm detachable terminal blocks, paralleled;...
- Page 14 DIN Rail Universal Dimmer Connectors, Controls & Indicators (Continued) CONNECTORS CONTROLS & INDICATORS REV (1 – 4) AUTO (1 – 4) NON-DIM (1 – 4) CHANNEL MODE SELECT (1 – 4) LOADS (1 – 4) LIVE (Continued on following page) 10 •...
- Page 15 Crestron DIN-1DIMU4 Connectors, Controls & Indicators (Continued) CONNECTORS CONTROLS & INDICATORS NEUTRAL DIMMED LIVE (1 – 4) GROUND 1. Interface connectors for NET and OVERRIDE ports are provided with the unit. 2. Captive screw terminals accept up to 2.5 mm Operations &...
-
Page 16: Industry Compliance
DIN Rail Universal Dimmer Industry Compliance This unit has been manufactured to comply with UL’s Standards for Safety in Canada and the United States. Formal approval is pending. As of the date of manufacture, the DIN-1DIMU4 has been tested and found to comply with specifications for CE marking and standards per EMC and Radiocommunications Compliance Labelling. -
Page 17: Setup
Crestron DIN-1DIMU4 Setup Network Wiring When wiring the Cresnet network, consider the following: • Use Crestron Certified Wire. NOTE: Cresnet HP cannot be used. • Use Crestron power supplies for Crestron equipment. • Provide sufficient power to the system. CAUTION: Insufficient power can lead to unpredictable results or damage to the equipment. -
Page 18: Installation
DIN Rail Universal Dimmer NET ID display to change the least significant digit of the Net ID number. • When the desired Net ID is displayed, press the SETUP button to exit the Setup mode. The SETUP LED extinguishes. NOTE: If an invalid Net ID is set (00, 02, FF), “Er” will be displayed on the NET ID display. - Page 19 Crestron DIN-1DIMU4 NOTE: When installing in an enclosure, high-voltage devices should be grouped separately from low-voltage devices. The DIN-1DIMU4 is designed for installation on a DIN rail. Refer to the following diagram when installing. Installing the DIN-1DIMU4 DIN RAIL RELEASE 1.
-
Page 20: Hardware Hookup
DIN Rail Universal Dimmer NOTE: Certain third party DIN cabinets provide space for an informational label between each DIN rail row. Crestron’s Engraver software (version 4.0 or later) can generate appropriate labels for all Crestron DIN rail products. Hardware Hookup Make the necessary connections as called out in the illustration that follows this paragraph. - Page 21 Crestron DIN-1DIMU4 NOTE: Ensure the unit is properly grounded. When making network connections to the DIN-1DIMU4, use a Crestron power supply. Hardware Connections for the DIN-1DIMU4 NET: TO CONTROL SYSTEM AND OTHER CRESNET DEVICES FROM DEVICE PROVIDING OVERRIDE SIGNAL & TO OTHER DEVICES RECEIVING OVERRIDE SIGNAL With the circuit breaker turned off, connect the wires to the terminal...
-
Page 22: Programming Software
DIN Rail Universal Dimmer Programming Software Have a question or comment about Crestron software? Answers to frequently asked questions (FAQs) can be viewed in the Online Help section of the Crestron website. To post a question or view questions you have submitted to Crestron’s True Blue Support, log in at http://support.crestron.com. -
Page 23: Programming With D3 Pro
Crestron DIN-1DIMU4 Programming with D3 Pro Crestron’s D3 Pro lighting software provides all the tools necessary to create a complete Crestron lighting system for residential applications. The lighting system includes the control system logic program, touchpanel projects and keypad programming, documentation and real- time lighting adjustment capabilities. - Page 24 DIN Rail Universal Dimmer Locating the DIN-1DIMU4 in the Device Library • The system tree of the control system displays the device in the appropriate slot with a default Net ID as shown in the following illustration. C2Net Device, Slot 5 •...
-
Page 25: Example Program
Crestron DIN-1DIMU4 • If necessary, double click a device to open the “Device Settings” window and change the Net ID, as shown in the following figure. “DIN-1DIMU4 Device Settings” Window • The ID code specified in the SIMPL Windows program must match the Net ID of each unit. -
Page 26: Uploading And Upgrading
DIN Rail Universal Dimmer Uploading and Upgrading Crestron recommends using the latest programming software and that each device contains the latest firmware to take advantage of the most recently released features. However, before attempting to upload or upgrade it is necessary to establish communication. Once communication has been established, files (for example, programs or firmware) can be transferred to the control system (and/or device). -
Page 27: Programs And Firmware
Crestron DIN-1DIMU4 Programs and Firmware Program or firmware files may be distributed from programmers to installers or from Crestron to dealers. Firmware upgrades are available from the Crestron website as new features are developed after product releases. One has the option to upload programs via the programming software or to upload and upgrade via the Crestron Toolbox. -
Page 28: Operation
DIN Rail Universal Dimmer Operation NET ID Use the NET ID buttons to change the Net ID of the DIN-1DIMU4. For information on Net ID, refer to “Identity Code” which starts on page 13. Manual The lighting level of each output can be manually controlled from the Control front panel. - Page 29 Crestron DIN-1DIMU4 Save The lighting level of each output can be saved as an override setting, Override which can be automatically recalled when the Override mode is enabled. Settings NOTE: The control system program has a setting that can prevent locally saving the override level settings.
-
Page 30: Problem Solving
DIN Rail Universal Dimmer Problem Solving Troubleshooting The following table provides corrective action for possible trouble situations. If further assistance is required, please contact a Crestron customer service representative. DIN-1DIMU4 Troubleshooting TROUBLE Device does not function. PWR LED blinks. (Continued on following page) 26 •... - Page 31 Crestron DIN-1DIMU4 DIN-1DIMU4 Troubleshooting (Continued) TROUBLE LOADS (status) LED on a channel is blinking once per second. LOADS (status) LED on a channel is blinking twice per second. LOADS (status) LED on a channel is blinking three times per second. Unit ignores Cresnet commands.
-
Page 32: Check Network Wiring
DIN Rail Universal Dimmer Check Network Wiring Use the Right In order to ensure optimum performance over the full range of your Wire installation topology, Crestron Certified Wire and only Crestron Certified Wire may be used. Failure to do so may incur additional charges if support is required to identify performance deficiencies because of using improper wire. -
Page 33: Reference Documents
Crestron DIN-1DIMU4 NOTE: All Crestron certified Cresnet wiring must consist of two twisted pairs. One twisted pair is the +24V conductor and the GND conductor and the other twisted pair is the Y conductor and the Z conductor. Strip and Tin When daisy-chaining Cresnet units, strip the ends of the wires carefully Wire to avoid nicking the conductors. -
Page 34: Future Updates
DIN Rail Universal Dimmer Future Updates As Crestron improves functions, adds new features and extends the capabilities of the DIN-1DIMU4, additional information may be made available as manual updates. These updates are solely electronic and serve as intermediary supplements prior to the release of a complete technical documentation revision. -
Page 35: Return And Warranty Policies
Crestron DIN-1DIMU4 Return and Warranty Policies Merchandise Returns / Repair Service 1. No merchandise may be returned for credit, exchange or service without prior authorization from CRESTRON. To obtain warranty service for CRESTRON products, contact an authorized CRESTRON dealer. Only authorized CRESTRON dealers may contact the factory and request an RMA (Return Merchandise Authorization) number. - Page 36 Crestron Electronics, Inc. Operations & Installation Guide – DOC. 6668A 15 Volvo Drive Rockleigh, NJ 07647 (2020750) Tel: 888.CRESTRON 06.08 Fax: 201.767.7576 Specifications subject to www.crestron.com change without notice.
Need help?
Do you have a question about the DIN Rail Universal Dimmer DIN-1DIMU4 and is the answer not in the manual?
Questions and answers