Table of Contents
Advertisement
Quick Links
RA0708_R72608_RA0708Y
Wireless PH Sensor
Wireless PH Sensor
User Manual
Copyright© Netvox Technology Co., Ltd.
This document contains proprietary technical information which is the property of NETVOX Technology. It shall be maintained in strict
confidence and shall not be disclosed to other parties, in whole or in part, without written permission of NETVOX Technology. The
specifications are subject to change without prior notice.
Advertisement
Table of Contents

Related Manuals for netvox RA0708


Summary of Contents for netvox RA0708
- Page 1 This document contains proprietary technical information which is the property of NETVOX Technology. It shall be maintained in strict confidence and shall not be disclosed to other parties, in whole or in part, without written permission of NETVOX Technology. The...
-
Page 2: Table Of Contents
Report Configuration Example ....................... 8 Calibration Configuration Example ....................9 Example for MinTime/MaxTime logic ..................11 6. Installation ............................. 12 6.1 RA0708 ............................12 6.2 R72608 ............................. 12 RA0708Y ............................13 PH Sensor Use ..........................14 PH Sensor Maintenance ........................ 15... -
Page 3: Introduction
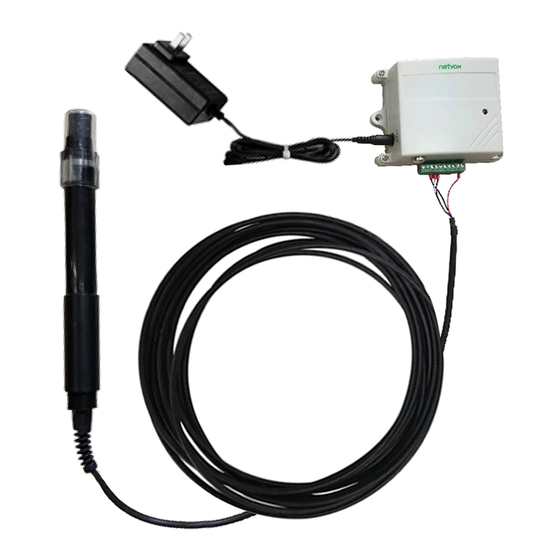
The main features include small size, low power consumption, transmission distance, and anti-interference ability. LoRaWAN: LoRaWAN uses LoRa technology to define end-to-end standard specifications to ensure interoperability between devices and gateways from different manufacturers. Appearance Adapter 12V Indicator Function Key PH Sensor ▲ RA0708... -
Page 4: Features
Solar Panel ▲ R72608 Features ⚫ Compatible with LoRaWAN ⚫ RA0708 and RA0708Y use DC 12V adapter power supply ⚫ R72608 uses solar panel and rechargeable lithium batteries ⚫ Simple operation and setting ⚫ pH value and temperature detection ⚫... -
Page 5: Set Up Instruction
Set up Instruction On/Off RA0708 and RA0708Y are connected to the DC 12V adapter for power-on Power on R72608 applies solar and rechargeable lithium batteries. Turn on Power on to turn on. Restore to factory setting Press and hold the function key for 5 seconds until green indicator flashes for 20 times. -
Page 6: Data Report
The device will immediately send a version packet report along with an uplink packet including temperature, voltage, and pH value. The device sends data based on the default configuration before any configuration is done. Default setting ReportMaxTime: RA0708 / RA0708Y: 0xB4 (180s) R72608: 0x708 (1800s) ≧ Note: Value must be greater than ReportMinTime... -
Page 7: Example Of Reportdatacmd
(a) When Report Type=0x01 is data packet. (If the device data exceeds 11 bytes or there are shared data packets, the Report Type will have different values.) (b) When Report Type=0xFFFF, it means that RA0708/ R72608/RA0708Y does not support the connected device or sensor malfunction. - Page 8 Device DeviceType ReportType NetvoxPayLoadData Reserved Battery TemperaturewithPH (1Byte, 0x08 (1Byte, (Signed 2Bytes, (Signed (2Byte ,0.01pH) fixed unit:0.1V) unit: 0.01°C) 2Byte, 1mv) 0x00) ThresholdAlarm(7Bytes, Bit0_LowPM2.5Alarm(ug/m3), Bit1_HighPM2.5Alarm(ug/m3), Bit2_LowPM10Alarm(ug/m3), Bit3_HighPM10Alarm(ug/m3), Bit4_LowO3Alarm, Bit5_HighO3Alarm, Bit6_LowCOAlarm, Bit7_HighCOAlarm, Bit8_LowNOAlarm, Bit9_HighNOAlarm, RA07 Series 0x05 Bit10_LowNO2Alarm, R726 Series 0x09 Bit11_HighNO2Alarm, R727 Series 0x0D...
-
Page 9: Report Configuration Example
(1) Configure RA0708 device parameters MinTime = 30s, MaxTime = 3600s (3600>30*1+10) Note: The value of ReportMaxTime should be greater than (ReportType count *ReportMinTime+10) (Unit: second) RA0708 Report data: PH value, temperature; ReportType Count = 1 (The MinTime of EU868 cannot be less than 120s.) Downlink: 0105001E0E100000000000... -
Page 10: Calibration Configuration Example
(2bytes, Unsigned) (2bytes, Signed) (2Bytes, Fixed 0x00) CalibrateRsp 1_Channel2,etc) (1) Configure RA0708 device Temperature Calibration: 1℃; Configure channel 0; Multiplier: 1, Divisor: 1, DeltValue: 100 Downlink: 013D000001000100640000 Device returns: 813D000000000000000000 (configuration successful) 813D000100000000000000 (configuration failed) (2) Read RA0708 device parameters... - Page 11 (4) Read RA0708 device parameters Downlink: 0213000000000000000000 Device returns: 8213010001000100640000 (device current parameter)
-
Page 12: Example For Mintime/Maxtime Logic
5.4 Example for MinTime/MaxTime logic Example#1 based on MinTime = 1 Hour, MaxTime= 1 Hour, Reportable Change i.e. BatteryVoltageChange=0.1V MaxTime MaxTime sleeping (MinTime) sleeping (MinTime) Wakes up and collect data Wakes up and collect data Wake up and collect data REPORTS 3.6V REPORTS 3.6V REPORTS 3.6V... -
Page 13: Installation
MinTime/MaxTime calculation is started. Installation 6.1 RA0708 RA0708 does not have a waterproof function. After the network joining is completed, please place it indoors. 6.2 R72608 R72608 product is waterproof. After the network-joining is completed, please leave it outdoors. -
Page 14: Ra0708Y
(5) R72608 has a battery compartment inside. Users can buy and install rechargeable 18650 lithium battery, 3 sections total. A single rechargeable lithium battery voltage is 3.7V, and the capacity is recommended at 5000mah. The installation of rechargeable lithium battery steps are as follows: 1: Remove the four screws around the battery cover 2: Insert three 18650 lithium batteries. -
Page 15: Ph Sensor Use
6.4 PH Sensor Use The water level of the water you plan to measure the pH value of is recommended to be higher than the spiral curve on the pH sensor. Spiral curve Note: (1) The sensor is recommended to be installed with angles higher than 15 degrees. (2) Horizontal or upside-down position is not allowed. -
Page 16: Ph Sensor Maintenance
6.5 PH Sensor Maintenance When measuring the pH sensor, it should be cleaned in distilled water (or deionized water), and the filter paper should be used to absorb moisture to prevent impurities from being introduced into the liquid to be tested. 1/3 of the sensor should be inserted into the solution to be tested. -
Page 17: Important Maintenance Instruction
PH sensor can be placed in water for a long time. If PH sensor is not applicable, please add some water to the sponge in the protective shell of the probe, and then install the protective shell to the probe position. PH sensor can not be exposed to the sun, and should be placed in a humid environment.
Need help?
Do you have a question about the RA0708 and is the answer not in the manual?
Questions and answers