Advertisement
The instrument performs AC/DC Voltage, DC Current, Resistance, Continuity, Diode Measurement.
 NOTE: Fully read and understand this manual before using this Digital Multimeter.
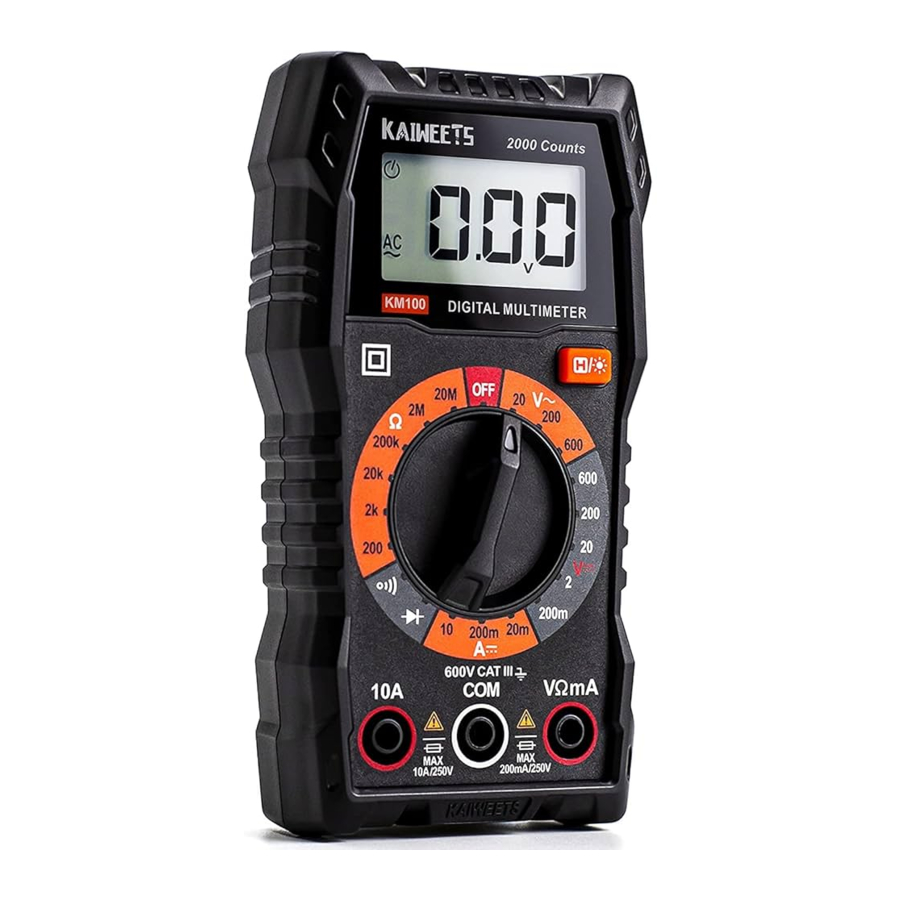
Product Diagram

Production Information
Symbol Meaning

Button Functions

Auto Power Off
- After turn on the meter, "
![]() " icon shows on display, it means the meter will auto power off after 15 minutes without operation, press any key to restore the working state of the instrument.
" icon shows on display, it means the meter will auto power off after 15 minutes without operation, press any key to restore the working state of the instrument. - Long press "
![]() " button and turn on the meter, the automatic shutdown function will be canceled. "
" button and turn on the meter, the automatic shutdown function will be canceled. " ![]() " will not display on the screen.
" will not display on the screen.
 " icon shows on display, it means the meter will auto power off after 15 minutes without operation, press any key to restore the working state of the instrument.
 " button and turn on the meter, the automatic shutdown function will be canceled. "
 Measurement Operation
DC/AC voltage measurement
- Turn the knob to "V~" or "V⎓" and select the appropriate range;
Note: If measuring an unknown voltage, set the maximum range and reduce it until a satisfactory reading is obtained. - Insert the red probe in "
![]() " socket, insert the black probe in "
" socket, insert the black probe in " ![]() ";
"; - Connect to the measured power supply or circuit in parallel, measure the voltage;
- Read the measurement result on display.
 " socket, insert the black probe in "
  ";
";
- Do not measure power supply or circuit greater than 600V.
- Pay attention to safety when measuring high voltage to avoid electric shock or personal injury.
- Measure the known voltage or current before use to ensure that the instrument functions well.
DC current measurement
- Disconnect the circuit to be tested;
- Turn the knob to "A⎓" and select the appropriate range;
Note: If the value of current is unknown, use the maximum measurement position (10A) and reduce the range until proper readings are obtained. - If the current to be measured is less than 200mA, insert the red test lead into the "
![]() " socket. If the current is between 200mA and 10A, insert the red test lead into the "10A'' socket, insert the black probe in "COM" socket;
" socket. If the current is between 200mA and 10A, insert the red test lead into the "10A'' socket, insert the black probe in "COM" socket; - Connect the red and black test leads in series to the circuit, then turn on the circuit power supply;
Note: For 10A measurements, only take readings for up to 10 seconds and allow 15 minutes between tests. This prevents the device from overloading and overheating.
When testing the current, there must be a load in the circuit. Do not connect the multimeter in series with the circuit without a load to measure. - Read the measurement result on display. If "OL" is displayed, it is out of range, select higher range.
 " socket. If the current is between 200mA and 10A, insert the red test lead into the "10A'' socket, insert the black probe in "COM" socket;
- Pay special attention to safety when measuring high voltage to avoid electric shock or personal injury.
- Test the known current with the meter before use to confirm the instrument function is intact.
Resistance measurement
- Turn the knob to resistance shift and select the appropriate range;
Note: During measuring an unknown Resistance, use the maximum range and reduce it until a satisfactory reading is obtained. - Insert the red probe in "
![]() " socket and insert the black probe in "COM" socket;
" socket and insert the black probe in "COM" socket; - Place the test leads at the both ends of the circuit or resistance to measure and maintain strong contact;
- Read the measurement result on display.
 " socket and insert the black probe in "COM" socket;
 NOTE:
- If the measured value is equal to the nominal resistance of the resistor or within the range of error, the resistor works correctly;
- If there is a large deviation between the nominal resistance and the resistance, the resistor is damaged;
- If the measured value is infinite (open circuit), zero (short circuit), or unstable, it means the resistor is damaged and it can't be used.
- Before measuring in-circuit resistance, be sure that the circuit under test has all power removed and all capacitors are fully discharged. Otherwise, the instrument may be damaged and may be struck by electric shocks.
Continuity measurement
- De-energize the circuit you will be testing;
- Turn the knob to "
![]() " and the icon "
" and the icon " ![]() " is displayed on screen;
" is displayed on screen; - Insert the red probe in "
![]() " socket and insert the black probe in "COM" socket;
" socket and insert the black probe in "COM" socket; - Touch the test lead tips together to check if they are connected normally, the buzzer will sound continuously;
- Contact the probe to the measured circuit, measure the resistance;
- If the resistance or circuit of the measured resistance is less than 50Ω, the built-in beep will sound and the value will be displayed on the LCD screen;
- If there is no continuity, the beep will not sound and"OL" will be displayed on the screen, which means the resistance is damaged.
 " and the icon "
 ![]()
Before measuring in-circuit resistance, be sure that the circuit under test has all power removed and all capacitors are fully discharged. Otherwise, the instrument may be damaged and may be struck by electric shocks.
Diode measurement
- Turn the knob to "
![]() " and the icon "
" and the icon " ![]() " is displayed on screen;
" is displayed on screen; - Insert the red probe in "
![]() " socket, insert the black probe in "COM" socket;
" socket, insert the black probe in "COM" socket; - Connect the red test lead to the positive end of the diode and the black test lead to the negative end, a beep sounds if connected the diode normally.
Note: Generally, the positive end of the diode is the longer one. - Read the result on the LCD display;
- If there is no reading, switch the test leads to the opposite ends of the diode and measure again.
![]()
To avoid damage to the meter or the measured object, disconnect the circuit power and discharge all the high-voltage capacitors before testing.

Technical Specifications

Accuracy Specifications
The accuracy is applicable within one year after the calibration.
Reference condition: Environment temperature: 18°C to 28°C; Relative humidity: ≤80%
Accuracy: ± (% reading + word)
DC Voltage

Overload protection: 600V
Maximum input voltage: 600V
AC Voltage

Overload protection: 600V
Maximum input voltage: 600V
Frequency Response: 40Hz ~ 400Hz
DC Current

Overload protection:
mA: F200mA/250V fuse
A: F10A/250V fuse
Maximum input current: mA: 200mA, A: 10A
When measuring large current, continuous measurement should be no longer than 15 seconds.
Resistance

Overload protection: 250V
Continuity&Diode

Replace Battery and Fuse
Replace Battery
- Turn off the power supply of the instrument and remove the probe on the instrument;
- Remove the screws fixing the battery cover, remove the battery cover;
- Remove old batteries, replace them with fresh batteries (AAA, 1.5V x 2). Please place the batteries according to the positive and negative polarity marks inside of the battery cover;
- Install the battery cover to its original position, fix and lock the battery cover with screws.
- To prevent electric shock or personal injury caused by error reading, please replace the battery promptly when the battery power is low. Do not make the battery short circuit or reverse battery polarity to discharge the batteries.
- To ensure safe operation and product maintenance, when the instrument will not be used for an extended period of time, please remove the batteries.
Replace Fuse
- Turn off the power supply of the instrument and remove the probes on the instrument.
- Remove the screws on the 4 corners fixing the back cover and remove the back cover.
- Remove the burnt fuse, replace with new fuse of the same specifications (mA: F200mA/250V fuse, 10A: F10A/250V fuse), and ensure that the fuse is clamped in the safety clip.
- Install the back cover, fix and lock it with screws.
Maintenance
Clean
If there's dust on the terminal or the terminal is wet, it may cause measurement error. Please clean the instrument according to the steps below:
- Turn off the power supply of the instrument and remove the test probe;
- Turn over the instrument and shake out the dust accumulated in the input socket. Wipe the outer cabinet with a damp cloth and mild detergent, do not use abrasive or solvent. Wipe contacts in each input socket with a clean cotton swab soaked in alcohol.
Safety Operation
To avoid possible electric shock or personal injury and to avoid possible damage to the meter or to the equipment being tested, adhere to the following rules:
- Please read this manual carefully before using the instrument, and pay special attention to the safety warning information.
- Before using the meter, inspect the exterior meter. Look for cracks or missing plastic. Do not use the meter if it is damaged.
- Before using the instrument, please check whether the probe is cracked or damaged. If so, please replace the same type and the same electrical specifications.
- The instrument shall be used in accordance with the specified measurement category, voltage or current rating.
![shock hazard]() Please comply with local and national safety code. Wear personal protection equipment (such as approved rubber gloves, masks and flame retardant clothes, etc.) to prevent being damaged by electric shock and electric arc due to exposed hazardous live conductor.
Please comply with local and national safety code. Wear personal protection equipment (such as approved rubber gloves, masks and flame retardant clothes, etc.) to prevent being damaged by electric shock and electric arc due to exposed hazardous live conductor.![shock hazard]() When the Meter is working at an effective voltage over 60V in DC or 30V rms in AC, special care should be taken because there is a danger of electric shock.
When the Meter is working at an effective voltage over 60V in DC or 30V rms in AC, special care should be taken because there is a danger of electric shock.- Do not apply more than the rated voltage, as marked on the meter, between the terminals or between any terminal and grounding.
- By measuring the known voltage to check whether the meter work is normal, if it is not normal or damaged, do not use it again.
- Use the proper terminals, function, and range for your measurements.
 Please comply with local and national safety code. Wear personal protection equipment (such as approved rubber gloves, masks and flame retardant clothes, etc.) to prevent being damaged by electric shock and electric arc due to exposed hazardous live conductor.
Contact us: support@Kaiweets.com

@kaiweetstools

Documents / ResourcesDownload manual
Here you can download full pdf version of manual, it may contain additional safety instructions, warranty information, FCC rules, etc.
Advertisement


Need help?
Do you have a question about the KM100 and is the answer not in the manual?
Questions and answers