Advertisement
- 1 Product Familiarization
- 2 Making Measurements
-
3
MANUAL Measurement Mode
- 3.1 AC/DC voltage measurement
- 3.2 Resistance measurement
- 3.3 Continuity test
- 3.4 Diode test
- 3.5 Capacitance measurement
- 3.6 AC/DC mV voltage measurement
- 3.7 Frequency/Duty measurement
- 3.8 Temperature measurement
- 3.9 Non-contact AC voltage detection
- 3.10 Live wire detecting
- 3.11 Ampere (A) current measurement
- 3.12 mA current measurement
- 4 Maintenance
- 5 Specifications
- 6 3 years Warranty
- 7 Safety Information
- 8 Documents / Resources
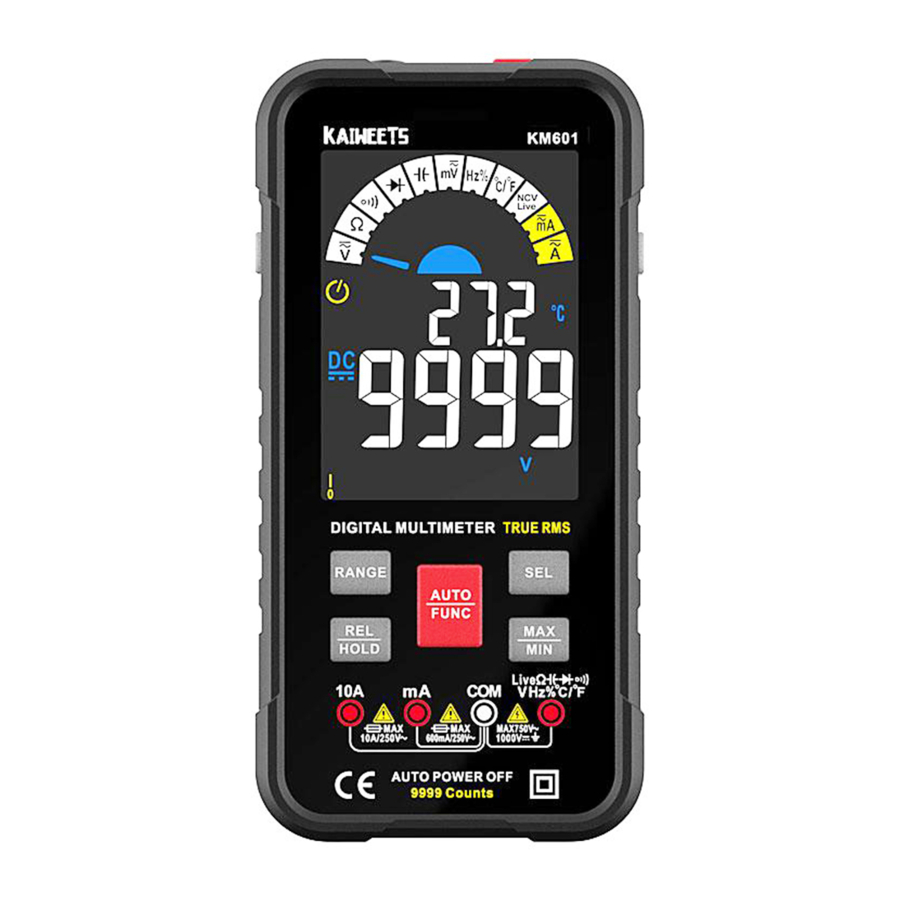
Product Familiarization
Overview

- NCV Detection sensor
- Power button
- 10A Jack
- mA Jack
- COM Jack
![]() Jack
Jack- Flashlight button
- Alarm indication light
- Colorful LCD Screen
- Functions&buttons
- Jack indication light
- APO button
- Flashlight
- Organizer bag
- K-Type Thermocouple
- Test leads
 Jack
JackFeatures


Display

Terminals

Making Measurements
When connecting the test leads to the circuit or device, connect the common (COM) test lead before connecting the live lead; when removing the test leads, remove the live lead before removing the common test lead.
Warnings
- Do not measure the voltage higher than DC1000V or AC750V, otherwise, the meter may be damaged.
![shock hazard]() Pay attention to safety when measuring high voltage to avoid electric shock or personal injury.
Pay attention to safety when measuring high voltage to avoid electric shock or personal injury.- Before use, test the known voltage or current with the meter to confirm that the meter is in good condition.
SMART (AUTO) Measurement Mode
The Meter defaults to SMART mode. In the SMART mode, the Meter can test DC voltage, AC voltage, resistance, continuity, it selects the range with the best resolution automatically.
Turn on & Ready to use


MANUAL Measurement Mode
The Meter defaults to SMART mode. In the SMART mode, press the '  ' button to switch to manual mode and select function from left to right.
AC/DC voltage measurement

Resistance measurement

Continuity test

Diode test

Capacitance measurement

AC/DC mV voltage measurement

Frequency/Duty measurement

Temperature measurement

Non-contact AC voltage detection

Live wire detecting


Ampere (A) current measurement


mA current measurement


Maintenance
Cleaning
Turn off the power to the Meter and remove the test leads.
Wipe the case with a damp cloth and mild detergent. Dirt or moisture in the terminals can affect readings.
Install Batteries


Replace Fuses
'  ' signal will be displayed on the screen when the fuses are blown, current testing function is not working, then please change the fuses.
 To avoid shock, injury, or damage to the Meter:
Use ONLY a fuse with the amperage, interrupt voltage, and speed ratings specified.
- mA: F600mA/250V fuse; Size: φ6*32mm
- A: F10A/250V fuse; Size: φ6*32mm


Specifications

Accuracy Specifications
Accuracy is specified for 1 year after calibration, at operating temperatures of 18°C to 28°C, with relative humidity at 0% to 80%. Accuracy ± ([% of Reading] + [Counts])

DC voltage

AC voltage

AC/DC current

Capacitance

Diode/Continuity

Resistance

Frequency/Duty

Temperature
3 years Warranty
Defective products will be repaired or replaced, free of charge, or at our discretion, if sent together with proof of purchase to our authorized distributor(s). For further detail of warranty coverage and warranty repair information, send an email to support@ kaiweets.com.
Company name: E2UK LONDON LTD
Address: 13 Quad Road, East Lane Business Park, Wembley HA9 7NE
Email: e2ukltd@gmail.com
Tel: +44 7429848355
Safety Information
A Warning identifies conditions and procedures that are dangerous to the user.
Warnings
![burn hazard]()
![shock hazard]()
To prevent possible electrical shock, fire, or personal injury:- Read all safety information before you use the Product.
- DO not alter the Product and use only as specified, or the protection supplied by the Product can be compromised.
- Carefully read all instructions.
![shock hazard]() Comply with local and national safety codes. Use personal protective equipment (approved rubber gloves, face protection, and flame-resistant clothes) to prevent shock and arc blast injury where hazardous live conductors are exposed.
Comply with local and national safety codes. Use personal protective equipment (approved rubber gloves, face protection, and flame-resistant clothes) to prevent shock and arc blast injury where hazardous live conductors are exposed.- Limit operation to the specified measurement category, voltage, or amperage ratings.
- Use Product-approved measurement category (CAT), voltage, and amperage-rated accessories (probes, test leads, and adapters) for all measurements.
- Do not touch voltages V ac RMS, 42 V ac peak, or 60 V dc.
- Use the correct terminals, function, and range for measurements.
- Do not use the Product around explosive gas, vapor, or in damp or wet environments.
- Do not operate the Product with covers removed or the case open. Hazardous voltage exposure is possible.
- Examine the case before you use the Product. Look for cracks or missing plastic. Carefully look at the insulation around the terminals.
- Disconnect power and discharge all high-voltage capacitors before you measure resistance, continuity, capacitance, or a diode junction.
- Do not apply more than the rated voltage, between the terminals or between each terminal and earth ground.
- Remove circuit power before you connect the Product in the circuit when you measure current. Connect the Product in series with the circuit.
- Measure a known voltage first to make sure that the Product operates correctly.
- Do not use test leads if they are damaged. Examine the test leads for damaged insulation, exposed metal, or if the wear indicator shows. Check test lead continuity.
- Remove the input signals before you clean the Product.

| Symbols | |||
| Symbols | Description | Symbols | Description |
 | WARNING. RISK OF DANGER. | | WARNING. HAZARDOUS VOLTAGE. Risk of electric shock. |
 | Hazardous Voltage |  | Conforms to European Union directives. |
| CAT II | Measurement Category Il is applicable to test and measuring circuits connected directly to utilization points (socket outlets and similar points) of the low-voltage MAINS installation. | ||
| CAT III | Measurement Category Ill is applicable to test and measuring circuits connected to the distribution part of the building's low-voltage MAINS installation. | ||
| CAT IV | Measurement Category IV is applicable to test and measuring circuits connected at the source of the building's low voltage MAINS installation. | ||

Documents / ResourcesDownload manual
Here you can download full pdf version of manual, it may contain additional safety instructions, warranty information, FCC rules, etc.
Advertisement


Need help?
Do you have a question about the KM601 and is the answer not in the manual?
Questions and answers