Advertisement
INSTALLATION MANUAL
Level of Difficulty
Easy
Installation difficulty levels are based on time
and effort involved and may vary depending on
the installer level of expertise, condition of the
vehicle and proper tools and equipment.
Parts List
Qty Description
1
Driver / left running board*
1
Passenger / right running board*
1
Threaded insert tool, M6
2
Threaded inserts, M6
16
Button head bolts, M6
16
Lock washer, M6
16
Flat washer, M6
14
Flange nut, M6
1
Hex wrench, M4
Tools Required
Pry tool
--
Torque Specifications
M6 bolt
3 ft-lbs.
Use above torque setting unless otherwise noted
ARIESAUTOMOTIVE.COM
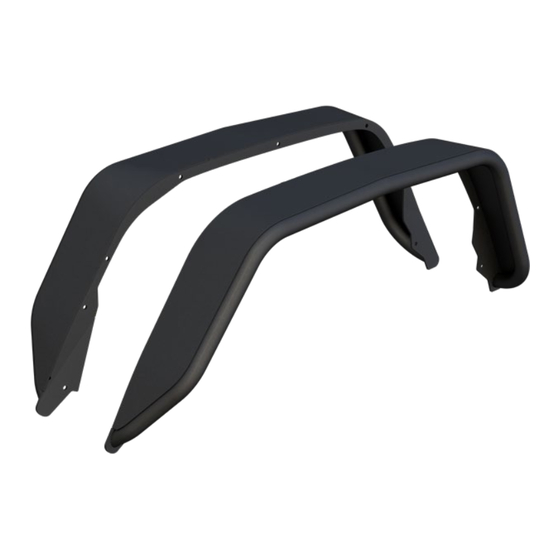
Product Photo
Passenger /
right fender
Front
NOTICE
Visit www.ariesautomotive.com for a full-color copy of this
instruction manual, as well as helpful videos, guides and much more!
Before you begin installation, read all instructions thoroughly.
Proper tools will improve the quality of installation and reduce the time required.
Periodic inspection of your product should be performed
to ensure all hardware and / or components remain secure.
To help prevent damage to the product or vehicle, refer to the specified
torque specifications when securing hardware during the installation process.
Maintenance
Mild automotive detergent may be used to clean the product. Do not use dish detergent, abrasive
cleaners, abrasive pads, wire brushes or other similar products that may damage the finish.
Product Registration and Warranty
ARIES stands behind our products with industry-leading warranties. To get copies of the product
warranties, register your purchase or provide feedback, visit: warranty.curtgroup.com/surveys
•
PRODUCT SUPPORT: 877.287.8634
•
2500207-INS-RA
•
12/30/2022
2500207
•
ECN9916
•
PAGE 1
Driver / left
fender
Advertisement
Table of Contents

Related Manuals for Lippert ARIES 2500207


Summary of Contents for Lippert ARIES 2500207
- Page 1 INSTALLATION MANUAL 2500207 Level of Difficulty Product Photo Easy Installation difficulty levels are based on time and effort involved and may vary depending on the installer level of expertise, condition of the Passenger / vehicle and proper tools and equipment. right fender Parts List Qty Description...
- Page 2 PROCEDURE: REMOVE CONTENTS FROM BOX. VERIFY ALL PARTS ARE PRESENT. READ INSTRUCTIONS CAREFULLY. CUTTING AND MODIFICATION IS REQUIRED TO REINSTALL THE PLASTIC FENDER LINER. DRILLING IS REQUIRED. ASSISTANCE IS RECOMMENDED. 1. Start installation on the Driver/Left side of the vehicle. Release the plastic clips and remove any hardware attaching the liner to the outer edge and underside of the fender and the body, (Figure 1).
- Page 3 Driver/Left Side Installation Pictured Front (Fig 1) Release clips and all hardware attaching inner fender liner to outer fender (Passenger/Right side shown) Front (Fig 2) Firmly pull fender straight out from vehicle. Remove any clips still attached to body Front (Fig 3) Drill 25/64”...
- Page 4 Driver/Left Side Installation Pictured (6-A) Select Insert Tool and (1) Insert. Thread Insert onto end of Insert Tool. Hand tighten only, do not tighten hex bolt (6-B) Firmly hold assembly and push Insert into drilled hole. (6-C) Use a wrench (open or box end) to hold nut (arrow) to prevent nut and tool from turning.
Need help?
Do you have a question about the ARIES 2500207 and is the answer not in the manual?
Questions and answers