CIRCLE FITNESS E7 Elliptical Owner's Manual
Hide thumbs
Also See for E7 Elliptical:
- Owner's manual (44 pages) ,
- Service manual (20 pages) ,
- Owner's manual (21 pages)
Table of Contents
Advertisement
Quick Links
Advertisement
Table of Contents

Related Manuals for CIRCLE FITNESS E7 Elliptical


Summary of Contents for CIRCLE FITNESS E7 Elliptical
- Page 1 ALWAYS MOVING FORWARD Owner’s Manual E7 Elliptical Display Type: LED Console...
-
Page 3: Table Of Contents
3.2. Care and Maintenance Instructions ..................... 7 ____________________________________________________________________ 4. Assembly 4.1. Specifications ................................4.2. Machine Overview ..........................8 4.3. Unpacking the E7 Elliptical ............................4.4 Elliptical Assembly ............................11 5. Engineering Mode Settings ___________________________________________________________________ 13 5.1. Engineering Mode 1 ..........................13 ........................ -
Page 4: Introduction
INTRODUCTION Dear Customer, Thank you for selecting the Circle Fitness E7 Elliptical. The E7 Elliptical provides an impressive selection of features designed to make your workouts more effective and enjoyable. For your benefit, read this manual carefully before you use the elliptical. -
Page 5: 1.0 Safety Information
1.0 SAFETY INFORMATION IMPORTANT: Please read all instructions and warnings before assembly and operation. To assure the correct use of the product, basic safety measures should always be followed including the warnings and cautions listed in this Owner’s Manual. SAFETY SYMBOLS USED IN THIS MANUAL Indicates a potentially hazardous situation which, if not avoided, could result in death WARNING or serious injury. -
Page 6: Serial Number Location And Specifications
WARNING: Do not hold the handlebars or the console arms when mounting, dismounting, or using the equipment. Use the handlebars for stability only. WARNING: Do not leave equipment unattended when plugged in. Turn all controls to OFF and unplug from outlet when not in use and before removing or replacing parts. -
Page 7: Transportation
Figure 1.4.1-1 Television Connection Options There are multiple options for presenting TV signal with Circle Fitness equipment. Here are some options available to your facility. Support Gym‘s Audio System by using CSAFE port (OPTIIONAL) 1.5.1 We can use the Tx and Rx shown in below photo to support Gym’s Audio system. -
Page 8: Grounding Instructions And Power Requirements
Grounding Instructions and Power Requirements 1.6.1 Facility Power Information Max Power Line Line Current Circuit Dissipation Product Voltage Frequency (RMS Outlet Configuration (Watts) (Hz) Amp) E7/ B8/ R8 (15.6”) 50-60Hz Dedicated NEMA 5-15 (Touchscreen) E7/ B8/ R8 (10”T) (Touchscreen) Self-generator E7/ B8/ R8 (8”) 50-60Hz Dedicated... -
Page 9: Check For Damaged Parts
Do Not use any equipment that is damaged or has worn or broken parts. 3.1.2 Maintain labels and name plates. Do not remove labels for any reason. They have essential information. If unreadable or missing, contact Circle Fitness Systems for and replacement at service@circlefitness.com www. -
Page 10: Care And Maintenance Instructions
Care and Maintenance Instructions 3.2.1 To maximize the life span of the equipment, and minimize down time, all equipment requires regular cleaning, and maintenance items performed on a scheduled basis. This section has detailed instructions on how to perform these items, the frequency of which they should be done, and a check list to sign off each time service is completed for a specific machine. -
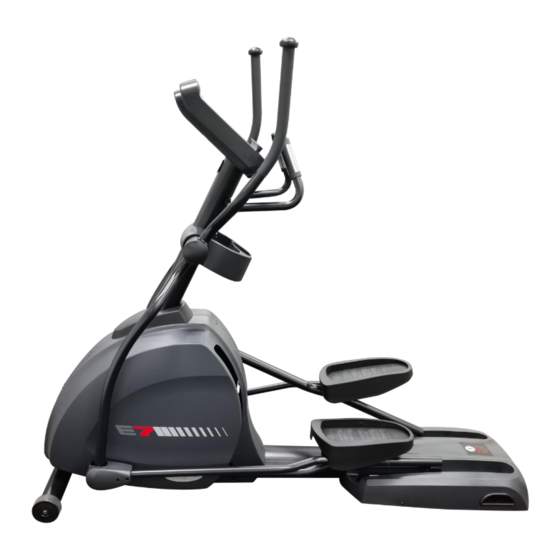
Page 11: Machine Overview
Console Set Upper Body Arm Upper Body Arm Heart Rate Handlebar Bottle Holder Pedals Transportation Wheel Unpacking the E7 Elliptical 4.3.1 Inside the carton includes the following parts: Console Mast and Fixed/ Console EP7 Main Frame Body Moving Handlebar Assembly... - Page 12 (3) M5 pan head hex Screw (4 PCS) and (4) Manual (5) Lubrication M3 Phillips flat head Screw (2 PCS) (6) Tools Allen Wrench (3mm) Allen Wrench (6mm) Allen Wrench (5mm) Wrench (13mm) 4.3.2 Prior to opening the shipping box, first you need to cut the fiberglass straps from around the wrapped carton and remove the upper carton cover.
- Page 13 Console Mast and Fixed/ Moving Handlebar Assembly 4.3.4 Remove the form the packaging. 4.3.5 Remove the Rear Styrofoam from the packaging. CAUTION: DO NOT drop the accessories during this removal process. 4.3.6 Remove the middle and front Styrofoam from the packaging. Styrofoam Styrofoam Styrofoam...
-
Page 14: Elliptical Assembly
4.3.7 With the assistance of at least one other person, lift the E7 Elliptical up. Then finish the removal. Remove Elliptical Assembly 4.4.1 Take out the Console Mast Cover from the Styrofoam packaging. 4.4.2 Combine the Console Mast Cover with the Console Mast and Fixed/ Moving Handlebar Assembly, and install them on the Elliptical’s main frame body. - Page 15 Console Mast and Fixed/ Moving Handlebar Assembly. M5 pan head hex Screw (4PCS) and M3 Phillips flat head Screw (2PCS) 4.4.6 E7 Elliptical assembly is now complete. 4.4.7 With the assistance from another person to hold the Console, connect the connectors from the Console Mast to the Console.
-
Page 16: Engineering Mode Settings
Engineering Mode Setting Engineering Mode 1 5.1.1 Test Mode. 5.1.1.1 In IDLE mode, first press “PAUSE/STOP” and then press “Start” for 3 seconds.) 5.1.1.2 All ON and OFF flashing mode: the window is all ON and OFF flashing, press START to enter the next mode. 5.1.2 LED Scanning Mode 5.1.2.1 For production testing of software and hardware, press START to enter the next mode. -
Page 17: Remaining Battery Capacity Checking
5.3.3.1 HEART RATE window displays E32, DOT MATRIX displays [ENGLISH] mobile string, you can press ▲ or ▼ to modify it to “NEDERLANDS” to “FRANCAIS” to “DEUTSCH” to “ITALIANO” to “ESPANOL” to “POLAND” to “Portuguese” to “SWEDISH” to “RUCCKIJJ”. Press START to enter the next setting. 5.3.4. -
Page 18: Heart Rate Handlebar (Standard)
Heart Rate Handlebar (Standard) 6.2.1 Place the palms of your hands directly on the heart rate handlebars. Both hands must grip the bars for your heart rate to register. 6.2.2 When gripping the handlebars, do not grip tightly. It is recommended that you hold the handlebars only long enough to see your heart rate readout on the console. -
Page 19: Keypad Instruction
Display Cross Check List Display Displays content Time Time usage or used for countdown Heart Rate Heart rate reading Watts The wattage machine output during user workout TOTAL STRIDES Total strides user pedaled STRIDES PER MINUTE Strides user pedaled every min Level Level settings L1~L25, the greater the level set, the greater the resistance Calories... - Page 20 WORKOUT”. You can press “STOP” to go back to the previous setting or press “Start” to execute the program under Start. 7.3.1.5 Press the “Start” key and all the values will begin to accumulate. This is the start of the “Execution Mode.” 7.3.1.6 DOT MATRIX displays the same message as “Quick Start”...
-
Page 21: P1~ P7 Program Profile
P1~ P7 Program Profile P1=ROLLING, P2=VALLEY, P3=FAT BURN, P4=RAMP, P5=STRENGTH, P6=INTERVAL, P7=RANDOM LEVEL LEVEL LEVEL LEVEL LEVEL LEVEL LEVEL LEVEL LEVEL LEVEL LEVEL LEVEL LEVEL LEVEL LEVEL LEVEL LEVEL LEVEL LEVEL... - Page 22 LEVEL LEVEL LEVEL LEVEL LEVEL LEVEL LEVEL LEVEL LEVEL LEVEL LEVEL P7-RANDOM:To randomly get graph 7.4.1 Heart Rate Control (HRC) 7.4.1.1 Press the “HRC” key. Once the DOT MATRIX window displays “THR”, press the ▲ or ▼ key to switch between HRC 65, HRC 75, and HRC 85.Confirm the selected program and press “ENTER”...
- Page 23 7.4.2.5 Modify the time, DOT MATRIX the display shows “SET TIME” then press “ENTER”. After the time has been modified, press “ENTER” to continue to modify the next item or press “STOP” to return to the previous setting. “SET BEGIN LEVEL THEN PRESS ENTER”...
- Page 24 7.4.4.2 In the user weight setting, DOT MATRIX displays “SET BODYWEIGHT THEN PRESS ENTER”. The value is displayed in the Calories window and flashes, after the modification has completed. Press “ENTER” to continue setting the next item or press “STOP” to return to the previous setting. 7.4.4.3 In the Time setting, DOT MATRIX displays “SET TIME THEN PRESS ENTER”.
-
Page 25: Watt Table
WATT TABLE LEVEL Watt... -
Page 26: Error Code And Troubleshooting
Error Code and Troubleshooting Item Error Message Descriptions isplays CAUSE: Communication timeout. This error message d if t console and generator lose communication for over 90 seconds. SOLUTION: COMMUNICATION FAIL 1. Check that the console and generator are connected properly. 2. - Page 28 ALWAYS MOVING FORWARD...
Need help?
Do you have a question about the E7 Elliptical and is the answer not in the manual?
Questions and answers
What kind of bushings are used the pedals?