Crestron Docking Station TPS-6X-DS Operation Manual
Docking station for the tps-6x
Hide thumbs
Also See for Docking Station TPS-6X-DS:
- Quick manual (60 pages) ,
- Operation manual (16 pages)
Table of Contents
Advertisement
Quick Links
Download this manual
See also:
Quick Manual
Advertisement
Table of Contents

Subscribe to Our Youtube Channel
Related Manuals for Crestron Docking Station TPS-6X-DS


Summary of Contents for Crestron Docking Station TPS-6X-DS
- Page 1 Crestron TPS-6X-DS Docking Station for the TPS-6X Operations Guide...
- Page 2 This document was prepared and written by the Technical Documentation department at: Crestron Electronics, Inc. 15 Volvo Drive Rockleigh, NJ 07647 1-888-CRESTRON All brand names, product names and trademarks are the property of their respective owners. ©2008 Crestron Electronics, Inc.
-
Page 3: Table Of Contents
Crestron TPS-6X-DS Contents Docking Station for the TPS-6X: TPS-6X-DS Introduction ... 1 Features and Functions ... 1 Specifications ... 2 Physical Description... 3 Setup ... 6 Hardware Hookup ... 6 Recommended Cleaning... 6 Operation ... 7 Mounting the Touchpanel... 7 Tilt Adjustment... -
Page 5: Docking Station For The Tps-6X: Tps-6X-Ds
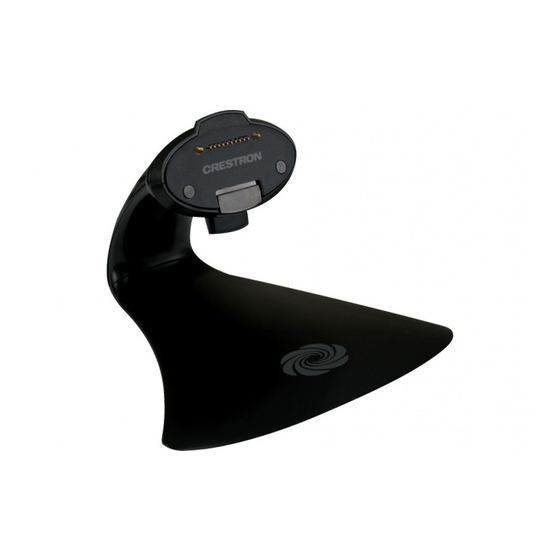
Crestron TPS-6X-DS Docking Station for the TPS-6X: TPS-6X-DS Introduction The TPS-6X-DS is the desktop docking station that is included as standard with the Isys converts it to a stylish tilt touchpanel, providing wired communications and video capability while charging the touchpanel’s internal battery. Features and Functions Versatile Docking Options The TPS-6X-DS provides both wired Ethernet and Cresnet connectivity to the... -
Page 6: Specifications
Docking Station for the TPS-6X Triple-Lock Tilt Mechanism The tiltable docking port on the TPS-6X-DS allows the touchpanel to be tilted at any angle up to 45 degrees for optimal viewing and operation. The angle can be freely adjusted during use or locked down at a fixed angle. A finger-operated latch can be engaged at any time to lock the touchpanel securely to the docking station or left unlocked for easiest removal after recharging. -
Page 7: Physical Description
Crestron TPS-6X-DS Physical Description This section provides information on the connections, controls and indicators available on your TPS-6X-DS. TPS-6X-DS Physical View TPS-6X-DS Overall Dimensions (Front View) Operations Guide – DOC. 6576B Docking Station for the TPS-6X Docking Station for the TPS-6X: TPS-6X-DS • 3 4.25 in (10.80 cm) - Page 8 Docking Station for the TPS-6X TPS-6X-DS Overall Dimensions (Top View) (17.67 cm) NOTE: The length of the connecting cable on the TPS-6X-DS is 9 feet (2.75 meters). The length of the cable has been shortened for illustrative purposes in the diagram above.
-
Page 9: Touchpanel Connector
Crestron TPS-6X-DS Connectors, Controls & Indicators 1. The interface module connector fixed onto the TPS-6X-DS is to be connected to the TPS-6X-IMCW’s 2. To determine which is pin 1 on the cable, hold the cable so that the end of the ten pin modular jack is Operations Guide –... -
Page 10: Setup
Docking Station for the TPS-6X Setup Hardware Hookup The only connection to the TPS-6X-DS is via the fixed cable, which is connected to the TO PANEL port on the (included) TPS-6X-IMCW Interface Module. When connecting the TPS-6X-DS, consider the following: Hardware Connection for the TPS-6X-DS NOTE: The length of the connecting cable on the TPS-6X-DS is 9 feet (2.75 meters). -
Page 11: Operation
Crestron TPS-6X-DS Operation Mounting the Touchpanel To mount the TPS-6X, the touchpanel must first be positioned onto the docking station at a slight angle to latch the top portion of the docking station onto the touchpanel. Magnets on the TPS-6X-DS attach to metal plates installed on the TPS-6X to secure the touchpanel in place (refer to the illustration below). -
Page 12: Operating Modes
Docking Station for the TPS-6X Operating Modes The TPS-6X-DS can be configured into a lock mode or unlock mode to either secure or release the TPS-6X touchpanel. The touchpanel can also be configured to permanently lock the touchpanel onto the TPS-6X-DS using a locking pin accessory. Lock Mode Pull the latch toward the touchpanel or the user as indicated in the illustration below. - Page 13 Crestron TPS-6X-DS Permanent Lock Mode Ensure the touchpanel is securely placed on the docking station and placed in lock mode. Then slide the locking pin accessory straight through the slot of the latch of docking station until the locking pin clicks into place (refer to the illustrations below).
-
Page 14: Resources
Docking Station for the TPS-6X Resources As of the date of manufacture, the TPS-6X-DS has been tested and found to comply with specifications for CE marking and standards per EMC and Radiocommunications Compliance Labelling. Further Inquiries If you cannot locate specific information or have questions after reviewing this guide, please take advantage of Crestron's award winning customer service team by calling Crestron at 1-888-CRESTRON [1-888-273-7876]. -
Page 15: Return And Warranty Policies
Crestron TPS-6X-DS Return and Warranty Policies Merchandise Returns / Repair Service 1. No merchandise may be returned for credit, exchange or service without prior authorization from CRESTRON. To obtain warranty service for CRESTRON products, contact an authorized CRESTRON dealer. Only authorized CRESTRON dealers may contact the factory and request an RMA (Return Merchandise Authorization) number. - Page 16 Crestron Electronics, Inc. Operations Guide – DOC. 6576B 15 Volvo Drive Rockleigh, NJ 07647 (2018618) Tel: 888.CRESTRON 08.08 Fax: 201.767.7576 Specifications subject to www.crestron.com change without notice.
Need help?
Do you have a question about the Docking Station TPS-6X-DS and is the answer not in the manual?
Questions and answers