Advertisement
Quick Links
Advertisement

Related Manuals for Grandstream Networks HT841


Summary of Contents for Grandstream Networks HT841
- Page 1 Grandstream Networks, Inc. HT841/HT881 User Manual...
-
Page 2: Product Overview
IP technology with their existing phone system. This series of enterprise analog FXO gateway can convert SIP/RTP IP calls into conventional PSTN calls, and it is available in two models, the HT841 and HT881, with 4 and 8 FXO ports, respectively. - Page 3 Operational: 32° – 104°F or 0º – 40ºC Environmental Storage: 14° – 140°F or -10º – 60ºC Humidity: 10 – 90% Non-condensing ● HT841/HT881 Dimensions and Weight Dimensions: 190mm x 100mm x 28mm (L x W x D) Weight: 0.46KG...
-
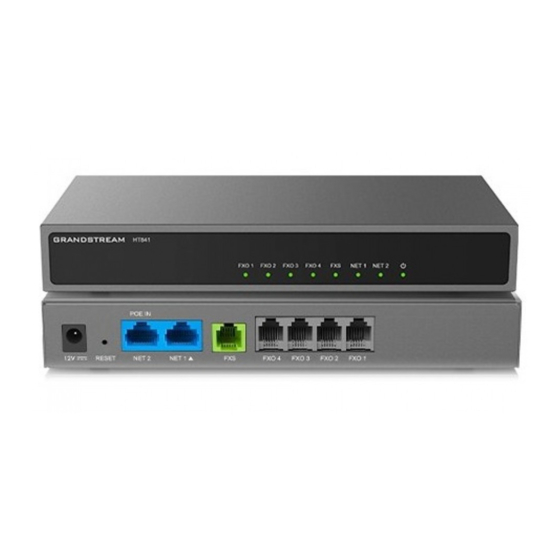
Page 4: Getting Started
HT841/HT881 Ports Description Port Description DC 12V Power socket. Used to power HT841/HT881 (12V - 0.5A) NET 1/NET 2 Network NET 1 / NET 2 port. ● Used to power and connect your HT841/HT881 to local network when using as router. - Page 5 2. Connect the NET 1/ NET 2 port of the HT841/HT881 to a router, switch, or modem using an Ethernet cable. 3. Insert the power adapter into the HT841/HT881 and connect it to a wall outlet and make sure to respect the technical specifications of the power adapter used.
- Page 6 HT841/HT881 LED Patterns LED Lights Status The Power LED lights up when the HT841/HT881 is powered on and it flashes when the Power LED HT841/HT88 is booting up. The NET 1 LED lights up when the HT841/HT881 is connected to your network through the NET1 LED NET1 port.
-
Page 7: Application Description
IP PBX / SIP Server with HT841/HT881 A SIP proxy server such as UCM6xxx can be deployed with the HT841/HT881 series. In this environment, the SIP server handles SIP registration and call control, and the HT841/HT881 processes media conversion between IP and PSTN calls. - Page 8 FXS Gateway with HT841/HT881 [No SIP Server required] Alternatively, the HT841/HT881 can be used without a SIP Server. You can use it in conjunction with an FXS Gateway (Ex. GXW42xx) and still be able to originate and terminate calls from IP to PSTN and vice versa. All you need to make sure is that the 2 gateways are able to locate each other (they should be on the same LAN or on Public IP addresses).
- Page 9 PSTN connectivity. FXS Telephony Implementation When the FXS port on an FXO gateway is connected to an analog phone, the following basic telephony operations can typically be performed: Placing a Phone Call To make the outgoing calls using your HT841/HT881...
- Page 10 Both HT841/HT881 and other VoIP Devices are on the same LAN using private IP addresses, or Both HT841/HT881 and other VoIP Devices can be connected through a router using public or private IP addresses (with necessary port forwarding or DMZ).
- Page 11 Forcing a Codec (per call) *027110 (PCMU), *027111 (PCMA), *02723 (G723), *02729 (G729), *027201 (iLBC). Disable LEC (per call) Dial “*03” +” number”. No dial tone is played in the middle. Enable SRTP Disable SRTP Block Caller ID (for all subsequent calls) Send Caller ID (for all subsequent calls) Direct IP Calling.
-
Page 12: Configuration Guide
The embedded Web GUI on the HT841/HT881 using PC’s web browser. Obtain HT841/HT881 IP Address HT841/HT881 is by default configured to obtain the IP address from the DHCP server where the unit is located. To know which IP address is assigned to your HT841/HT881, you should access the “Interactive Voice Response... - Page 13 This prompt will be played immediately after off hook If the device is not registered “Device not registered” and the option “Outgoing Call without Registration” is in NO HT841/HT881 IVR Menu Four success tips when using the voice prompt “*” shifts down to the next menu option and “#” returns to the main menu “9”...
-
Page 14: Web Configuration Pages Definitions
4. Enter the administrator’s password to access the Web Configuration Menu. The computer must be connected to the same sub-network as the HT841/HT881. This can be easily done by connecting the computer to the same hub or switch as the HT841/HT881. - Page 15 ● Prog: Specifies Program version. This is the main firmware release number, which is always used for identifying the software system of the HT841/HT881. ● CPE: Specifies CPE version. The CPE version is displayed only when HT841/HT881 is connected to an ACS using the TR-069 protocol.
- Page 16 HTTPS is selected, web UI will be accessed using HTTPS. The default is HTTP. HTTP Web Port Customizes HTTP port used to access the HT841/HT881 web UI. Default is 80. HTTPS Web Port Customizes HTTPS port used to access the HT841/HT881 web UI. Default is 443.
- Page 17 4. Both, prefer IPv6: Enable both IPv4 and IPv6 and prefer IPv6. Note: Make sure to reboot the HT841/HT881 unit for the changes to take effect. Allows users to configure the appropriate network settings on the HT841/HT881 to obtain IPv4 IPv4 Address address.
- Page 18 DNS server. These fields are set to zero by default. Allows users to configure the appropriate network settings on the HT841/HT881 to obtain an IPv6 address. Users could select DHCP or Static IP. By default, it is set to DHCP.
- Page 19 ● WAN Only: In this mode, only the WAN port is active. LAN port is not used. The default mode is Bridge mode. Save the setting and reboot prior to configuring the HT841/HT881. Defines the number of ports that can be managed while in NAT router mode.
- Page 20 For example; 192.168.2.1 will be changed to 192.168.3.1 if the netmask is 255.255.255.0. Then the device will reboot The default value is 100. The last segment of IP address is assigned to the HT841/HT881 in the LAN Network. LAN DHCP Start IP Default configuration assigns IP address (to local network devices) starting from 192.168.2.100.
- Page 21 Up to 8 rules are available. Gives the administrator the option to restore the default configuration on the HT841/HT881. There are 3 types of factory reset: 1. ISP Data Reset: All ISP (Internet Service Provider) configurations that may affect the IP address will be reset (including WAN static IP).
- Page 22 Uses ARP to check the network connectivity. Use ARP to detect network connectivity Default is “Yes”. Verify host when using HTTPS Enables / disables the host verification when using HTTPS. Selects firmware upgrade/provisioning method: TFTP, HTTP, HTTPS, FTP or FTPS. Default is Upgrade via HTTPS.
- Page 23 Randomized Automatic Upgrade every X minute(s) by random 1 to X minute(s). Configures the HT841/HT881 to always search for the new firmware at boot up. During the Always Check for New Firmware at boot stage, the HT8xx will contact the firmware upgrade server to search for a new firmware, Boot up when available it will start the upgrade process, otherwise it will boot normally.
- Page 24 Build-in trusted : (Default) Build-in trusted certificates Custom trusted certificate: Uploaded Certificates All trusted Certificates: Both built-in and uploaded Certificates Specifies SSL certificate used for SIP over TLS is in X.509 format. The HT8xx has built-in private key and SSL certificate. SIP TLS Certificate Maximum supported length is 4069.
- Page 25 Set RADIUS shared secret. Configure RADIUS VSA Vendor ID to match RADIUS server’s configuration. Default is RADIUS VSA Vendor ID 42397 for Grandstream Networks Inc. Configure RADIUS VSA Access Level Attribute to match RADIUS server’s configuration. RADIUS VSA Access Level Attribute...
- Page 26 Enable OpenVPN® Allow user to enable OpenVPN®. Default is No. OpenVPN® Server Address Specify the IP address or FQDN for the OpenVPN® Server. OpenVPN® Port Specify the listening port of the OpenVPN® server. Default is 1194 OpenVPN® Interface type Specify the Interface type of OpenVPN® whether TAP or TUN. Default is TUN. OpenVPN®...
- Page 27 Disable Direct IP Call Direct IP call is disabled if set to Yes. When this feature is set to Yes, device will play busy tone when the FXS port account is not Play Busy Tone When Account is registered, and the attached analog phone is offhook. unregistered Disabled by Default.
- Page 28 TLS 1.0 TLS 1.1 TLS 1.2 Default is Unlimited. This feature allows customer to choose desired Maximum TLS Version. Choices are: Unlimited Maximum TLS Version TLS 1.0 TLS 1.1 TLS 1.2 Default is Unlimited. If set to SSL/TLS, the syslog messages will be sent through secured TLS Protocol to syslog server.
- Page 29 computer. The firmware filename should be “ht8x1fw.bin” Press Upload from local directory button to load configuration file to the device from your computer. The configuration file should be an XML file (for instance: “config.xml”). Note: The field Upload Configuration is not mandatory in the document but if available only device with specified MAC address will accept the configuration file.
- Page 30 From Domain configuration. Allow DHCP Option 120 (override Configures the HT841/HT881 to collect SIP server address from DHCP option 120. Default SIP Server) is No. Selects transport protocol for SIP packets; UDP or TCP or TLS. Please make sure your SIP SIP transport Server or network environment supports SIP over the selected transport method.
- Page 31 Enabled: “Tel:” will be used instead of “sip:” in the SIP request. Please consult your carrier before changing this parameter. The default is Disabled. Controls whether the HT841/HT881 needs to send REGISTER messages to the proxy server. SIP Registration The default setting is Yes.
- Page 32 SIP DSCP (Diff-Serv value in decimal, 0-63, default 26) RTP DSCP (Diff-Serv value in decimal, 0-63, default 46) Defines local port to use by the HT841/HT881 for listening and transmitting SIP packets. The Local SIP Port default value for FXS 1 is 5060 and 5062 for FXS 2.
- Page 33 Checks the SIP User ID in the Request URI of the incoming INVITE; if it doesn’t match the Check SIP User ID for Incoming HT841/HT881 SIP User ID, the call will be rejected. Direct IP calling will also be disabled. INVITE The default is No.
- Page 34 Defines T1 timeout value. It is an estimate of the round-trip time between the client and server transactions. For example, HT841/HT881 will attempt to send a request to a SIP server. The time it takes between sending out the request to the point of getting a response is the SIP T1 SIP T1 Timeout timer.
- Page 35 Off Hook Auto Dial Delay Specifies the auto-dial delay after off hook. Determines a SIP Extension to notify the SIP server that the HT841/HT881 is behind a Proxy-Require NAT/Firewall. Use NAT IP Defines NAT IP address used in SIP/SDP messages. It should only be used if required by ITSP.
- Page 36 where it is connected. Replaces # by %23 in some special situations. Do Not Escape ‘#’ as %23 in SIP URI Default is No. Sends only one m line in SDP, regardless of how many m fields are in the incoming SDP. Disable Multiple m Line in SDP Default is No.
- Page 37 1. Default: Outgoing – { x+ | +x+ | *x+ | *xx*x+ } Example of a simple dial plan used in a Home/Office in the US: { ^1900x. | <=1617>[2-9]xxxxxx | 1[2-9]xx[2-9]xxxxxx | 011[2-9]x. | [3469]11 } Explanation of example rule (reading from left to right): ^1900x.
- Page 38 Allows users to delay posting Media Change Event, it can be set to “Immediately” or to “After When To Restart Session After Re- replying 200OK” INVITE received The default value is “Immediately”. Appends “100rel” attribute to the value of the required header of the initial signaling messages. Enable 100rel Default is No.
- Page 39 Reverses the polarity upon call establishment and termination. Polarity Reversal Default is No. Allows the traditional PBX used with HT841/HT881 to apply this method for signaling call Loop Current Disconnect termination. The method initiates a short voltage drop on the line when the remote (VoIP) side disconnects an active call.
- Page 40 HT841/HT881 support a range from 40 to 2000 ms. Default values are 300 minimum and 1100 maximum. Specifies the on-hook time for an on-hook event to be validated. HT841/HT881 support a range On Hook Timing from 40 to 2000 ms. Default value is 400.
- Page 41 The configuration, completed in Distinctive Ring Tones block in the same page, applies to ring tones cadences configured here. Customizes the Call Waiting Tone 1 to 10 with associate caller ID: when selected, if caller ID is configured, then the device will ONLY use this call waiting tone when the incoming call waiting is from the Caller ID.
- Page 42 – Enable Unconditional Forward: Default is 72 – Disable Unconditional Forward: Default is 73 Allow users to customize the Busy Forward feature codes. Default is Yes Busy Forward Feature – Enable Busy Forward: Default is 90 – Disable Busy Forward: Default is 91 Allow users to customize the Delayed Forward feature codes.
- Page 43 Proxy, or media gateway, or session border controller. (For example: proxy.myprovider.com, Outbound Proxy IPv4: 192.168.5.170, or IPv6: fe80::20b:82ff:fe75:211d). It’s Used by HT841/881 for firewall or NAT penetration in different network environments. If symmetric NAT is detected, STUN will not work and only outbound proxy can correct the problem Configures the backup outbound proxy to be used when the “Outbound Proxy”...
- Page 44 Enabled: “Tel:” will be used instead of “sip:” in the SIP request. Please consult your carrier before changing this parameter. The default is Disabled. Controls whether the HT841/HT881 needs to send REGISTER messages to the proxy server. SIP Registration The default setting is Yes.
- Page 45 Checks the SIP User ID in the Request URI of the incoming INVITE; if it doesn’t match the Check SIP User ID for Incoming HT841/HT881 SIP User ID, the call will be rejected. Direct IP calling will also be disabled. INVITE The default is No.
- Page 46 Defines T1 timeout value. It is an estimate of the round-trip time between the client and server transactions. For example, HT841/HT881 will attempt to send a request to a SIP server. The time it takes between sending out the request to the point of getting a response is the SIP T1 SIP T1 Timeout timer.
- Page 47 Note: Please refer to the user guide for detailed steps to perform above operations.More additional Digit events were added on the new firmware 1.0.43.10. Determines a SIP Extension to notify the SIP server that the HT841/HT881 is behind a Proxy-Require NAT/Firewall.
- Page 48 This option should be used only if there is a SIP proxy is configured and supporting “484 Incomplete Address” responses. Otherwise, the call will likely be rejected by the proxy (with a 404 Not Found error). Default is No. This feature is NOT designed to work with and should NOT be enabled for direct IP-to-IP calling.
- Page 49 Enable Session Timer Disable the session timer when this option is set to “No”. By default, this option is enabled. Enables SIP sessions to be periodically “refreshed” via a SIP request (UPDATE, or re- INVITE). When the session interval expires, if there is no refresh via an UPDATE or re- Session Expiration INVITE message, the session will be terminated.
- Page 50 iLBC Frame Size Specifies iLBC packet frame size (20ms or 30ms). Default is 20ms. Disable OPUS Stereo in SDP Disables OPUS stereo in SDP. Default is No. Determines payload type for iLBC. Valid range is between 96 and 127. iLBC Payload Type Default is 97.
- Page 51 Refers to the method used to transmit Caller ID information, which can be: ● Relay via SIP Form: Caller ID information is transmitted using the "From" field in the SIP header. ● Relay via P-SIP Asserted identity: Caller ID information is transmitted using the "P- Asserted-Identity"...
- Page 52 In this case the HT841/HT881 will search for a power drop. This is a preconfigured value of duration for a line power drop used by specific service providers. For example, for a configured value of 500ms the device will ignore any random...
- Page 53 This configuration is applicable for VoIP to PSTN calls and indicates one or two stage dialing Stage Method (1/2) methods. The time to wait before HT841/HT881 initiates the call via PSTN line. Min Delay Before Dial PSTN Number Default 500ms, range is from 50 to 65000ms.
- Page 54 The HT841/HT881 embedded Web server responds to HTTP/HTTPS GET/POST requests. Embedded HTML pages allow a user to configure the HT841/HT881 through a web browser such as Google Chrome, Mozilla Firefox and Microsoft’s IE. Microsoft Internet Explorer: version 10 or higher.
- Page 55 Changing Admin Level Password 1. Access your HT841/HT881 web UI by entering its IP address in your favorite browser. 2. Enter your admin password (default: The password found on the sticker on the back of the unit).
- Page 56 HT841/HT881 User Password change Changing Viewer Password 1. Access your HT841/HT881 web UI by entering its IP address in your favorite browser. 2. Enter your admin password (default: The password found on the sticker on the back of the unit).
- Page 57 Select voice menu option 01 to allow the HT841/HT881 to use DHCP. STATIC IP MODE Select voice menu option 01 to allow the HT841/HT881 to enable the STATIC IP mode, then use option 02, 03, 04, 05 to set up IP address, Subnet Mask, Gateway and DNS server respectively.
- Page 58 Press Apply at the bottom of the page to save your configuration. Register SIP Account After applying your configuration, your account will register to your SIP Server, you can verify if it has been correctly registered with your SIP server from your HT841/HT881 web interface under Status �� Port Status ��...
-
Page 59: Upgrading And Provisioning
Wait 30 seconds to log in again. UPGRADING AND PROVISIONING The HT841/HT881 can be upgraded via FTP/FTPS/TFTP/HTTP/HTTPS by configuring the URL/IP Address for the FTP/FTPS/TFTP/HTTP/HTTPS server and selecting a download method. Configure a valid URL for TFTP or FTP/FTPS or HTTP/HTTPS (default is HTTPS);... - Page 60 1. Download the firmware file from Grandstream web site 2. Unzip it and copy the file in to a folder in your PC 3. From the HT841/HT881 web interface (Advanced Settings page) you can browse your hard drive and select the folder you previously saved the file.
- Page 61 When the HT841/HT881 boots up or reboots, it will send a request to download a file named “cfgxxxxxxxxxxxx” followed by a configuration XML file named “cfgxxxxxxxxxxxx.xml”, where “xxxxxxxxxxxx” is the MAC address of the phone, i.e., “cfg000b820102ab”...
-
Page 62: Restore Factory Default Settings
To reset default factory settings using the reset button please follow the steps above: 1. Unplug the Ethernet cable. 2. Locate the reset hole on the back panel of your HT841/HT881. 3. Insert a pin in this hole, and press for about 7 seconds. -
Page 63: Change Log
Factory Reset will be disabled if the “Lock keypad update” is set to “Yes”. If the HT841/HT881 was previously locked by your local service provider, pressing the RESET button will only restart the unit. The device will not return to factory default settings.
Need help?
Do you have a question about the HT841 and is the answer not in the manual?
Questions and answers