Table of Contents
Advertisement
Quick Links
Specifications
Wingspan:
Length:
Wing Area:
Flying Weight:
Battery:
Motor:
On-Board Electronics:
Transmitter:
USB Charger:
22.2 in. (565mm)
16 in. (405mm)
75.95 sq. in. (4.9 dm2)
2.1 oz. (60g)
250mAh 1S 3.7V LiPo
Dual Brushed w/Gearbox
3-in-1 Control Board (Receiver, Servos, ESC)
4-Channel 2.4GHz
1S 300mA
Advertisement
Table of Contents

Related Manuals for Rage GOLDEN AGE Series


Summary of Contents for Rage GOLDEN AGE Series
-
Page 1: Specifications
Specifications Wingspan: 22.2 in. (565mm) Length: 16 in. (405mm) Wing Area: 75.95 sq. in. (4.9 dm2) Flying Weight: 2.1 oz. (60g) Battery: 250mAh 1S 3.7V LiPo Motor: Dual Brushed w/Gearbox On-Board Electronics: 3-in-1 Control Board (Receiver, Servos, ESC) Transmitter: 4-Channel 2.4GHz USB Charger: 1S 300mA... -
Page 2: Table Of Contents
Table of Contents Specifications Table of Contents General Precautions Taylorcraft Story Safety Precautions Taylorcraft RTF Contents FCC Information LiPo Battery Warning Taylorcraft Assembly Charging LiPo Battery Battery Installation Center of Gravity Transmitter Details Servo Reversing Checking Control Movements Binding/Arming Prop Replacement First Flight Service/Repair Parts List... -
Page 3: Taylorcraft Story
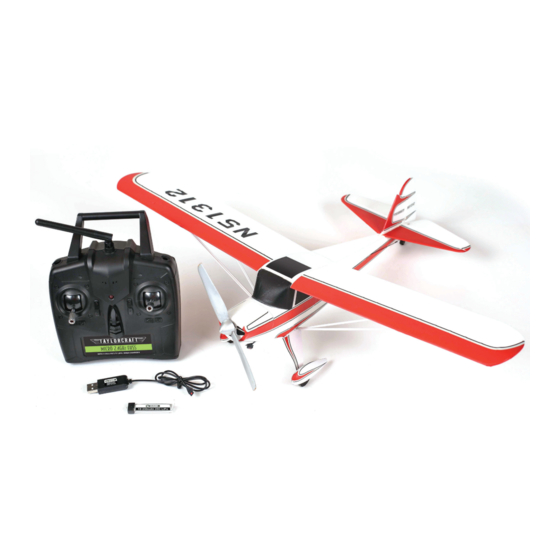
The Taylorcraft comes fully assembled as an RTF (Ready-To-Fly), so everything needed to fly is included in the box. As with previous Golden Age series airplanes from Rage RC®, the 3-in-1 control board arrives factory-installed with a proportional servo for rudder and elevator control. -
Page 4: Taylorcraft Rtf Contents
FCC Information This device complies with part 15 of the FCC rules. Operation is subject to the following two conditions: (1) This device may not cause harmful interference, and (2) This device must accept any interference received, including interference that may cause undesired operation. -
Page 5: Taylorcraft Assembly
Taylorcraft Assembly The Taylorcraft comes nearly completely assembled. All that is required is the installation of the landing gear. Once the batteries are installed in the transmitter and the flight battery is charged and installed in the airframe, the model is ready for flight. To install the landing gear, slip the notch on the rear wire of the landing gear into the slot on the bottom of the fuselage, and then push the... -
Page 6: Transmitter Details
Transmitter Details Antenna Power Light Handle Elevator Trim Bind Button Throttle Stick Rudder/Elevator Stick To Initiate Servo Reversing Rudder Trim Power Switch PLEASE NOTE: Install 4 AA batteries into the battery compartment located on the back of the transmitter, under the battery hatch cover. Make sure that the batteries are installed with correct polarity per the diagram inside the battery compartment. -
Page 7: Checking Control Movements
Checking Control Movements With both the transmitter and the aircraft powered on, check the movement of the control surfaces. When the elevator stick is moved toward the bottom of the Elevator Up transmitter, the elevator should move up. When in flight this will raise the nose. -
Page 8: Binding/Arming
Binding/Arming Binding The Taylorcraft comes bound to the transmitter. Should you need to re-bind, follow these steps. • Turn on both transmitter and aircraft • Press both throttle trim buttons simultaneously. • The transmitter will beep until binding process is complete. •... -
Page 9: Service/Repair
Service/Repair The main components of the Taylorcraft are held in place by magnets which greatly simplifies any necessary disassembly or repair. To remove the wing strut, grasp the strut To reassemble, place the base of the strut near its base and slide toward the rear. on the magnet on the fuselage and rotate The magnets will release and the strut can the strut back into position. -
Page 10: Parts List
Parts List See your local hobby shop or place of purchase first. If unavailable, parts can be ordered direct at www.ragerc.com or call 1-800-622-7223 M-F 9:00-5:00PM Mountain Time Item Number Description RGRA1113 Taylorcraft EP RTF RGRA1275 Fuselage w/ Decals; Taylorcraft RGRA1276 Main Wing w/ Support; Taylorcraft RGRA1277 Wing Strut Set; Taylorcraft RGRA1278 Tail Set w/ Decals; Taylorcraft RGRA1279 Micro Propeller and Spinner; Taylorcraft RGRA1280... -
Page 11: Limited Warranty
BEEN ADVISED OF THE POSSIBILITY OF SUCH DAMAGES. Further, in no event shall the liability of Rage R/C exceed the individual price of the Product on which liability is asserted. As Rage R/C has no control over use, setup, final assembly, modification or misuse, no liability shall be assumed nor accepted for any resulting damage or... - Page 12 2019 HRP Distributing, Inc...
Need help?
Do you have a question about the GOLDEN AGE Series and is the answer not in the manual?
Questions and answers