
Related Manuals for Check Point QUANTUM FORCE 19000


Summary of Contents for Check Point QUANTUM FORCE 19000
- Page 1 31 December 2023 QUANTUM FORCE 19000 AND 29000 APPLIANCES RR1-CP-25, RR1-CP-10, and RR1-CP-20 Getting Started Guide...
- Page 2 Check Point. While every precaution has been taken in the preparation of this book, Check Point assumes no responsibility for errors or omissions.
- Page 3 Download the latest version of this document in PDF format. Feedback Check Point is engaged in a continuous effort to improve its documentation. Please help us by sending your comments. Quantum Force 19000 and 29000 Appliances Getting Started Guide | 3...
- Page 4 "Front Panel LEDs" on page 47 23 November 2023 Updated: "Configuring Appliances" on page 37 "Support" on page 62 13 November 2023 Added: "AC Power Cords" on page 57 23 October 2023 First release of this document Quantum Force 19000 and 29000 Appliances Getting Started Guide | 4...
-
Page 5: Table Of Contents
Available Software Images Creating the Network Object Synchronizing RAID 19000 / 29000 Appliances Hardware Front Panel 19200 29100 / 29200 Front Panel LEDs Synchronization Port LEDs Management Port LEDs System LEDs Quantum Force 19000 and 29000 Appliances Getting Started Guide | 5... - Page 6 Dual Redundant BIOS PSU Configuration and Monitoring AC Power Cords Replacing and Upgrading Components Restoring Factory Defaults Restoring in Gaia Portal Restoring from the Boot Menu Restoring in Gaia Clish Support Quantum Force 19000 and 29000 Appliances Getting Started Guide | 6...
-
Page 7: Safety, Environmental, And Electronic Emissions Notices
Warning - Many components described in this document can be damaged by Electrostatic Discharge (ESD). Follow the precautions described here and before specific procedures detailed in the document to protect static-sensitive components from ESD-related damage. Quantum Force 19000 and 29000 Appliances Getting Started Guide | 7... - Page 8 This device is not intended for use in the direct field of view at visual display workplaces. To avoid incommoding reflexions at visual display workplaces this device must not be placed in the direct field of view. Quantum Force 19000 and 29000 Appliances Getting Started Guide | 8...
- Page 9 To uninstall the equipment, disconnect the ground wire after turning off the power. A ground wire is required and the part connecting the conductor must be greater than 6 AWG. Quantum Force 19000 and 29000 Appliances Getting Started Guide | 9...
- Page 10 Safe Drinking Water and Toxic Enforcement Act of 1986, California Health & Safety Code s. 25249.5, et seq. ("Proposition 65"), that is "known to the State to cause cancer or reproductive toxicity" (see http://www.calepa.ca.gov) Quantum Force 19000 and 29000 Appliances Getting Started Guide | 10...
- Page 11 Directive on the Approximation of the Laws of the Member States relating to Electromagnetic Compatibility Directive (2014/30/EU). The above product conforms with Low Voltage Directive 2014/35/EU and complies with the requirements relating to electrical equipment designed for use within certain voltage limits. Quantum Force 19000 and 29000 Appliances Getting Started Guide | 11...
- Page 12 This Class A digital apparatus complies with Canadian ICES-003. VCCI Compliance Statement This section provides the compliance statement for the Voluntary Control Council for Interference by Information Technology Equipment (VCCI), which governs radio frequency emissions in Japan. Quantum Force 19000 and 29000 Appliances Getting Started Guide | 12...
- Page 13 For more information about where you can drop off your waste equipment for recycling, please contact your local city office or your household waste disposal service. Quantum Force 19000 and 29000 Appliances Getting Started Guide | 13...
-
Page 14: Sicherheits-, Umwelt- Und Emv-Hinweise
Das Gerät darf nur an einem Ort mit beschränktem Zugang verwendet werden und muss von einer fachkundigen Person installiert werden. Bevor Sie ein Gehäuse aufsetzen oder entfernen oder in der Nähe einer Stromquelle arbeiten, schalten Sie den Strom aus und ziehen Sie das Netzkabel ab. Quantum Force 19000 and 29000 Appliances Getting Started Guide | 14... - Page 15 Das Gerät ist nicht zur Verwendung im direkten Blickfeld von Arbeitsplätzen mit visueller Anzeige vorgesehen. Um störende Reflexionen an Arbeitsplätzen mit visueller Anzeige zu vermeiden, darf das Gerät nicht im direkten Blickfeld platziert werden. Quantum Force 19000 and 29000 Appliances Getting Started Guide | 15...
- Page 16 Blitzeinschlags zu verringern. Um das Gerät zu deinstallieren, trennen Sie den Erdungsdraht nach dem Ausschalten der Stromversorgung ab. Ein Erdungsdraht ist erforderlich, und der Teil, der den Leiter verbindet, muss größer als 6 AWG sein. Quantum Force 19000 and 29000 Appliances Getting Started Guide | 16...
- Page 17 5. Zuverlässige Erdung - Ausrüstung, die in Racks montiert ist, muss zuverlässig geerdet sein. Besonders müssen hierbei die Stromanschlussleitungen und weniger die direkten Verbindungen zum Abzweigstromkreis beachtet werden (z. B. durch die Verwendung von Adapterleisten). Quantum Force 19000 and 29000 Appliances Getting Started Guide | 17...
- Page 18 Vorsicht! Der Hersteller übernimmt keine Verantwortung für Radio- oder Fernsehsignalstörungen, die durch nicht genehmigte Modifikationen des Geräts auftreten. Derartige Modifikationen könnten zum Erlöschen der Betriebserlaubnis des Benutzers führen. Quantum Force 19000 and 29000 Appliances Getting Started Guide | 18...
- Page 19 Vergrößern des Abstands zwischen Gerät und Empfänger. Anschließen des Geräts an einen anderen Stromkreis als den, an den der Empfänger angeschlossen ist. Lassen Sie sich vom Händler oder einem erfahrenen Radio- bzw. Fernsehtechniker beraten. Quantum Force 19000 and 29000 Appliances Getting Started Guide | 19...
- Page 20 Sie auf eine Art und Weise verwertet werden, die keine Gefährdung für die Gesundheit von Mensch und Umwelt darstellt. Weitere Informationen darüber, wo Sie alte Elektrogeräte zum Recyceln abgeben können, erhalten sie bei den örtlichen Behörden oder dem für Sie zuständigen Abfallwirtschaftsunternehmen. Quantum Force 19000 and 29000 Appliances Getting Started Guide | 20...
-
Page 21: Remarques Relatives À La Sécurité, L'environnement Et Les Émissions Électroniques
Avant d'installer ou retirer un châssis ou de travailler à proximité d'alimentations, mettez-le hors tension et débranchez le cordon d'alimentation. Quantum Force 19000 and 29000 Appliances Getting Started Guide | 21... - Page 22 Cet appareil n'est pas prévu pour être utilisé dans le champ de vision direct des personnes occupant un bureau. Pour éviter toute gêne occasionnée par un éventuel reflet, cet appareil ne doit pas être placé dans le champ de vision direct des personnes occupant un bureau. Quantum Force 19000 and 29000 Appliances Getting Started Guide | 22...
- Page 23 Pour désinstaller équipement, débrancher le câble de terre après avoir coupé le courant. Un câble de terre est obligatoire et la partie reliant le conducteur doit être supérieure à 6 AWG Quantum Force 19000 and 29000 Appliances Getting Started Guide | 23...
- Page 24 California Safe Drinking Water and Toxic Enforcement Act of 1986 du California Health & Safety Code s. 25249.5, et seq. (« Proposition 65 »), qui sont « connus par l'état pour être cancérigène ou être toxiques pour la reproduction » (voir http://www.calepa.ca.gov) Quantum Force 19000 and 29000 Appliances Getting Started Guide | 24...
- Page 25 électromagnétique (2014/30/UE). Le produit ci-dessus est conforme à la directive basse tension 2014/35/UE et satisfait aux exigences relatives aux équipements électriques conçus pour être utilisés dans une certaine plage de tensions. Quantum Force 19000 and 29000 Appliances Getting Started Guide | 25...
- Page 26 Déclaration de conformité VCCI Cette section présente la déclaration de conformité du Voluntary Control Council for Interference (VCCI) concernant les équipements de technologie de l'information, qui régit les émissions de fréquence radio au Japon. Quantum Force 19000 and 29000 Appliances Getting Started Guide | 26...
- Page 27 Pour obtenir plus d'informations sur les lieux où déposer vos équipements mis au rebut, veuillez contacter votre municipalité ou le service de gestion des déchets. Quantum Force 19000 and 29000 Appliances Getting Started Guide | 27...
-
Page 28: Declaration Of Conformity
Israel. Date first applied: February 2023 The models of the declaration described above have been assessed and found to be in compliance with the following harmonized standards, regulations, and technical references: Quantum Force 19000 and 29000 Appliances Getting Started Guide | 28... - Page 29 CISPR32:2015+COR1: 2016 Class A Safety EN 62368-1:2014/A11:2017, EN 62368- Information technology 1:2014 equipment. Electrical Safety requirements, LVD EN 62368-1:2014+A11:2017. J 62368-1 (H30) AS/NZS 62368.1:2018. CAN/CSA C22.2 No. 62368-1-14. UL 62368-1, Second Edition. Quantum Force 19000 and 29000 Appliances Getting Started Guide | 29...
- Page 30 Restriction of Hazardous Substances) re-cast directive 2011/65/EU Substances REACH and (EU)2015/863 amending Annex II REACH (Registration, Authorization and Restriction of Chemicals, EU Regulation (EC) 01907/2006 WEEE Directive 2012/19/EU Waste Electrical and Electronic Equipment Quantum Force 19000 and 29000 Appliances Getting Started Guide | 30...
-
Page 31: Introduction
Check Point products, consult the Check Point Support Center. Welcome to the Check Point family. We look forward to meeting all of your current and future network, application and management security needs. Quantum Force 19200, 29100, and 29200... - Page 32 Introduction The Check Point 19200 / 29100 / 29200 series comes with a first-year subscription to the full SandBlast Prevention suite. Security Appliance In This Document 19200 Base/Plus Security Appliance 19200 29100 Base/Plus Security Appliance 29100 29200 Base/Plus Security Appliance 29200 Quantum Force 19000 and 29000 Appliances Getting Started Guide | 32...
-
Page 33: Shipping Carton Contents
SmartConsole: GUI applications that are used to manage various aspects of Security Policy enforcement. SmartDashboard: A Legacy SmartConsole GUI application that is used by the system administrator to create and manage specific settings for some Software Blades. Quantum Force 19000 and 29000 Appliances Getting Started Guide | 33... - Page 34 Introduction Locally Managed Deployment: When all Check Point components responsible for both the management and enforcement of the Security Policy (the Security Management Server and the Security Gateway) are installed on the same machine. Centrally Managed Deployment: When the Security Gateway and the Security Management Server are installed on separate machines.
-
Page 35: Mounting The Appliances In A Rack
The appliance and rack rails were tested in extreme conditions and when properly installed do not block air flow to the appliance. These appliances are specifically designed to install with these rails. Quantum Force 19000 and 29000 Appliances Getting Started Guide | 35... - Page 36 Mounting the Appliances in a Rack The appliance shown is 19200, but the air flow is the same for all appliances. Quantum Force 19000 and 29000 Appliances Getting Started Guide | 36...
-
Page 37: Configuring Appliances
2. In the section Installing a Security Gateway > Configuring Gaia for the First Time , follow the instructions for the First Time Configuration Wizard. Important - For the Maestro initial configuration, see the Quantum Maestro Getting Started Guide Quantum Force 19000 and 29000 Appliances Getting Started Guide | 37... -
Page 38: Connecting To The Appliance Cli
If you hear the alarm, reconnect the cord to the outlet. To turn off the alarm, press the red "Alarm off" button on the rear panel of the appliance. Quantum Force 19000 and 29000 Appliances Getting Started Guide | 38... -
Page 39: Available Software Images
ClusterXL Administration Guide for your version Maestro Administration Guide for your version 3. Configure the applicable Security Policy. 4. Install the Access Control Policy. 5. Install the Threat Prevention Policy. Quantum Force 19000 and 29000 Appliances Getting Started Guide | 39... -
Page 40: Synchronizing Raid
At first boot up, wait for up to six hours to allow the storage devices to fully synchronize. If you reboot the appliance before the storage devices are synchronized, the synchronization starts again from the beginning at the next boot. Quantum Force 19000 and 29000 Appliances Getting Started Guide | 40... - Page 41 To monitor the RAID status of the storage devices in Gaia Portal: 1. Log in to the Gaia Portal. 2. From the left tree, click Maintenance > RAID Monitoring. Quantum Force 19000 and 29000 Appliances Getting Started Guide | 41...
- Page 42 2. In the top pane, select the Security Gateway / Cluster object that represents the appliance. 3. In the lower pane, on the Summary tab, click Device & License Information. Example: 4. Click RAID Volumes. The window shows volume and disk information. Example: Quantum Force 19000 and 29000 Appliances Getting Started Guide | 42...
- Page 43 3. Insert a new storage device. If necessary, you can reboot the appliance with one storage device and install the new storage device later. The appliance automatically adds the new storage device to the RAID configuration. Quantum Force 19000 and 29000 Appliances Getting Started Guide | 43...
-
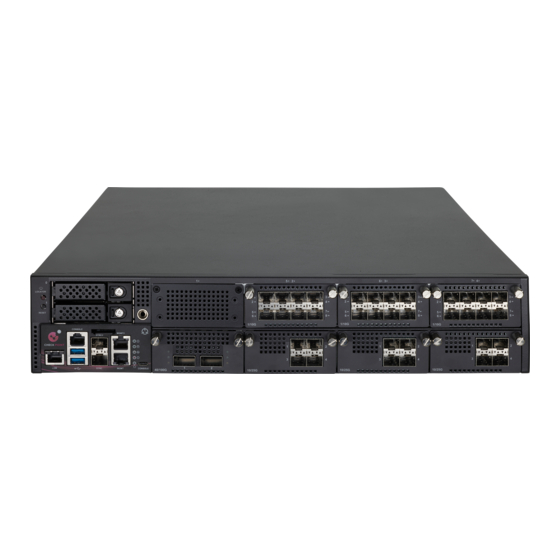
Page 44: 19000 / 29000 Appliances Hardware
29100 / 29200 Item Component Description Locator button Turns the location beacon LED on and off in the appliance. Reset Insert a pin for 5 to 8 seconds to perform a hardware reset. Quantum Force 19000 and 29000 Appliances Getting Started Guide | 44... - Page 45 Ports to manage the Gaia Operating System on this ports appliance. Configuration options: Use one of these ports - Mgmt or Mgmt2. Create a bond on these two ports (Mgmt and Mgmt2) for redundancy. "Management Port LEDs" on page 47 Quantum Force 19000 and 29000 Appliances Getting Started Guide | 45...
- Page 46 The bottom row of slots (from left to right): eth1-0X, eth2-0X, eth3-0X, and eth4-0X. For port speed and port activity LED descriptions, see the relevant chapter in Installing and Removing Line Cards Quantum Force 19000 and 29000 Appliances Getting Started Guide | 46...
-
Page 47: Front Panel Leds
(bottom port SYNC) On (Amber) - 10 Gbit/s data rate is selected Link Speed LED On (Blue) - 25 Gbit/s data rate is (top port SYNC2) selected Management Port LEDs Quantum Force 19000 and 29000 Appliances Getting Started Guide | 47... -
Page 48: System Leds
Off - No power/no status status Amber - Power supply fault detected Green - All power supplies are functioning correctly Alert Off - No faults were detected Blinking red - System fault was detected Quantum Force 19000 and 29000 Appliances Getting Started Guide | 48... -
Page 49: Rear Panel
Description Grounding Used to connect grounding. lugs Cover screws Loosen screws to remove the cover of the appliance. When servicing the appliance, connect an ESD strap to this grounding point. point Quantum Force 19000 and 29000 Appliances Getting Started Guide | 49... - Page 50 Blinking amber - Warning about a hardware issue (high temperature, high power, high current, slow fan) that may lead to an issue with the PSU Blinking fast green - PSU in Firmware update Quantum Force 19000 and 29000 Appliances Getting Started Guide | 50...
-
Page 51: Cooling Fan Units Naming Convention
Fan 1 Inlet Fan1_IN Fan 1 Outlet Fan1_OUT Fan 2 Inlet Fan2_IN Fan 2 Outlet Fan2_OUT Fan 3 Inlet Fan3_IN Fan 3 Outlet Fan4_OUT Fan 4 Inlet Fan4_IN Fan 4 Outlet Fan4_OUT Quantum Force 19000 and 29000 Appliances Getting Started Guide | 51... -
Page 52: Installing The Power Cable Restraint
You can use the power cable restraint to prevent accidental removal of the power cable. Item Description Restraint anchor Cable loop Restraint strip tab Restraint strip Item Description Power supply inlet Restraint strip slot Quantum Force 19000 and 29000 Appliances Getting Started Guide | 52... -
Page 53: Lights Out Management
9. Make sure the cable loop is secured and the power cable cannot be removed. Lights Out Management The Check Point Lights Out Management (LOM) card lets you use a dedicated management channel to remotely control Check Point appliances. Lights Out Management can also work when the appliance is turned off or does not respond. - Page 54 Check Point Support . The appliance is fully functional until the BIOS recovery is completed. Note that it can take a few minutes for it to boot in BIOS recovery mode. Quantum Force 19000 and 29000 Appliances Getting Started Guide | 54...
-
Page 55: Psu Configuration And Monitoring
There is no SNMP alarm. When a PSU does not function correctly: The PSU LED is amber The Alert LED is blinking due to a PSU issue An SNMP alarm is sent. Quantum Force 19000 and 29000 Appliances Getting Started Guide | 55... - Page 56 Power - The sensor type is "power supply". Type 0 - No problems found. Status 1 - Error. The maximum and minimum thresholds. Maximum Minimum PSUs are only measured as Up or Down. Quantum Force 19000 and 29000 Appliances Getting Started Guide | 56...
-
Page 57: Ac Power Cords
250V~ 250V~ 0.75mm Australia QP-003, QP-007, HO5VV-F 250V~ 250V~ 0.75mm QP-026, QP-007, HO5VV-F 250V~ 250V~ 0.75mm QP-02, QP-007, 18AWG 125V~ 125V~ QP-02, QP-007, 14AWG 125V~ 125V~ QP-055, QP-007, 14AWG 125V~ 125V~ Quantum Force 19000 and 29000 Appliances Getting Started Guide | 57... - Page 58 250V~ 250V~ 0.75mm China QP-012, QP-007, VCTF 250V~ 250V~ Israel QP-007, HO5VV-F 029R, 250V~ 0.75mm 250V~ South Africa YP-80, QP-007, HO5VV-F 250V~ 250V~ 0.75mm Argentina QP-048, QP-007, HO5VV-F 250V~ 250V~ 0.75mm Quantum Force 19000 and 29000 Appliances Getting Started Guide | 58...
-
Page 59: Replacing And Upgrading Components
For more information about how to install these parts and components, see the appliance Home Page sk180520. Warning - Unless directed to do so by Check Point Software Technologies Ltd., you are prohibited by warranty and support agreements to replace any parts. -
Page 60: Restoring Factory Defaults
In the HyperTerminal Connect To window, select a port from the Connect using list. 4. Define the serial port settings: 9600 BPS, 8 bits, no parity, 1 stop bit 5. From the Flow control list, select None. Quantum Force 19000 and 29000 Appliances Getting Started Guide | 60... -
Page 61: Restoring In Gaia Clish
1. Connect to the command line on the appliance. 2. Log in to Gaia Clish. 3. Run: set fcd revert<SPACE><TAB> set fcd revert <Name of Default Image> 4. Follow the instructions on the screen. 5. Reboot the appliance: reboot Quantum Force 19000 and 29000 Appliances Getting Started Guide | 61... -
Page 62: Support
Support Support Check Point For additional technical information about Check Point products, consult the Support Center Quantum Force 19000 and 29000 Appliances Getting Started Guide | 62...
Need help?
Do you have a question about the QUANTUM FORCE 19000 and is the answer not in the manual?
Questions and answers