Advertisement
Quick Links
Advertisement

Related Manuals for Nadoli PN-RT3434


Summary of Contents for Nadoli PN-RT3434
- Page 1 PN-RT3434 Installation Instruction Sheet Manuel d'installation...
- Page 2 Instructions for installing shower cabin Intruction pour l'installation de la cabine de douche...
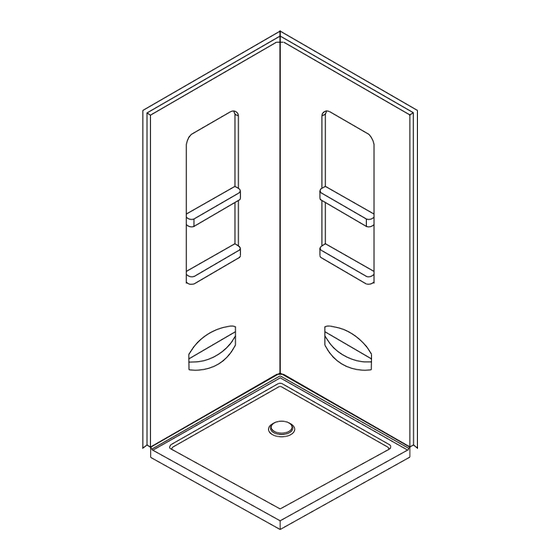
- Page 3 Step 1 A. Fix the the back board and bottom pot, with the 2"x 4" framework. N.B. The size of the framework is for reference. The measurement should be done for the back board and bottom pot.n from Étape 1 A.
- Page 4 Step 4 Fix the drainer as what the sketch shows. Étape 4 Comme indiqué, installer l’égouttoir. Step 5 Fix the bottom pot with cement or plaster. With the cement or plaster laid on the ground, put the bottom pot on it, with appropriate press to make it leveled.
- Page 5 Step 7 Fix the basin with the screws at the bottom pot sides, with the orientation holes made on site. Étape 7 Fixer le bassin avec vis à coté de bassin. Choisir l’emplacement de trou selon la situation pratique. Step 8 Fix the back board with the orientation holes on it for fixing the faucet.
- Page 6 Step 10 Fill in the slot between the bottom pot and walls. Étape 10 Remplir les écarts entre le bassin et le paroi avec la colle de verre. Step 11 Fix the back board on the walls with screws. Étape 11 Fixer avec vis la plaque de dos sur le paroi.
- Page 7 Shower Base Installation Manual Base de douche Manuel d'installation This indentation is designed to ensure the water goes back to the shower base, towards the drain. Cette fente est conçue pour permettre à l'eau de retourner vers l'intérieur de la base de douche, vers le drain. Rev.June 15,2018...
- Page 8 IMPORTANT / IMPORTANT 1.Read this manual carefully and completely before proceeding. * Lisez attentivement ce manuel au complet avant de continuer. 2.It is recommended that you wear safety glasses at all times during the installation * Il est recommandé de porter des lunettes de sécurité en tout temps lors de l'installation 3.Prior to installation of base, all framing and plumbing work must be completed in accordance with this instruction sheet.For renovation work, existing shower surfaces must be removed to accommodate framing requirements.
- Page 9 BS-RD3601 BS-RD533601 6˝(152mm) 5˝(127mm) 6˝(152mm) 4-3/4˝(122mm) BS-RD3603 BS-RD3802 6˝(152mm) 3-1/4˝(80mm) 5˝(127mm) 2˝(55mm)
- Page 10 BS-NA3801 BS-NA3803 6˝(152mm) 6˝(152mm) 5˝(127mm) 5˝(127mm) BS-RD4001 BS-RD4003 6˝(152mm) 6˝(152mm) 5˝(127mm) 5˝(127mm)
- Page 11 BS-RT3442R (2LIPS) BS-RT3442L (2LIPS) 3-5/16˝(85mm) 3-5/16˝(85mm) 2-5/16˝(60mm) 2-5/16˝(60mm) BS-RT3434 BS-RT3648-W3 3-3/8˝(85mm) 3-1/8˝(80mm) 2-1/2˝(55mm) 2-1/2˝(60mm)
- Page 12 BS-RT3636W3 BS-RT3636W2 3-1/8˝ 80mm) 3-1/8˝ 80mm) 2-1/2˝ 55mm) 2-1/2˝ 55mm) BS-RT3648R (2LIPS) BS-RT3648L (2LIPS) 3-3/8˝(85mm) 3-3/8˝(85mm) 2-3/4˝(60mm) 2-3/4˝(60mm)
- Page 13 BS-RT503260L (W/3LIPS) BS-RT503260R (W/3LIPS) BS-RT503236L BS-RT503236R...
- Page 14 BS-RT503248R BS-RT503248L BS-RT533660R BS-RT533660L...
- Page 15 BS-RT513260R BS-RT513260L BS-RT513260W3 BS-RT3660W3...
- Page 16 BS-RT3660L BS-RT3660R...
- Page 17 PROTECTION BASE / BASE PROTECTION Enlever la péllicule de plastique protectrice Remove protective plastic film if there have a film Si vous faites l'installation d'une modèle en coin, svp suivre les instructions de la section 2. If you are proceeding with the installation of a corner model, please follow instructions in section 2. Si vous faites l'installation d'un modèle rectangulaire, svp suivre les instructions de la section 3.
- Page 18 SUITE / CONTINUED Mortier Mortar INSTALLATION BASE / BASE INSTALLATION FORET 1/8" 1/8" DRILL BIT...
- Page 19 SUITE / CONTINUED ref.:j 20~30mm ATTENTION ! Attendre 24h avant d'installer votre porte de douche, afin de permettre au mortier et à la finition de sécher complètement. WARNING ! Wait 24h before proceeding with the installa-tion of the shower door. This will ensure that the finish and mortar is dry.
- Page 20 SUITE / CONTINUED VUE SECTIONNELLE / SIDE SECTION VIEW...
- Page 21 INSTALLATION BASE / BASE INSTALLATION Enlever la péllicule de plastique protectrice Remove protective plastic film SUITE / CONTINUED 90° 90°...
- Page 22 SUITE / CONTINUED SUITE / CONTINUED FORET 1/8" 1 8 DRILL BIT...
- Page 23 SUITE / CONTINUED Mortar FLOOR/PLANCHER Base / Base Pellicule / Film Mor?er / Mortar FLOOR/PLANCHER SUITE / CONTINUED IMPORTANT VUE SECTIONNELLE / SIDE SECTION VIEW...
- Page 24 SUITE / CONTINUED 20~30mm ATTENTION ! Attendre 24h avant d'installer votre porte de douche, afin de permettre au mortier et à la finition de sécher complètement. WARNING ! Wait 24h before proceeding with the installa-tion of the shower door. This will ensure that the finish and mortar Céramiques Tiles...
-
Page 25: Garantie
GARANTIE Votre base de douche Bain Dépôt est garantie contre tout défauts de fabrication à partir de la date de la livraison. Cette garantie de un (1) an couvre la structure de fibre de verre ( 1 an ) et la finition d’acrylique ( 1 an ). Cette garantie s’adresse seulement au propriétaire original. -
Page 26: Warranty
WARRANTY Your Bath Depot shower base is guaranteed against any manufacturing defect from the date of delivery. This guarantee covers the fiberglass structure for a duration of one (1) year, the acrylic finish for one (1) year. This guarantee applies to the original owner. It covers parts for the first year. This guarantee does not cover travel expenses or installation fees, nor does it cover desinstallation fees of transportation.
Need help?
Do you have a question about the PN-RT3434 and is the answer not in the manual?
Questions and answers