
Related Manuals for Halma Ampac TITANUS MICRO-SENS


Summary of Contents for Halma Ampac TITANUS MICRO-SENS
- Page 1 Fire detection and evacuation solutions that save lives. Aspirating smoke detector TITANUS MICRO·SENS® Technical Manual MAN3186...
-
Page 2: Table Of Contents
MAN3186 - TITANUS MICRO•SENS® Contents 1 General information ............................ 6 Introduction ............................6 Safety notices........................... 6 1.2.1 Personal injury........................7 1.2.2 Material and environmental damage ..................7 1.2.3 Other notices ......................... 7 Warranty ............................8 Copyright............................8 Packaging ............................9 Environmental protection ........................ - Page 3 MAN3186 - TITANUS MICRO•SENS® 5 Project planning ............................64 General information ........................64 5.1.1 Laws, standards and guidelines ................... 65 5.1.2 Pipe system ......................... 66 5.1.3 Air flow monitoring ....................... 71 5.1.4 Sensitivity ..........................72 5.1.5 Project planning limits ......................73 Project planning guidelines ......................
- Page 4 MAN3186 - TITANUS MICRO•SENS® 6.20 Installing the air filter or special filter ..................... 154 6.20.1 Installing air filter type LF-AD or LF-AD-x ................155 6.20.2 Installing special filter type SF-400/650 ................157 6.20.3 Installing a combination of air filter and special filter ............158 6.21 Installation of air return .........................
- Page 5 MAN3186 - TITANUS MICRO•SENS® Replacing filter elements in the device base .................. 210 Replacing the filter elements of air filter type LF-AD-x ..............211 Replacing the filter elements of special filter type SF-400 / 650 ............. 212 Checking the air flow sensor calibration ..................213 8.10 Checking ROOM·IDENT and response indicators .................
-
Page 6: General Information
MAN3186 - TITANUS MICRO•SENS® 1 General information This document contains important information on the function and on the project planning for the intended use. 1.1 Introduction This technical manual is intended for installers of fire alarm systems. It primarily includes engineers, fitters, service technicians etc. who have expertise in the field of fire alarm technology, but might be working with this device for the first time. -
Page 7: Personal Injury
MAN3186 - TITANUS MICRO•SENS® 1.2.1 Personal injury DANGER Type and source of hazard ... indicates an immediately dangerous situation that leads to death or serious injury if it is not avoided. WARNING Type and source of hazard ...indicates a possibly dangerous situation that leads to death or serious injury if it is not avoided. -
Page 8: Warranty
MAN3186 - TITANUS MICRO•SENS® LITERATURE ...indicates further documentation. 1.3 Warranty The document is subject to technical modifications without prior announcement and makes no claim to completeness. The "delivery and installation conditions" of WAGNER Group GmbH apply as a matter of principle. No warranty and liability claims can be applied for personal injury and material damages if these were caused by one or more of the following factors: ▪... -
Page 9: Packaging
MAN3186 - TITANUS MICRO•SENS® 1.5 Packaging NOTE Environmental damage caused by incorrect disposal Incorrect disposal of the packaging materials may pose risks to the environment. Packaging materials are valuable raw materials and can be re-used in many cases or treated and recycled. ►... -
Page 10: Instructions For The User
MAN3186 - TITANUS MICRO•SENS® 1.7 Instructions for the user Regular visual inspections and functional tests must be carried out to ensure the system remains functional. Such tests are an integral part of the system documentation and must be set out by the installer of the system in accordance with the system parameters. -
Page 11: Product Description
MAN3186 - TITANUS MICRO•SENS® 2 Product description You will find the characteristics and application areas in this chapter. 2.1 Characteristics The TITANUS MICRO·SENS® belongs to the group of tried and tested aspirating smoke detectors of WAGNER Group GmbH. In addition to monitoring rooms and equipment, the TITANUS MICRO·SENS®... - Page 12 MAN3186 - TITANUS MICRO•SENS® In addition, a dynamic air flow sensor system can be activated in the diagnostic software. This sensitises the device to quick changes in the air flow, e.g. in the event the aspiration apertures are suddenly covered. An air flow fault is already triggered at an air flow deviation of approx.
- Page 13 MAN3186 - TITANUS MICRO•SENS® Aspiration apertures The pipe system aspiration apertures require a specifically defined opening diameter, depending on the project specifications. WAGNER Group GmbH has developed aspiration-reducing film sheets with sleeves and aspiration- reducing clips in order to achieve these precise aspiration apertures. These not only allow convenient assembly, but also prevent "whistling"...
-
Page 14: Areas Of Application
MAN3186 - TITANUS MICRO•SENS® 2.2 Areas of application The TITANUS MICRO·SENS® is an aspirating smoke detector used for the protection of rooms, facilities and air conditioning ducts. Principle Air samples are taken from the monitoring area using a pipe system with defined aspiration apertures and supplied to the detection unit. - Page 15 MAN3186 - TITANUS MICRO•SENS® Room monitoring The TITANUS MICRO·SENS® is suitable for the monitoring of rooms with, e.g. ▪ Raised floors, suspended ceilings ▪ Tunnels, channels, difficult to access cavities ▪ Warehouses, refrigerated warehouses, lift shafts ▪ Museums, cultural facilities ▪...
- Page 16 MAN3186 - TITANUS MICRO•SENS® Room monitoring with air- Room monitoring is performed: conditioning ▪ in server rooms with air conditioning ▪ on ventilation ducts ▪ over raised floors, suspended ceilings ▪ in IT rooms, e‑distributor rooms, transformer cells ▪ on air conditioning units ▪...
- Page 17 MAN3186 - TITANUS MICRO•SENS® System monitoring The TITANUS MICRO·SENS® is also suitable for the monitoring of un- ventilated and forced-ventilated units/cabinets, e.g.: ▪ Distribution cabinets, switching cabinets ▪ Telephone exchange installations ▪ Measuring and control systems Image 3: Principle of equipment monitoring The TITANUS MICRO·SENS®...
-
Page 18: Technical Description
MAN3186 - TITANUS MICRO•SENS® 3 Technical description In this chapter, you will find the overviews of all components and functional descriptions. 3.1 System description The TITANUS MICRO·SENS® comprises the detection unit, device base and pipe system. The most important component of the TITANUS MICRO·SENS® is the sensitive detection unit. -
Page 19: Function
MAN3186 - TITANUS MICRO•SENS® Extensive accessories (e.g. integrated air filter, various external air filters or air purge system) are available in order to ensure safe operation even under the most difficult conditions (e.g. recycling areas). For applications with special safety requirements, a TITANUS MICRO·SENS® version with a redundant fan can be used. - Page 20 MAN3186 - TITANUS MICRO•SENS® After a programmable delay time has elapsed, the fault is displayed on the TITANUS MICRO·SENS® and a corresponding fault message is forwarded via a fault contact to any connected FDCP. The trigger thresholds for the monitoring window can be adapted to the ambient conditions. Trigger threshold Target value...
- Page 21 MAN3186 - TITANUS MICRO•SENS® during operation without triggering an air flow fault. Only if the selected air flow threshold is exceeded will the air flow fault be reported by the unit and can be transmitted. Functional monitoring The detection unit is monitored for contamination and signal faults. Faults are displayed on the TITANUS MICRO·SENS®...
- Page 22 MAN3186 - TITANUS MICRO•SENS® Phase 1 The TITANUS MICRO·SENS® draws in air samples from the monitoring area in the general operating state and evaluates them for the presence of smoke particles. Image 5: Phase 1 ROOM IDENT in the general operating state Phase 2 As soon as the system has switched to the alarm state as a result of a rise in the concentration of smoke particles typical of a fire, the alarm is triggered.
- Page 23 MAN3186 - TITANUS MICRO•SENS® Phase 3 With the alarm or with the function "Main alarm after ROOM IDENT", and after the adjustable pre-alarm threshold has been reached, the aspiration fan switches off and a second fan purges the pipe system of smoke particles in the opposite direction.
-
Page 24: Layout And Accessory Components
MAN3186 - TITANUS MICRO•SENS® For units where the function "Main alarm after ROOM IDENT" is activated, the alarm is now triggered. Resetting via FDCP Alarm and fault messages are reset via a connected fire detection control panel. A reset circuit board can be optionally used if, in case of operation of the TITANUS MICRO·SENS®... -
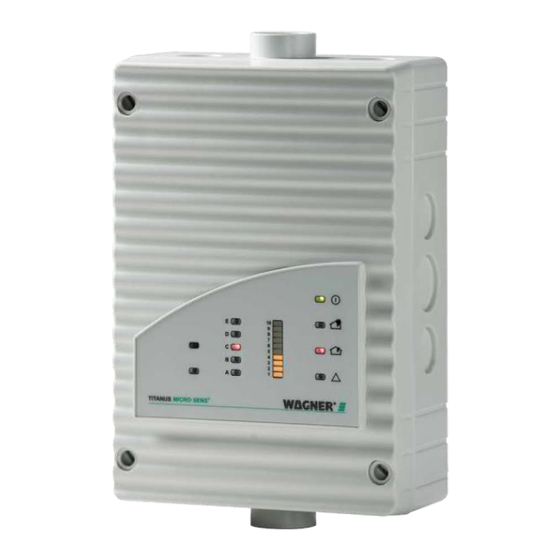
Page 25: Device
MAN3186 - TITANUS MICRO•SENS® 1 Pipe system 2 TITANUS MICRO·SENS® 3 Air return 4 Fire alarm cable (FDCP/power supply or to the next unit) 5 Indicator bus* 6 Detector box* 7 Front film sheet for remote display* 8 Remote display* 9 Response indicator* 10 Diagnostic tool 11 Test pipe*... - Page 26 MAN3186 - TITANUS MICRO•SENS® ▪ Aspiration unit with optimised air ducting ▪ Visual displays for smoke level , main alarm, pre-alarm , fault, operation and localisation of the fire site ▪ Infrared interface for diagnostic tool optional Image 10: Displays and connections Item Function Description Cable gland for fire alarm cable...
- Page 27 MAN3186 - TITANUS MICRO•SENS® Image 11: Front film sheet of TITANUS MICRO·SENS® Item Function Description Front film sheet Infrared interface Commissioning and fault diagnostics Fire site localisation A-E Alarm location display (5x red LED) Smoke level indicator Current smoke level (Bar graph, 10x yellow LED) Operation (green LED) Operating indicator...
-
Page 28: Reset Circuit Board
MAN3186 - TITANUS MICRO•SENS® 3.2.3 Reset circuit board Image 12: Reset circuit board The TITANUS MICRO·SENS® enables the use of maximum one optional reset circuit board. The optional reset circuit board is used to reset alarm and fault messages on the device in case of resetting of a collective detection line via a fire detection control panel. -
Page 29: Diagnostic Tool
MAN3186 - TITANUS MICRO•SENS® 3.2.4 Diagnostic tool Image 13: Diagnostic tool It is advisable to read out, check and archive the commissioning statuses. The device configuration for the TITANUS MICRO·SENS® can be changed during commissioning using the diagnostic tool. For maintenance and service, the diagnostic software offers the option to display the stored and current device state as well as fault messages of the TITANUS MICRO·SENS®... -
Page 30: Detector Box
MAN3186 - TITANUS MICRO•SENS® 3.2.5 Detector box External detector boxes can be installed in the pipe system in conjunction with the TITANUS MICRO·SENS®. The detector box can be used in order to ... ▪ ... set up dual detection dependency. ▪... - Page 31 MAN3186 - TITANUS MICRO•SENS® air intake Image 15: Functional principle of detector box (localisation and elevation of the response sensitivity) 1 TITANUS MICRO·SENS® 2 Pipe system 3 Detector box 4 Aspiration aperture LITERATURE You will find more information in the technical manual "TITANUS MICRO·SENS®...
- Page 32 MAN3186 - TITANUS MICRO•SENS® – Infrared interface for diagnostics Image 16: Detector box 1 Detector box 2 Cable glands 8x M20 3 Cable glands 6x M25 4 Front film sheet 5 Pipe connection 6 Membrane cable entries 1x M20 (enclosed with device base pack) 7 Membrane cable entries 2x M25 (enclosed with device base pack)
- Page 33 MAN3186 - TITANUS MICRO•SENS® Image 17: Front film sheet of the detector box Item Components Description Infrared interface Commissioning and fault diagnostics Smoke level display Current smoke level (bargraph, 10x yellow LED) Operation (green LED) Operating indicator Main alarm (red LED) 100% smoke level Pre-alarm (red LED) 66% smoke level...
-
Page 34: Network Module
MAN3186 - TITANUS MICRO•SENS® 3.2.6 Network module Image 18: Network module type NU-2 With the network modules, multiple network-capable aspirating smoke detectors can be connected to a network and log data and status information recorded for all aspirating smoke detectors equipped with a network module. A special network module is available for deep-freeze applications. - Page 35 MAN3186 - TITANUS MICRO•SENS® When an incident occurs (e.g. a threshold is exceeded), an alert or a fault message is sent to a managing entity or directly to another network participant via what is referred to as SNMP traps. Data logger (optional) An integrated data logger is used to record event data (alarms and faults) and log data (smoke level, air flow, air flow temperature or detection status) of the TITANUS MICRO·SENS®.
-
Page 36: Remote Display
MAN3186 - TITANUS MICRO•SENS® 3.2.7 Remote display Image 19: Remote display for wall mounting The TITANUS MICRO·SENS® offers connection options for one or more remote displays. The displays on the remote display are identical to those on the detection unit. Connection is made on the device base of the TITANUS MICRO·SENS®. -
Page 37: Response Indicator
MAN3186 - TITANUS MICRO•SENS® 3.2.8 Response indicator Image 20: Response indicator type DJ-TM When using the TITANUS MICRO·SENS® with localisation of the fire site, up to five addressable response indicators can be used via the indicator bus. The response indicator can be connected up to a distance of 1000 m. -
Page 38: Pipe System
MAN3186 - TITANUS MICRO•SENS® 3.3 Pipe system The pipe system serves to take air samples from the monitoring area. 3.3.1 Entire overview of available pipe components Image 21: Available pipe system components... - Page 39 MAN3186 - TITANUS MICRO•SENS® 1 Special filter type SF-650 2 Condensate separator type KA-DN-25 3 Condensate separator type KA-1 4 T-piece 5 Curve 90° 6 Ceiling feed-through set (3-part) 7 Sleeve 8 Double screw connection 9 90° angle 10 45° angle 11 Reducing coupling 12 Aspiration hose 13 Non-return valve...
-
Page 40: Air Purge System
MAN3186 - TITANUS MICRO•SENS® 3.3.2 Air purge system NOTE Damage of aspiration‑reducing film sheets due to purging If air purge systems are used, aspiration‑reducing film sheets can be damaged or detached in the purging process. ► Use aspiration‑reducing clips with appropriate aspiration reductions. In monitoring areas where an increased occurrence of dust particles or freezing is to be expected, it may be necessary to purge the pipe system and its aspiration apertures with compressed air. - Page 41 MAN3186 - TITANUS MICRO•SENS® Image 22: Manual air purge system with 3-way ball valve made of ABS or PVC 1 TITANUS MICRO·SENS® 2 Pipe system 3 3‑way ball valve (ABS/PVC) A Compressed air B Air flow for purging...
- Page 42 MAN3186 - TITANUS MICRO•SENS® Image 23: Manual air purge system with metal 3-way ball valve 1 TITANUS MICRO·SENS® 2 Pipe system 3 3‑way ball valve (metal) A Compressed air B Air flow for purging...
- Page 43 MAN3186 - TITANUS MICRO•SENS® Image 24: Components of automatic air purge system 1 TITANUS MICRO·SENS® 2 Pipe system 3 2/2‑way valve, shut-off valve complete 4 Valve controller 5 To FDCP 6 2/2‑way valve, compressed air valve complete 7 Aspiration pipe 20x1.5 mm 8 Reducer 9 Quick-action coupling sleeve with fittings A Air flow for purging...
-
Page 44: Aspiration Apertures
MAN3186 - TITANUS MICRO•SENS® 3.3.3 Aspiration apertures 3.3.3.1 Aspiration‑reducing film sheets Image 25: Aspiration aperture, aspiration-reducing film sheet and marking tape 1 Aspiration-reducing film sheet 2 Air sampling pipe (pipe system) 3 Aspiration aperture Ø 25/64" (10 mm) 4 Marking tape An aspiration aperture is a 10 mm drill hole in the aspiration pipe which is covered with an aspiration‑reducing film sheet with the required opening diameter. - Page 45 MAN3186 - TITANUS MICRO•SENS® The aspiration‑reducing film sheet is secured with a sleeve to prevent it from loosening. The sleeve is a transparent adhesive film with red edges and a 10 mm hole. It is adhered on top of the aspiration‑reducing film sheet in such a way that the aspiration aperture is not covered and is also visible from greater distances.
- Page 46 MAN3186 - TITANUS MICRO•SENS® The aspiration reducers with plastic clips are to be preferred to aspiration‑reducing film sheets with sleeves for project planning in areas with ambient impacts that require air purging (e.g. dust). The plastic clips are more stable when pressure is applied and the cleaning effect is significantly better due to the elastic rubber inserts.
-
Page 47: Ceiling Feed-Through
MAN3186 - TITANUS MICRO•SENS® 3.3.4 Ceiling feed-through air intake Image 27: Ceiling feed-through 1 Ceiling 2 Pipe system 3 T-piece (pipe hood) 4 Capillary hose 5 Suspended ceiling 6 Aspiration aperture 7 Ceiling feed‑through (hose nozzle, nut and ceiling feed‑through) 8 Aspiration‑reducing film sheet Aesthetics Fitting in suspended ceilings is possible if concealed installation of the pipe... - Page 48 MAN3186 - TITANUS MICRO•SENS® Image 28: Ceiling feed-throught with upstream aspiration‑reducing film sheet 1 Pipe system 2 T‑piece (pipe hood) 3 Aspiration‑reducing film sheet 4 Hose nozzle 5 Capillary hose 6 Suspended ceiling The aspiration hoses (capillary hoses) with upstream aspiration reduction in the T-pieces (pipe hoods) can be used for concealed installation in e.g.
-
Page 49: Air Filter And Special Filter
MAN3186 - TITANUS MICRO•SENS® 3.3.5 Air filter and special filter Image 29: Air and special filter 1 TITANUS MICRO·SENS® 2 Special filter SF-650 3 Air filter LF-AD-x 4 Special filter SF-400 5 Direction of flow In monitoring areas with disturbing ambient influences (e.g. dust), an air or special filter is to be used to protect the TITANUS MICRO·SENS®. - Page 50 MAN3186 - TITANUS MICRO•SENS® Special filter type SF‑x In case of excessive dirt, special filter type SF‑400 or type SF‑650 with a larger surface is available. The special filter ensures reliable filtration of dust and dirt particles. The particles are reliably separated and permanently withheld by the filter medium.
- Page 51 MAN3186 - TITANUS MICRO•SENS® LF-AD LF-AD LF-AD LF-AD ® TITANUS Image 31: Air filter type LF-AD in multiple aspiration branches To extend maintenance intervals, one air filter can be installed in each outgoing branch instead of one in the main aspiration branch. The same project planning specifications as defined in the annexed project planning table apply.
- Page 52 MAN3186 - TITANUS MICRO•SENS® LF-AD LF-AD LF-AD LF-AD ® TITANUS Image 32: Air filter type LF-AD in the main aspiration branch Moreover, multiple air filters can be installed in parallel in the main aspiration branch to extend the maintenance intervals. For this purpose, the main aspiration branch must be partitioned into two or several branches and each equipped with the same air filter or air filter combination.
-
Page 53: Air Return For Pressure Differences And Air Pollution
MAN3186 - TITANUS MICRO•SENS® 3.3.6 Air return for pressure differences and air pollution air intake Image 33: Principle of the air return 1 Pipe system 2 TITANUS MICRO·SENS® 3 Air return If the TITANUS MICRO·SENS® and pipe system are installed in two areas P1 and P2 with different air pressure, return of the suction air into the pipe system pressure area is required. - Page 54 MAN3186 - TITANUS MICRO•SENS® Image 34: Air return 1 Aspiration pipe 2 TITANUS MICRO·SENS® 3 Air return 4 Direction of flow The air return pipe is mounted in the conical pipe connection for the air return of the TITANUS MICRO·SENS®. A secure hold is ensured due to the precise fit of the air return pipe.
-
Page 55: Silencer
MAN3186 - TITANUS MICRO•SENS® 3.3.7 Silencer Image 35: Installing a silencer 1 TITANUS MICRO·SENS® 2 Direction of flow 3 Silencer type SD-1 By using the silencer type SD-1, the noise level can be reduced by up to 10 dB(A) for use in areas in which low noise emissions of the TITANUS MICRO·SENS®... -
Page 56: Condensate Separator
MAN3186 - TITANUS MICRO•SENS® 3.3.8 Condensate separator If the TITANUS MICRO·SENS® is operated in environments where condensate can form in the pipe system, a condensate separator is used. To collect the condensate, the condensate separator is mounted at the lowest point of the pipe system upstream of the air filter and TITANUS MICRO·SENS®. - Page 57 MAN3186 - TITANUS MICRO•SENS® Image 37: Condensate seperator type KA-1 1 Condensate separator type KA-1 2 Aspiration pipe 3 TITANUS MICRO·SENS® 4 Air filter type LF-AD-x Automatic condensate separation is possible due to a capillary effect thanks to an integrated cotton wick. The condensate separator can be operated within a temperature range of 0 °C ...
-
Page 58: Technical Data
MAN3186 - TITANUS MICRO•SENS® 4 Technical data You will find the technical data in this chapter. 4.1 Device TITANUS MICRO·SENS® Voltage supply 16 … 30 Supply voltage (Ue) [V] Nominal supply voltage [V DC] Current consumption All current consumptions specified refer to an ambient temperature of 20 °C and a supply voltage of 24 V. -
Page 59: Accessories
MAN3186 - TITANUS MICRO•SENS® Temperature range -20 … +60 [°C] -40 … +60 Deep freeze version [°C] Humidity Non-condensing [% RH] Max. 95 (non-condensing) Design Axial Fan service life (12 V) 60,000 h at 24 °C Displays on the device Operation Green LED Alarm... -
Page 60: Detector Box
MAN3186 - TITANUS MICRO•SENS® 4.2.1 Detector box Voltage supply 15 … 30 Supply voltage (Ue) [V] Nominal supply voltage [V DC] Current consumption All current consumptions specified refer to an ambient temperature of 20 °C and a supply voltage of 24 V. Standby mode [mA] Alarm mode, device without bargraph [mA]... -
Page 61: Remote Displays
MAN3186 - TITANUS MICRO•SENS® 0.1 … 2.0 DM-MB-TMx-x-10 [% light obscuration/m] 0.5 … 2.0 DM-MB-TMx-x-50 [% light obscuration/m] 4.2.2 Remote displays Voltage 15 … 30 Supply voltage (Ue) [V] Nominal supply voltage [V DC] Current All current consumptions specified refer to an ambient temperature of 20 °C. Standby mode [mA] Max. -
Page 62: Response Indicator
MAN3186 - TITANUS MICRO•SENS® 4.2.3 Response indicator Voltage supply Supply voltage (Ue) [V] 15 - 30 Nominal supply voltage [V DC] Current consumption All current consumptions specified refer to an ambient temperature of 20 °C and a supply voltage of 24 V. Standby mode [mA] Flashing light [mA] Permanent light [mA]... -
Page 63: Network Module
MAN3186 - TITANUS MICRO•SENS® 4.2.6 Network module Current consumption All current consumptions specified refer to an ambient temperature of 20 °C and a supply voltage of 24 V. [mA] Max. 50 Temperature range -20 … +60 [°C] -40 … +60 Deep freeze version [°C] 4.3 Pipe system Max. -
Page 64: Project Planning
MAN3186 - TITANUS MICRO•SENS® 5 Project planning You will find information for the project planning of a TITANUS MICRO·SENS® with the corresponding pipe system in this chapter. 5.1 General information The project planning of the TITANUS MICRO·SENS® according to AS ISO 7240‑20 is described below. -
Page 65: Laws, Standards And Guidelines
MAN3186 - TITANUS MICRO•SENS® 5.1.1 Laws, standards and guidelines The basic principles for the project planning of a TITANUS MICRO·SENS® can be found in the following laws, standards and guidelines. In addition to these laws, standards and guidelines, the corresponding national laws, standards and guidelines must be observed and the project planning must be adapted to these specifications. -
Page 66: Pipe System
MAN3186 - TITANUS MICRO•SENS® 5.1.2 Pipe system When planning the pipe system, it must be ensured that reliable fire detection is guaranteed for any fire present in an installation or in a monitored area. The number of aspiration apertures and the design of the pipe system depend on the size and geometry of the monitoring area. - Page 67 MAN3186 - TITANUS MICRO•SENS® I-pipe system U-pipe system M-pipe system Double U-pipe system Image 38: Pipe configurations...
- Page 68 MAN3186 - TITANUS MICRO•SENS® Symmetry of the pipe system The following conditions are applicable to extract consistent air samples via all aspiration apertures: ▪ The length of the shortest branch and the length of the longest branch must not exceed a ratio of 1:2. ▪...
- Page 69 MAN3186 - TITANUS MICRO•SENS® Calculation The diameters of the aspiration apertures for an asymmetrical U‑pipe system are determined as specified below: Number of aspiration apertures = total number of aspiration apertures of the respective branch * number of branches in the pipe system The result and the table of the corresponding pipe shape of the pipe system yield the individual diameters of the aspiration apertures for the respective branch (see chapter "Determining the diameter of the aspiration apertures").
- Page 70 MAN3186 - TITANUS MICRO•SENS® Change of direction A change of direction in the pipe system can increase the flow resistance. A gentle change of direction (e.g. by means of 90° elbows) is already permissible in the scope of project planning in accordance with AS ISO 7240‑20 and need not be taken into further consideration.
-
Page 71: Air Flow Monitoring
MAN3186 - TITANUS MICRO•SENS® 5.1.3 Air flow monitoring AS ISO 7240‑20 requires the detection of a 20% change in the total air flow of the pipe system. In order to accomplish this, the triggering threshold of the air flow sensor system must be set to ≤ 20%. We recommend performing an air pressure-dependent air flow calibration in this setting. -
Page 72: Sensitivity
MAN3186 - TITANUS MICRO•SENS® If the TITANUS MICRO·SENS® and pipe system are located in areas with different air pressure, return of the suction air into the pipe system pressure area must be provided (see chapter "Project planning with air return"). TITANUS MICRO·SENS®... -
Page 73: Project Planning Limits
MAN3186 - TITANUS MICRO•SENS® 5.1.5 Project planning limits The following limit values must always be observed for the TITANUS MICRO·SENS®: ▪ The minimum pipe length between two aspiration apertures is 4 m (with simplified project planning 0.1 m) ▪ The minimum pipe length between two aspiration apertures for localising the fire site is 3 m. -
Page 74: Project Planning Guidelines
MAN3186 - TITANUS MICRO•SENS® 5.2 Project planning guidelines The knowledge of specific factors is essential in order to carry out project planning in accordance with AS ISO 7240‑20. These are the requirements for the sensitivity of the system, the number of aspiration apertures and the accessories necessary for the corresponding application. -
Page 75: Detailed Pipe Accessories
MAN3186 - TITANUS MICRO•SENS® 5.2.2 Detailed pipe accessories Air filter Type Application Examples LF-AD Coarse filter to separate Dusts, insects, fibres, particles ≳15 µm hairs, fly ash, pollen Table 12: Air filter – type and areas of application Type Examples SF-400 Fine filter for separating As LF-AD, additionally: fine dust... -
Page 76: Procedure For Pipe Project Planning
MAN3186 - TITANUS MICRO•SENS® 5.2.3 Procedure for pipe project planning The following project planning tables are available in the appendix for project planning and for planning pipe systems for each previously selected pipe accessory. ▪ Project planning without filter ▪ Project planning with air filter LF‑AD ▪... - Page 77 MAN3186 - TITANUS MICRO•SENS® Procedure In the following example, project planning with air filter type LF-AD-1 and four aspiration apertures, without any other accessories, should comply with class B. The red arrows show the possible project planning for different pipe shapes.
- Page 78 MAN3186 - TITANUS MICRO•SENS® Classifica�on of TITANUS MICRO·SENS® and MICRO·SENS®-LSNi Project planning with air filter type LF-AD-1 Number of aspira�on apertures Module Sensi�vity [% Lt/m] DM-TM-10 DM-TM-50 Number of aspira�on apertures Pipe shape Fan voltage [V] without pipe accessories or with detector box ≥...
-
Page 79: Determination Of Aspiration Aperture Diameter
MAN3186 - TITANUS MICRO•SENS® Results: The following detection units can be optionally used with the corresponding settings for class B or A: ▪ Detection unit DM-TMx-xx-10-x with a sensitivity of 0.1 to 0.6 % light obscuration/m ▪ Detection unit DM-TMx-xx-50-x with a sensitivity of 0.5 or 0.6 % light obscuration/m Possible system parameters: ▪... - Page 80 MAN3186 - TITANUS MICRO•SENS® 5.2.4.2 U-pipe system TITANUS MICRO·SENS® Image 44: U-pipe system Number of aspiration apertures Ø aspiration aperture [mm] Table 19: Diameter of aspiration apertures, U-pipe Punching diameter of the aspiration‑reducing film sheet 5.2.4.3 M-pipe system TITANUS MICRO·SENS® Image 45: M-pipe system Number of aspiration apertures...
- Page 81 MAN3186 - TITANUS MICRO•SENS® 5.2.4.4 Double U-pipe system TITANUS MICRO·SENS® Image 46: Double U-pipe system Number of aspiration apertures Ø aspiration aperture [mm] Table 21: Diameter of aspiration apertures, double U-pipe Punching diameter of the aspiration‑reducing film sheet...
-
Page 82: Special Project Planning
MAN3186 - TITANUS MICRO•SENS® 5.3 Special project planning The following are considered special project planning: ▪ Project planning for single hole monitoring ▪ Simplified pipe project planning ▪ Project planning with stubs ▪ Project planning for forced air flow ▪ Project planning with aspiration hose ▪... - Page 83 MAN3186 - TITANUS MICRO•SENS® 5.3.1.1 I-pipe system TITANUS MICRO·SENS® Image 47: I-pipe system for room monitoring Limit values Min. distance between device to first aspiration aperture Max. distance between device to first aspiration aperture 20 m Max. overall pipe length of pipe Ø 25 mm 40 m Max.
- Page 84 MAN3186 - TITANUS MICRO•SENS® Number of aspiration apertures 1 blocked aspiration aperture ±25% ±15% ±10% 2 blocked aspiration apertures ±20% ±15% 3 blocked aspiration apertures 4 blocked aspiration apertures 5 blocked aspiration apertures … detected with main air flow set to x% Table 24: I-pipe system triggering thresholds - not possible O not feasible...
- Page 85 MAN3186 - TITANUS MICRO•SENS® 5.3.1.2 U-pipe system TITANUS MICRO·SENS® Image 48: U-pipe system for room monitoring Limit values Min. distance between device and T-piece Max. distance between device and T-piece 20 m Max. branch lengths 25 m Max. overall pipe length of pipe Ø 25 mm 50 m Max.
- Page 86 MAN3186 - TITANUS MICRO•SENS® Number of aspiration apertures 1 blocked aspiration aperture ±20% ±10% 2 blocked aspiration apertures ±20% ±15% ±10% 3 blocked aspiration apertures ±25% ±20% 4 blocked aspiration apertures ±30% 5 blocked aspiration apertures 6 blocked aspiration apertures 7 blocked aspiration apertures …...
- Page 87 MAN3186 - TITANUS MICRO•SENS® 5.3.1.3 M-pipe system TITANUS MICRO·SENS® Image 49: M-pipe system for room monitoring Limit values Min. distance between device and T-piece Max. distance between device and T-piece 20 m Max. branch lengths 16.5 m Max. overall pipe length of pipe Ø 25 mm 50 m Max.
- Page 88 MAN3186 - TITANUS MICRO•SENS® Number of aspiration apertures 1 blocked aspiration aperture ±25% ±10% 2 blocked aspiration apertures ±25% 3 blocked aspiration apertures 4 blocked aspiration apertures 5 blocked aspiration apertures 6 blocked aspiration apertures Table 30: M-pipe system trigger thresholds - not possible O not feasible NOTE...
- Page 89 MAN3186 - TITANUS MICRO•SENS® 5.3.1.4 Double U-pipe system TITANUS MICRO·SENS® Image 50: Double U-pipe system for room monitoring Limit values Min. distance between device and T-piece Max. distance between device and T-piece 20 m Max. branch lengths 12.5 m Max. overall pipe length of pipe Ø 25 mm 50 m Max.
-
Page 90: Simplified Project Planning
MAN3186 - TITANUS MICRO•SENS® Number of aspiration apertures 1 blocked aspiration aperture ±10% 2 blocked aspiration apertures ±25% ±10% 3 blocked aspiration apertures ±20% 4 blocked aspiration apertures ±30% 5 blocked aspiration apertures 6 blocked aspiration apertures Table 33: Double U-pipe system triggering thresholds - not possible O not feasible NOTE... - Page 91 MAN3186 - TITANUS MICRO•SENS® 5.3.2.1 I-pipe system TITANUS MICRO·SENS® Image 51: I-pipe system, e.g. equipment monitoring Limit values Min. distance between device to first aspiration aperture Max. distance between device to first aspiration aperture 20 m Max. overall pipe length of pipe Ø 25 mm 40 m Max.
- Page 92 MAN3186 - TITANUS MICRO•SENS® 5.3.2.2 M-pipe system TITANUS MICRO·SENS® Image 52: M-pipe system, e.g. for equipment monitoring Limit values Min. distance between device and T-piece Max. distance between device and T-piece 20 m Max. branch lengths 16.5 m Max. overall pipe length of pipe Ø 25 mm 50 m Max.
- Page 93 MAN3186 - TITANUS MICRO•SENS® 5.3.2.3 U-pipe system TITANUS MICRO·SENS® Image 53: U-pipe system, e.g. for equipment monitoring Limit values Min. distance between device and T-piece Max. distance between device and T-piece 20 m Max. branch lengths 25 m Max. overall pipe length of pipe Ø 25 mm 50 m Max.
- Page 94 MAN3186 - TITANUS MICRO•SENS® 5.3.2.4 Double U-pipe system TITANUS MICRO·SENS® Image 54: Double U-pipe system, e.g. for equipment monitoring Limit values Min. distance between device and T-piece Max. distance between device and T-piece 20 m Max. branch lengths 12.5 m Max.
-
Page 95: Project Planning With Stubs
MAN3186 - TITANUS MICRO•SENS® 5.3.3 Project planning with stubs Project planning with stubs is suitable to achieve aspiration apertures, which are not located on the main path of a branch. Stub Aspiration aperture Branch Aspiration aperture Capillary tube from Ceiling feed-through Aspiration aperture Image 55: Examples of project planning with stubs (as I-pipe system here) The project planning configurations shown in the diagram for the I‑pipe... - Page 96 MAN3186 - TITANUS MICRO•SENS® Critical length (I For project planning with stubs, it must be ensured that the "critical crit. length" (l ) does not exceed the permissible maximum overall pipe length. crit. The "critical length" with the I‑pipe system is defined as the distance between the TITANUS MICRO·SENS®...
- Page 97 MAN3186 - TITANUS MICRO•SENS® Intervals of the aspiration The permissible min. and max. distance (d) between the aspiration apertures apertures must be taken into account, depending on the type of project planning. Image 58: Intervals of the aspiration apertures Depending on the type of project planning, the following threshold values apply for the intervals between the aspiration apertures as well as for the intervals between the T‑piece and the first aspiration aperture of the following stub:...
- Page 98 MAN3186 - TITANUS MICRO•SENS® Maximum stub length The stub length is the pipe length between a T-piece (as outlet of a stub) and the last aspiration aperture of the connected stub. The maximum stub length may not exceed 2x d (maximum distance between two aspiration max.
-
Page 99: Project Planning With Forced Air Flow
MAN3186 - TITANUS MICRO•SENS® 5.3.4 Project planning with forced air flow Air conditioning duct Air conditioning systems are distinguished between low-speed and high- monitoring speed systems. The information listed in this section only applies to low-speed systems. There are insufficient empirical values for high-speed systems. For that reason, smoke tests are to be conducted with air conditioning ducts having flow rates higher than 10 m/s to determine the optimum response characteristics. - Page 100 MAN3186 - TITANUS MICRO•SENS® Installation location The air conditioning duct must be installed as far away as from silencers, air baffles and bends as possible. The reference value for the distance from such obstacles is: at least 3x minimum duct diameter. If it is absolutely necessary to attach the pipe system directly behind silencers, air baffles or bends, the main flow speed areas have to be monitored.
- Page 101 MAN3186 - TITANUS MICRO•SENS® Image 63: Silencer in air-conditioning duct 1 Aspiration pipe 2 Main speed range 3 Sound absorption 4 Suction drill hole 5 Air-conditioning duct The following must be observed when installing pipe systems in air conditioning ducts: ▪...
- Page 102 MAN3186 - TITANUS MICRO•SENS® Air return Min. 2 m Front view Top view Image 64: Air return in the air-conditioning duct 1 Air-conditioning duct 2 Aspiration 3 TITANUS MICRO·SENS® 4 Air return 5 Duct adapter 6 Air flow 7 45° chamfered end The open end of the air return pipe is chamfered at an angle of 45°.
- Page 103 MAN3186 - TITANUS MICRO•SENS® Diameter of aspiration apertures The diameters of the aspiration apertures are obtained from the number of aspiration apertures. The precise value can be found in chapter "Simplified pipeline project planning". The pipe connection is achieved with an end cap without drilling. Arrangement The aspiration apertures must be arranged against the air flow.
-
Page 104: Project Planning With Aspiration Hose
MAN3186 - TITANUS MICRO•SENS® 5.3.5 Project planning with aspiration hose The use of aspiration hoses can make sense if several changes of direction are required in a pipe system over short distances, e.g. to bypass obstacles. The overall aspiration pipe cannot consist of aspiration hose alone. Aspiration reducers must not be attached to aspiration hoses. -
Page 105: Project Planning With Air Return
MAN3186 - TITANUS MICRO•SENS® 5.3.6 Project planning with air return In cases where there are air pressure differences between the area of the TITANUS MICRO·SENS® and the area of the aspiration apertures, air return of the drawn-in sample air into the pressure area of the aspiration apertures may be necessary. -
Page 106: Energy Supply
MAN3186 - TITANUS MICRO•SENS® 5.4 Energy supply NOTE No standard conformity in case of wrong energy supply The energy supply of the TITANUS MICRO·SENS® must be approved in accordance with AS ISO 7240‑4. When configuring the external energy supply, the alarm-ready state and the alarm state of the connected devices are taken into account. - Page 107 MAN3186 - TITANUS MICRO•SENS® Alarm-ready state In the alarm-ready state, the energy supply must ensure that the backup batteries are charged and supply the standby current for: ▪ Connected devices ▪ Any connected accessories To be able to calculate the power supply current that is actually required for the alarm-ready state, the standby current and the charging...
- Page 108 MAN3186 - TITANUS MICRO•SENS® ► Calculate the minimum required battery capacity according to the following formula: Unit Description Variable/ constant Minimum required battery capacity Standby current Required hold-up time Alarm current Required alarm time Safety factor, only consider for hold-up times < 24 h Nominal battery capacity To select the required nominal battery capacity , consider the...
- Page 109 MAN3186 - TITANUS MICRO•SENS® Power supply current Variable Unit Description Power supply current for alarm-ready state Standby current Cable length and wire cross-section Charge current The maximum cable length between the energy supply and the device is calculated based on the conductivity (cable material), the wire cross-section, the maximum current and the permissible drop in voltage on the device supply line.
-
Page 110: Installation
MAN3186 - TITANUS MICRO•SENS® 6 Installation You will find information about installing the TITANUS MICRO·SENS® and the pipe system in this chapter. 6.1 General information The provisions, guidelines and terms listed in the chapter "Project planning" apply. The following must be observed when installing the TITANUS MICRO·SENS®: ▪... -
Page 111: Determination Of Installation Location
MAN3186 - TITANUS MICRO•SENS® 6.2 Determination of installation location When choosing the installation location, you should make sure that … ▪ … the device is not situated in the immediate vicinity of opening areas (e.g. doors). ▪ … the displays are clearly visible. ▪... -
Page 112: Installation Of Device
MAN3186 - TITANUS MICRO•SENS® 6.3 Installation of device Image 67: Mounting orientation 1 Aspiration pipe 2 Angled pipe 3 Air return 4 TITANUS MICRO·SENS® with top air outlet 5 TITANUS MICRO·SENS® with bottom air outlet The device can be installed with the air inlet pointing up or down. Rotate the cover accordingly by 180°. - Page 113 MAN3186 - TITANUS MICRO•SENS® Rotating the cover or detection unit Image 68: Rotate the cover of the detection unit ► Loosen the four screws. ► Rotate the detection unit by 180°. ► Fasten the detection unit again with the four screws.
- Page 114 MAN3186 - TITANUS MICRO•SENS® Wall mounting Image 69: Drilling distances of the device base (all data in mm) Installation materials Cylinder or flat-head screws ▪ Thread diameter: max. 4 mm ▪ Head diameter: max. 8 mm ► Mark the drilling intervals on a wall. ►...
-
Page 115: Establishing The Electrical Connection
MAN3186 - TITANUS MICRO•SENS® 6.4 Establishing the electrical connection The following steps must be initially performed to prepare the electrical connections: Image 70: Screw terminals in the device base 1 Aspiration pipe connection 2 Device base 3 Terminal block ► Break through the necessary number of cable glands on the device base, e.g. - Page 116 MAN3186 - TITANUS MICRO•SENS® cable glands of the components to be connected and the permissible wire diameters of the terminals in the device base for 0.5 - 2.5 mm² wires. Alarm relay Fault relay Reset + Indicator bus Reset - Image 71: Assigning the screw terminals in the device base Alarm and fault contacts can be used e.g.
- Page 117 MAN3186 - TITANUS MICRO•SENS® Additional housing To install accessory modules, a prefabricated mounting plate is screwed into the additional housing. Image 72: Position of the mounting plate in the device base of the additional housing...
- Page 118 MAN3186 - TITANUS MICRO•SENS® Image 73: Position of the drill holes on the mounting plate of the additional housing 1 Network module 2 Remote display 3 Mounting base for cable ties 4 Relay circuit board RU-1 or RU-2 5a/b Max. two reset circuit boards 6 Reset and disconnect button circuit board...
-
Page 119: Connecting To An Fdcp, With Reset Button
MAN3186 - TITANUS MICRO•SENS® 6.4.1 Connecting to an FDCP, with reset button Device 1 Device n Example Reset button Principle of alarm connection Indicator bus Line termination or output to the next device Resistors are dependent on the connected FDCP. Image 74: Connecting to an FDCP, with reset button 6.5 Inserting and connecting the reset circuit board... - Page 120 MAN3186 - TITANUS MICRO•SENS® The formulas shown for calculation of the standby current and the termination resistor of the detector line take the ideal status of signal evaluation into consideration. Line standby current The standby current of the detector line must be calculated as shown below: Unit Description...
- Page 121 MAN3186 - TITANUS MICRO•SENS® Installation Image 75: Inserting the reset circuit board into the additional housing The following work steps must be performed to install the reset circuit board in the additional housing: ► Use a screwdriver to loosen the four screws on the additional housing. ►...
- Page 122 MAN3186 - TITANUS MICRO•SENS® Device 1 Device n Example Detection unit device base Additional housing Resetting Indicator bus Resistance R must be calculated. Resistors are dependent on the connected FDCP. Detector line Reset circuit board The reset circuit board must be installed after the last device on the line.
-
Page 123: Inserting And Connecting The Reset And Disconnect Button Circuit Board
MAN3186 - TITANUS MICRO•SENS® 6.6 Inserting and connecting the reset and disconnect button circuit board An additional housing is required to install the reset or disconnect button. It must be installed right next to the TITANUS MICRO·SENS®. Image 77: Inserting the reset and disconnect button circuit board into the additional housing To install the reset and disconnect button circuit board, proceed as follows: ►... - Page 124 MAN3186 - TITANUS MICRO•SENS® Example Indicator bus Detection unit device base Additional housing Reset and disconnect button circuit board Resistors are dependent on the connected fire detection control panel. Reset and disconnect button front panel Image 78: Connection with reset and disconnect button ►...
-
Page 125: Inserting And Connecting Relay Module Type Ru-1/Ru-2
MAN3186 - TITANUS MICRO•SENS® 6.7 Inserting and connecting relay module type RU-1/RU-2 A maximum of two relay modules can be connected to the device. An additional housing is required to install each of the relay modules. It must be installed right next to the TITANUS MICRO·SENS®. Image 79: Inserting the relay module into the additional housing To install the relay modules, proceed as follows: ►... - Page 126 MAN3186 - TITANUS MICRO•SENS® ► Perform the wiring according to one of the following circuit diagrams. Observe the permissible cable diameters of the screw connections for the components to be connected and the permissible wire diameters of the terminals in the device base for 0.5 - 2.5 mm² wires. Indicator bus Detection unit device base to the next...
- Page 127 MAN3186 - TITANUS MICRO•SENS® Indicator bus Detection unit device base to the next Additional housing relay module remote display Relay module type RU-2 Main alarm Main alarm Fault Pre-alarm Pre-alarm Image 81: Example: Connection with relay module type RU-2 ► Fasten the cover again with a screwdriver by tightening the four screws on the device cover.
-
Page 128: Inserting And Connecting Network Module
MAN3186 - TITANUS MICRO•SENS® 6.8 Inserting and connecting network module The network module connects the network to the TITANUS MICRO·SENS®. The network should only be set up in consultation with the customer's system administrator(s). Only use a shielded Ethernet cable CAT5 or higher. - Page 129 MAN3186 - TITANUS MICRO•SENS® Image 82: Inserting the network module into the additional housing To install the network module, proceed as follows: ► Loosen the four screws on the additional housing.
- Page 130 MAN3186 - TITANUS MICRO•SENS® ► Attach the spacers (included with the installation kit) on the assembly holes (pos. A) of the mounting plate. Image 83: Fixing points for network module on the mounting plate of additional housing ► Fasten the mounting bases for cable ties to the bottom part of the housing by means of a fastening screw on the mounting plate (pos.
- Page 131 MAN3186 - TITANUS MICRO•SENS® ► For the required wiring, lead the connecting cable(s) (max. 1.5 mm through the prepared cable entries. The cable(s) are secured by the mounting base(s) and cable tie(s). ► Connect the network module as indicated in the following connection diagram.
-
Page 132: Connecting Remote Display
MAN3186 - TITANUS MICRO•SENS® 6.9 Connecting remote display A maximum of two remote displays can be connected to the device. Image 85: Remote display To connect the remote display, proceed as follows: ► Loosen the four screws on the housing cover. ►... - Page 133 MAN3186 - TITANUS MICRO•SENS® ► Perform wiring according to the following circuit diagram. Indicator bus Detection unit device base Remote display housing Next remote display housing Image 86: Connecting the remote display...
-
Page 134: Attaching The Front Film Sheet
MAN3186 - TITANUS MICRO•SENS® 6.9.1 Attaching the front film sheet Image 87: Attaching the front film sheet to the remote display With the remote display, the cable entry can be at the top, bottom or side without having to rotate the cover. For the remote display, a front film sheet with the same information as the TITANUS MICRO·SENS®... - Page 135 MAN3186 - TITANUS MICRO•SENS® ► Perform wiring according to the following circuit diagram. Indicator bus Detection unit device base Response indicator housing Next response indicator housing Image 89: Connection of the response indicator...
- Page 136 MAN3186 - TITANUS MICRO•SENS® ► Example: Address the response indicator according to desired alarm site indication with DIL switch S1 (A corresponds to the aspiration aperture closest to the TITANUS MICRO·SENS®). Additionally, choose between permanent or flashing light. Example 1 Example 2 - Response indicator B - Response indicator E...
-
Page 137: Inserting The Detection Unit In The Device Base
MAN3186 - TITANUS MICRO•SENS® 6.11 Inserting the detection unit in the device base Image 92: Inserting the detection unit NOTE Danger of device damage due to electrostatic discharge Only perform the following work with the device disconnected from the mains. Do not touch the components of the circuit boards without an anti- static set. -
Page 138: General Information On The Pipe System
MAN3186 - TITANUS MICRO•SENS® 6.12 General information on the pipe system The pipes, hoses and fittings used for the pipe system must at least fulfil the requirements of class 1131 in accordance with EN 61386‑1, 2004. Class 1131 defines the following requirements for the pipe system used: Characteristics Severity Compression resistance... - Page 139 MAN3186 - TITANUS MICRO•SENS® The change in length can be calculated with the following formula: ΔL Length alteration in [mm] Length of the pipe to be calculated in [m] ΔT Maximum temperature difference in [°C] δ Coefficient of length alteration in mm/m°C δUPVC = 0.08 mm/m°C δABS = 0.101 mm/m°C Pipe clips...
- Page 140 MAN3186 - TITANUS MICRO•SENS® For monitoring areas with high temperature differences (up to -40 °C), plastic pipe clamps type CLIC-PA are used. These have two fastening points for fixing the pipe: Position 1 (first engaging) Locks the pipe, allowing length extension (used in deep freeze applications). Position 2 (second engaging) Fixes the pipe and does not allow pipe extension.
-
Page 141: Installation Of The Pipe System
MAN3186 - TITANUS MICRO•SENS® 6.13 Installation of the pipe system Aspiration pipe ABS (halogen-free) Aspiration pipe PVC ABSR-2518 R-2519 ABSR-3220 R-3218 ABSR-4025 R-4019 Table 49: Pipe types The pipe system must be installed according to project specifications and taking into account the project planning guidelines (see section "Project planning"). - Page 142 MAN3186 - TITANUS MICRO•SENS® WARNING Risk of injury due to flammable liquids and vapours Formation of explosive/highly flammable vapour/air mixtures is possible. Injuries to health due to direct or indirect contact. ► Prior to processing, observe the safety notes of the manufacturer. ►...
-
Page 143: Installation Of The Aspiration Pipe
MAN3186 - TITANUS MICRO•SENS® 6.14 Installation of the aspiration pipe Image 96: Installation of the aspiration pipe 1 TITANUS MICRO·SENS® 2 Direction of flow 3 Aspiration pipe Never use glue to join the aspiration pipe and the pipe connection. If there are great variations in temperature, the pipe must be attached very close to the device, so that the pipe does not come out of the pipe connection due to fluctuations in length which may occur (see section "Pipe installation"). - Page 144 MAN3186 - TITANUS MICRO•SENS® Air flow reducers must not be attached to the air sampling hose. ► Cut the aspiration hose to length with a metal saw / pipe shears or a pipe cutter (38 mm). ► Deburr the cut edges. ►...
-
Page 145: Installation Of Aspiration Apertures
MAN3186 - TITANUS MICRO•SENS® 6.16 Installation of aspiration apertures Image 97: Aspiration aperture, aspiration-reducing film sheet and marking tape 1 Aspiration-reducing film sheet 2 Air sampling pipe (pipe system) 3 Aspiration aperture Ø 25/64" (10 mm) 4 Marking tape Select the position and size of the aspiration apertures in the pipe system according to the project specifications and taking the project planning guidelines into account (see chapter "Project planning"). - Page 146 MAN3186 - TITANUS MICRO•SENS® WARNING Risk of injury due to flammable liquids and vapours Formation of explosive/highly flammable vapour/air mixtures is possible. Injuries to health due to direct or indirect contact. ► Prior to processing, observe the safety notes of the manufacturer. ►...
-
Page 147: Installation Of Aspiration-Reducing Clips
MAN3186 - TITANUS MICRO•SENS® 6.17 Installation of aspiration‑reducing clips Image 98: Installation of aspiration‑reducing clips Use aspiration‑reducing clips for refrigerated areas and when using air purge systems. For all other applications, use aspiration‑reducing film sheets. ► Drill a hole with a 10 mm drill at right angles to the pipe. ►... - Page 148 MAN3186 - TITANUS MICRO•SENS® ► Fasten the aspiration‑reducer clip centrally over the drill hole. The diameter of the opening in the aspiration‑reducing film sheet must not be changed.
-
Page 149: Installation Of The Ceiling Feed-Through
MAN3186 - TITANUS MICRO•SENS® 6.18 Installation of the ceiling feed-through An aspiration hose 12x9 mm is required for mounting ceiling feed-throughs. The length of the aspiration hose per ceiling feed-through is limited to a maximum of 1 m. 6.18.1 Mounting ceiling feed-through for suspended ceilings Image 99: Overview of ceiling feed-throught components 1 Elbow 90°... - Page 150 MAN3186 - TITANUS MICRO•SENS® The following work steps are required to install a ceiling feed-through: WARNING Risk of injury due to flammable liquids and vapours Formation of explosive/highly flammable vapour/air mixtures is possible. Injuries to health due to direct or indirect contact. ►...
-
Page 151: Installation Of The Ceiling Feed-Through For Special Applications
MAN3186 - TITANUS MICRO•SENS® 6.18.2 Installation of the ceiling feed-through for special applications Image 100: Ceiling feed-throught with upstream aspiration‑reducing film sheet 1 Pipe system 2 T‑piece (pipe hood) 3 Aspiration‑reducing film sheet 4 Hose nozzle 5 Capillary hose 6 Suspended ceiling NOTE Missing monitoring for rupture The capillary hose cannot be monitored for rupture in case of the special... - Page 152 MAN3186 - TITANUS MICRO•SENS® WARNING Risk of injury due to flammable liquids and vapours Formation of explosive/highly flammable vapour/air mixtures is possible. Injuries to health due to direct or indirect contact. ► Prior to processing, observe the safety notes of the manufacturer. ►...
-
Page 153: Installation Of Pipe System On Forced Air Flow Monitoring
MAN3186 - TITANUS MICRO•SENS® 6.19 Installation of pipe system on forced air flow monitoring A forced air flow means the use of ventilating and air-conditioning units. Special pipe project planning must be observed for the monitoring of the ventilation or air conditioning ducts (see chapter "Project planning with forced air flow"). -
Page 154: Detection In The Bypass
MAN3186 - TITANUS MICRO•SENS® 6.19.2 Detection in the bypass Refer to the chapter "Installing the pipe system" and "Air return" for information on connecting the air return. For project planning of TITANUS MICRO·SENS® in these areas, see the chapters "Special project planning" and "Project planning for forced air flow". Image 102: Positioning the air return using the air conditioning duct (bypass) as an example 1 Air-conditioning duct... -
Page 155: Installing Air Filter Type Lf-Ad Or Lf-Ad-X
MAN3186 - TITANUS MICRO•SENS® 6.20.1 Installing air filter type LF-AD or LF-AD-x Installation of air filter type LF-AD and LF-AD-x is identical. Image 103: Air filter type LF-AD and LF‑AD‑x Installation materials Cylinder or flat-head screws ▪ Thread diameter max. 4 mm ▪... - Page 156 MAN3186 - TITANUS MICRO•SENS® ► Mark the drilling intervals on a wall. Ø 4 Image 105: Drilling intervals air filter type LF-AD and LF-AD-x ► Drill the holes according to the size of the suitable installation material (screws/plugs). ► Tighten the four screws by hand. It must be ensured that the device is installed mechanically stress-free.
-
Page 157: Installing Special Filter Type Sf-400/650
MAN3186 - TITANUS MICRO•SENS® 6.20.2 Installing special filter type SF-400/650 Image 106: Installing the special filter 1 Clamp 2 45° angle 3 PVC transition screw connection 4 Special filter type SF-400, SF‑650 To install or uninstall the special filter, use the two PVC transition screw connections on the filter ends. -
Page 158: Installing A Combination Of Air Filter And Special Filter
MAN3186 - TITANUS MICRO•SENS® 6.20.3 Installing a combination of air filter and special filter When using special filter and air filter in combination, the air filter must be installed downstream of the special filter, viewed from the TITANUS MICRO·SENS®. Image 107: Installing air filter and special filter in combination 1 TITANUS MICRO·SENS®... -
Page 159: Installation Of Air Return
MAN3186 - TITANUS MICRO•SENS® 6.21 Installation of air return Image 108: Installation of air return ► Insert the aspiration pipe for air return into the pipe connection of the TITANUS MICRO·SENS® provided for this purpose. A secure hold is achieved because the air return pipe fits precisely into the pipe connection. -
Page 160: Installing A Silencer
MAN3186 - TITANUS MICRO•SENS® 6.22 Installing a silencer A silencer should be installed downstream of the air outlet of a TITANUS MICRO·SENS®. Image 109: Silencer type SD-1 ► Insert the aspiration pipe in the provided pipe connection of the bottom part of the housing. - Page 161 MAN3186 - TITANUS MICRO•SENS® ► Mark the drilling intervals on a wall. Ø 4 Image 111: Drilling intervals for silencer type SD-1 ► Drill the holes according to the size of the suitable installation material (screws/plugs). ► Tighten the four screws by hand. It must be ensured that the device is installed mechanically stress-free.
-
Page 162: Installation Of 3-Way Ball Valve
MAN3186 - TITANUS MICRO•SENS® 6.23 Installation of 3-way ball valve A ball valve is required to purge the pipe system with compressed air or to close off the pipe system and simulate a blocked pipe. 6.23.1 3‑way ball valve (ABS/PVC) scheme position position... - Page 163 MAN3186 - TITANUS MICRO•SENS® To install or remove the 3-way ball valve, use the three union nuts. Observe the assignment of connections (see diagram) during assembly: ► Install the pipe system on connection C. ► Install the TITANUS MICRO·SENS® on connection A or B. ►...
-
Page 164: 3-Way Ball Valve (Metal)
MAN3186 - TITANUS MICRO•SENS® 6.23.2 3‑way ball valve (metal) scheme position position position 0° 90° 180° Image 113: Installing the metal 3-way ball valve open closed 1 Compressed air connection 2 3‑way ball valve 3 Pipe system 4 Air filter (optional) 5 Device Switching is done between fire detection (0°... - Page 165 MAN3186 - TITANUS MICRO•SENS® ► Install the TITANUS MICRO·SENS® on connection A or B. ► Install the compressed air supply on the remaining connection A or B.
-
Page 166: Installation Of The Condensate Separator
MAN3186 - TITANUS MICRO•SENS® 6.24 Installation of the condensate separator The condensate separators are used to collect and drain precipitated water vapour and condensate from the pipe system. 6.24.1 Condensate separator type KA-1 Image 114: Condensate separator type KA-1 Install the condensate separator at the lowest point of the pipe system and upstream of the air filter (optional) and the TITANUS MICRO·SENS®. -
Page 167: Condensate Separator Type Ka-Dn 25
MAN3186 - TITANUS MICRO•SENS® ► Glue the pipe system to be airtight with the condensate separator using Tangit glue. 6.24.2 Condensate separator type KA-DN 25 Image 115: Condensate separator type KA-DN 25 1 Aspiration pipe 2 Bracket 3 45° angle 4 Air filter type LF-AD-x 5 TITANUS MICRO·SENS®... -
Page 168: Installation Of Test Adapter
MAN3186 - TITANUS MICRO•SENS® 6.25 Installation of test adapter A test adapter must be installed upstream of the air inlet of a TITANUS MICRO·SENS®. The test adapter must always be closed in normal operation and is only opened for maintenance and service purposes, to introduce test gas or smoke aerosols. -
Page 169: Commissioning
MAN3186 - TITANUS MICRO•SENS® 7 Commissioning You will find information about commissioning in this section. All stored and current diagnostic data as well as settings made of the TITANUS MICRO·SENS® can be saved in the form of a file or an automatically created log using the diagnostic software. -
Page 170: Plug-And-Play Commissioning
MAN3186 - TITANUS MICRO•SENS® 7.1.1 Plug‑and‑play commissioning In the case of plug-and-play commissioning, the default settings are not changed. Image 118: Inserting the detection unit in the device base 1 Housing cover with detection unit 1a Interior view 1b Front view 2 X4 (pin 1 …... -
Page 171: Commissioning Using Diagnostic Tool
MAN3186 - TITANUS MICRO•SENS® 7.1.2 Commissioning using diagnostic tool In the case of commissioning using the diagnostic tool, the default settings can be changed. Data transmission is bidirectional via the infrared interface on the front of the TITANUS MICRO-SENS®. ► Insert the detection unit into the device base. Pay attention to the mechanical coding, which prevents the TITANUS MICRO·SENS®... - Page 172 MAN3186 - TITANUS MICRO•SENS® 7.1.2.1 Installation of diagnostic software Image 120: Diagnostic tool to transfer and read out device data 1 TITANUS MICRO·SENS® 2 Bracket 3 Diagnostic interface (in case) 4 Case 5 Connection cable 6 CD-ROM A Infrared interface If a function cannot be changed in the diagnostic software, it is greyed out.
- Page 173 MAN3186 - TITANUS MICRO•SENS® 7.1.2.2 Installation of USB driver The USB driver for the diagnostic software must be installed on the service PC. The installation is done using a CD-ROM from the diagnostic tool case or using a file from the Intranet download section of the WAGNER Group GmbH.
- Page 174 MAN3186 - TITANUS MICRO•SENS® 7.1.2.3 Interface and operation of the diagnostic software ► Start the diagnostic software. ► Make sure that a TITANUS MICRO·SENS® is detected and the diagnostic software goes to the following screen via the current unit number. Image 121: States of the detected unit ►...
-
Page 175: Making Settings Using The Diagnostic Software
MAN3186 - TITANUS MICRO•SENS® 7.2 Making settings using the diagnostic software All settings are made via the diagnostic software. In the "Settings" menu, the currently set values of the TITANUS MICRO·SENS® are displayed. Image 123: Tab "Settings"... -
Page 176: Selecting The Sensitivity (Ma)
MAN3186 - TITANUS MICRO•SENS® Clicking the "Set" button allows you to change the values. Image 124: Making settings 7.2.1 Selecting the sensitivity (MA) Detection unit Sensitivity Default setting Setting levels [% light obscuration/m] [% light obscuration/m] [% light obscuration/m] DM‑TMx‑xx‑10‑x 0.1 - 2 DM‑TMx‑xx‑50‑x 0.5 - 2... -
Page 177: Setting The Alarm Delay
MAN3186 - TITANUS MICRO•SENS® 7.2.2 Setting the alarm delay If the smoke level rises during operation up to the alarm threshold, the delay time starts to run. The signal is only forwarded when the delay period comes to an end if the smoke level persists. This means that a false alarm can be prevented in case of short-term loads (e.g. -
Page 178: Setting The Fault Delay
MAN3186 - TITANUS MICRO•SENS® 7.2.4 Setting the fault delay In monitoring areas with temporary fault variables (e.g. air pressure fluctuations), other delay times should be set according to the duration of the fault variables. NOTE No standard conformity in case of improper project planning For project planning that complies with AS ISO 7240-20, the delay time must be set to ≤... -
Page 179: Activating Or Deactivating Dynamic Air Flow
MAN3186 - TITANUS MICRO•SENS® 7.2.7 Activating or deactivating dynamic air flow Detection unit Dynamic air flow activated Default setting DM‑TMx‑xx‑10‑x off - on DM‑TMx‑xx‑50‑x off - on Table 57: Dynamic air flow 7.2.8 Activating or deactivating ROOM·IDENT (optional) This function must be activated if the function "Main alarm after ROOM IDENT"... -
Page 180: Activating Or Deactivating Main Alarm After Room·ident (Optional)
MAN3186 - TITANUS MICRO•SENS® 7.2.10 Activating or deactivating main alarm after ROOM·IDENT (optional) NOTE No standard conformity in case of improper project planning The function "Main alarm after ROOM IDENT" is not AS ISO 7240- 20 compliant. For certain applications, it may be useful to trigger the alarm only after localising the fire site. -
Page 181: Setting The Fan Voltage
MAN3186 - TITANUS MICRO•SENS® 7.2.13 Setting the fan voltage In critical applications, the fan voltage can be increased to increase the transport speed in the pipe system and thus ensure faster detection for longer pipe lengths. If the fan voltage is changed, the TITANUS MICRO·SENS®... -
Page 182: Air Pressure-Independent Calibration
MAN3186 - TITANUS MICRO•SENS® Types of calibration The calibration of the air flow sensor can: ▪ be performed independently of the current air pressure. Pay attention to the limitations (see chapter "Project planning" and "Air flow monitoring"). ▪ be carried out depending on the current air pressure to compensate the influence of air pressure fluctuation. -
Page 183: Air Pressure-Dependent Calibration
MAN3186 - TITANUS MICRO•SENS® 7.3.2 Air pressure-dependent calibration The air pressure-dependent calibration of the TITANUS MICRO·SENS® can only be carried out using the diagnostic software. Furthermore, a barometer (recommended: digital precision pocket barometer GPB 1300, Greisinger electronic GmbH) is required for this type of calibration. ►... - Page 184 MAN3186 - TITANUS MICRO•SENS® ► Press the button "Initialize". Make sure that the air flow is not affected during the initialisation phase. Image 126: Diagnostic software button "Initialize" under "Settings" ► Make sure that the operating LED on the unit is flashing. ►...
-
Page 185: Checking The Detection Unit And Alarm Signal Transmission
MAN3186 - TITANUS MICRO•SENS® 7.4 Checking the detection unit and alarm signal transmission Trigger the TITANUS MICRO·SENS® and check the transmission path to the FDCP as follows: ► Enter all values determined in the following steps into the test record (see chapter "Annex"). -
Page 186: Checking The Air Flow Monitoring And Fault Signal Transmission
MAN3186 - TITANUS MICRO•SENS® 7.5 Checking the air flow monitoring and fault signal transmission The following steps cannot be carried out until the air flow sensor has been successfully calibrated (see chapter "Calibration of air flow sensor"). ► Enter all values determined in the following steps into the test record (see chapter "Annex"). -
Page 187: Function Test
MAN3186 - TITANUS MICRO•SENS® 7.6 Function test If the TITANUS MICRO·SENS® cannot be calibrated, check its functionality using the test pipe, digital fine pressure gauge with adapter, service PC and diagnostic software. The following describes the complete function test with digital fine pressure gauge type GDH 01 AN. - Page 188 MAN3186 - TITANUS MICRO•SENS® Image 127: Preparing the functionality 1 TITANUS MICRO·SENS® 2 Test pipe 3 Aspiration aperture Ø 4.6 mm 4 Aspiration aperture Ø 4.2 mm 5 Aspiration aperture Ø 7.0 mm 6 Pressure measurement hose 7 Adapter 8 Digital fine pressure gauge (example) ►...
- Page 189 MAN3186 - TITANUS MICRO•SENS® ► On the "Settings" tab, change the following settings: Image 128: Settings for function test (top)
-
Page 190: Performing The Function Test
MAN3186 - TITANUS MICRO•SENS® Image 129: Settings for function test (bottom) 7.6.2 Performing the function test ► Save the settings of the TITANUS MICRO·SENS® via the device log (text file) or make note of the settings. ► Close all the test pipe aspiration apertures with adhesive tape. ►... - Page 191 MAN3186 - TITANUS MICRO•SENS® ► Make sure that the device reports the following faults within 30 s: ▪ “Detector module fault“ ▪ "Air flow too low (static evaluation)" Image 130: Tab "Fault messages" ► Open the Ø 4.6 and 4.2 mm aspiration apertures on the test pipe.
- Page 192 MAN3186 - TITANUS MICRO•SENS® ► Click the "Initialize" button to start air flow initialisation. Image 131: Start initialisation ► Make sure that the "Initialisation active" LED flashes for the duration of the initialisation phase. ► Make sure that the fault LEDs have gone out. ➜...
- Page 193 MAN3186 - TITANUS MICRO•SENS® ► Make sure that the fault LED has gone out after a few seconds. ► Open the Ø 7.0 mm aspiration aperture on the test pipe. ► Make sure that the fault LED begins to flash after approx. 5 s. ►...
-
Page 194: Commission Room·ident
MAN3186 - TITANUS MICRO•SENS® 7.7 Commission ROOM·IDENT The localisation of the fire site (ROOM·IDENT) is put into operation using the diagnostic software. Commissioning of ROOM·IDENT does not differ for the "ROOM·IDENT" and "Fire alarm after ROOM·IDENT" functions. ► Press the "Train" button to be able to set all values for localising the fire site. - Page 195 MAN3186 - TITANUS MICRO•SENS® ► Enter the number of aspiration apertures. Image 133: Tab ROOM·IDENT Pressing the "?" (question mark) button opens a web help with information on the values to be entered. ► Enter the purge time. The selected value is permanently saved in the TITANUS MICRO·SENS® and used for every localisation procedure.
- Page 196 MAN3186 - TITANUS MICRO•SENS® For devices with a serial number greater than 187000, the air purge time must be calculated according to the following formula: Unit Description Variable/ constant Required purge time Example Maximum determined aspiration time The calculated purge time is to be rounded up to whole seconds and the value thus obtained is to be entered under "Blow out time".
- Page 197 MAN3186 - TITANUS MICRO•SENS® NOTE Reducing the voltage of the purge fan only makes sense if the voltage of the aspiration fan is less than or equal to the voltage of the purge fan. To reduce the current consumption of the unit during the purge process, the voltage of the purge fan can be changed as follows: Application Purge fan voltage [V]...
- Page 198 MAN3186 - TITANUS MICRO•SENS® ► Select the aspiration aperture whose transport time you want to Determining the transport time determine, e.g. aspiration aperture C. Image 134: ROOM·IDENT tab ► Enter the pre-selection time necessary to reach the aspiration aperture and supply the smoke. ►...
- Page 199 MAN3186 - TITANUS MICRO•SENS® ► Make sure that the TITANUS MICRO·SENS® detects the smoke and indicates this via the smoke level indicator. The alarm site indicator of the selected aspiration aperture turns green and the determined time is entered. ➜ The teach-in mode for the selected aspiration aperture is now complete.
-
Page 200: Commissioning Response Indicators
MAN3186 - TITANUS MICRO•SENS® 7.8 Commissioning response indicators The response indicators are commissioned using diagnostic software. ► Press the "Testing" button to be able to select a response indicator. Image 135: Tab "ROOM·IDENT"... - Page 201 MAN3186 - TITANUS MICRO•SENS® ► Select a response indicator to check the address setting. Image 136: Tab "ROOM·IDENT" response indicators ► Check that the correct response indicator is flashing or illuminated at the installation location. ► Repeat the process for all other aspiration apertures. ►...
-
Page 202: Maintenance
MAN3186 - TITANUS MICRO•SENS® 8 Maintenance You will find information about maintenance in this section. The test record must be completed during the maintenance (see chapter "Appendix"). The test record is required for the subsequent evaluation of the data (e.g. air flow value, air pressure and temperature during maintenance). 8.1 Maintenance intervals Maintenance includes regular inspections. -
Page 203: Checking The Detection Unit And Alarm Signal Transmission
MAN3186 - TITANUS MICRO•SENS® 8.3 Checking the detection unit and alarm signal transmission Any hardware defects in the detection unit are shown under the "Fault messages" tab of the diagnostic software. Image 137: Tab "Fault messages" detection unit ► Visually check the detection unit for dirt or damage on the outside and replace the unit if necessary. -
Page 204: Pipe System Check
MAN3186 - TITANUS MICRO•SENS® 8.4 Pipe system check NOTE Device damage due to application of compressed air During start-up and purging, compressed air is applied that can result in damage to the air flow sensor. ► Preferably use a 3-way ball valve. ►... - Page 205 MAN3186 - TITANUS MICRO•SENS® 8.4.1.1 3‑way ball valve (ABS/PVC) scheme position position position 180° 0° 90° Image 138: Installing a 3-way ball valve made of ABS/PVC open closed 1 Compressed air connection 2 3‑way ball valve 3 Pipe system 4 Air filter (optional) 5 TITANUS MICRO·SENS®...
- Page 206 MAN3186 - TITANUS MICRO•SENS® ► Move the lever of the ball valve to the 0° or 180° setting. ► Make sure that the TITANUS MICRO·SENS® is disconnected from the pipe system and the compressed air supply. ► Wait approx. 20 s. The dust and dirt stirred up in the pipe system settles and thus cannot be drawn in via the TITANUS MICRO·SENS®.
- Page 207 MAN3186 - TITANUS MICRO•SENS® 8.4.1.2 3‑way ball valve (metal) scheme position position position 0° 90° 180° Image 139: Installing the metal 3-way ball valve open closed 1 Compressed air connection 2 3‑way ball valve 3 Pipe system 4 Air filter (optional) 5 Device ►...
-
Page 208: Replacing The Detection Unit
MAN3186 - TITANUS MICRO•SENS® ► Move the lever of the ball valve to the 90° setting. ► Make sure that the TITANUS MICRO·SENS® is disconnected from the pipe system and the compressed air supply. ► Wait approx. 20 seconds. The dust and dirt stirred up in the pipe system settles and thus cannot be drawn in via the TITANUS MICRO·SENS®. - Page 209 MAN3186 - TITANUS MICRO•SENS® ➜ Air flow calibration is carried out automatically, independent of the air pressure. If the TITANUS MICRO·SENS® was previously calibrated depending on the air pressure, carry out another air pressure- dependent calibration using the diagnostic software after replacing the detection unit.
-
Page 210: Replacing Filter Elements In The Device Base
MAN3186 - TITANUS MICRO•SENS® 8.6 Replacing filter elements in the device base Image 141: Replacing filter elements in the device base 1 Detection unit 2 Bracket for filter element 3 Filter element ► Unfasten the four cover screws of the detection unit using a screwdriver. ►... -
Page 211: Replacing The Filter Elements Of Air Filter Type Lf-Ad-X
MAN3186 - TITANUS MICRO•SENS® 8.7 Replacing the filter elements of air filter type LF-AD-x Opening the filter after the expiry of the adjusted delay time can lead to an air flow fault. Image 142: Replacing the air filter elements ► Unfasten the four cover screws by using a screwdriver. ►... -
Page 212: Replacing The Filter Elements Of Special Filter Type Sf-400 / 650
MAN3186 - TITANUS MICRO•SENS® 8.8 Replacing the filter elements of special filter type SF-400 / 650 Removing the special filter leads to an air flow fault on the TITANUS MICRO·SENS®. Image 143: Replacing the filter elements of the special filter 1 Pipe system 2 Special filter type SF‑400, SF‑650 3 PVC transition screw connections... -
Page 213: Checking The Air Flow Sensor Calibration
MAN3186 - TITANUS MICRO•SENS® ► Tighten the PVC transition screw connections. 8.9 Checking the air flow sensor calibration NOTE No standard conformity in case of improper project planning The air flow monitoring should be set to ≤20 % to achieve project planning that complies with AS ISO 7240. - Page 214 MAN3186 - TITANUS MICRO•SENS® Air pressure-independent If an air pressure-independent calibration has been carried out, fluctuations calibration in the air pressure can lead to undesirable air flow faults. If the air flow range is set to >30%, the air flow sensor may be calibrated independent of the air pressure.
-
Page 215: Checking Room·ident And Response Indicators
MAN3186 - TITANUS MICRO•SENS® 8.10 Checking ROOM·IDENT and response indicators ► Open the "ROOM·IDENT" tab in the diagnostic software. ► Press the "Testing" button. Image 144: "ROOM IDENT" tab... - Page 216 MAN3186 - TITANUS MICRO•SENS® ► Enter the pre-selection time needed to reach the desired aspiration aperture and supply it with smoke. Image 145: Checking ROOM·IDENT and response indicators ► Press the "Start" button to start the test. ► Make sure that the TITANUS MICRO·SENS® switches from aspiration mode to purge mode.
-
Page 217: Checking The Air Flow Monitoring And Fault Signal Transmission
MAN3186 - TITANUS MICRO•SENS® ► Check by means of diagnostic software whether the correct aspiration aperture has been identified. ► Repeat this test for all taught in aspiration apertures. 8.11 Checking the air flow monitoring and fault signal transmission A breakage or blockage of the pipe system is displayed in the diagnostic software under the "Fault messages"... -
Page 218: Glossary
MAN3186 - TITANUS MICRO•SENS® Glossary Aerosol Alarm state Airborne particles in microscopic or sub- Condition of a fire alarm system or part of it, in microscopic grain size range. They exist of response to an existing hazard. unburned parts of the burning material, Aspirating smoke detector intermediate products of oxidative conversion and finely distributed carbon (soot). - Page 219 MAN3186 - TITANUS MICRO•SENS® of one detector. With the response of the first Detector line (addressable) detector, both an internal alarm and a control Line technology in which the connected function can be triggered. participants, e.g. fire detectors, couplers, input or output modules, are each given their own address (individual display and operation, with See "Fire detection unit"...
- Page 220 MAN3186 - TITANUS MICRO•SENS® Fire detector control panel Plug‑and‑play Central part of a fire alarm system that Function that enables the aspirating smoke monitors the system for faults, supplies the detector to be easily installed and detector with power and records messages, commissioned.
- Page 221 MAN3186 - TITANUS MICRO•SENS® ROOM·IDENT Termination resistor See "Fire site localisation" Termination element at the end of a detector or control line for the monitoring of the detector or Scattered light smoke detectors control line, even including wire breakage and short circuit.
-
Page 222: Appendix
MAN3186 - TITANUS MICRO•SENS® Appendix See also ▪ "Project planning tables with air filters" [➔ 234] ▪ "Test record" [➔ 239]... - Page 223 MAN3186 - TITANUS MICRO•SENS® Number of aspiration apertures Module Sensitivity [% Lt/m] DM-TM-10 DM-TM-50 Number of aspiration apertures Pipe shape Fan voltage [V] without pipe accessories or with detector box or VSK ≥ 9 ≥ 9 ≥ 9 Double U ≥...
- Page 224 Classification of TITANUS MICRO·SENS® and MICRO·SENS®- LSNi Project planning with air filter type LF‑AD Number of aspiration apertures Module Sensitivity [% Lt/m] DM-TM-10 DM-TM-50 Number of aspiration apertures Pipe shape Fan voltage [V] without pipe accessories or with detector box or VSK ≥...
- Page 225 Classification of TITANUS MICRO·SENS® and MICRO·SENS®- LSNi Project planning with air filter type LF‑AD Number of aspiration apertures Module Sensitivity [% Lt/m] DM-TM-10 DM-TM-50 Number of aspiration apertures Pipe shape Fan voltage [V] without pipe accessories or with detector box ≥...
- Page 226 Classification of TITANUS MICRO·SENS® and MICRO·SENS®- LSNi Project planning with air filter type LF-AD-2 Number of aspiration apertures Module Sensitivity [% Lt/m] DM-TM-10 DM-TM-50 Number of aspiration apertures Pipe shape Fan voltage [V] without pipe accessories or with detector box ≥...
- Page 227 Classification of TITANUS MICRO·SENS® and MICRO·SENS®- LSNi Project planning with air filter type LF-AD-2 Number of aspiration apertures Module Sensitivity [% Lt/m] DM-TM-10 DM-TM-50 Number of aspiration apertures Pipe shape Fan voltage [V] without additional accessories ≥ 9 ≥ 9 ≥...
- Page 228 ® MICRO·SENS Test record TITANUS Device identification Device number Basic device serial number Date Measuring and adjustment values Commissioning (✓/ –) Visual inspection Air flow [m/s] Temperature [°C] Air pressure-dependent calibration (yes/no) Air pressure-independent calibration (yes/no) (✓/ –) Detection unit and alarm transmission (✓/ –) Air flow monitoring and fault signal transmission Negative pressure...
Need help?
Do you have a question about the Ampac TITANUS MICRO-SENS and is the answer not in the manual?
Questions and answers