Table of Contents
Advertisement
Quick Links
1
Description
2
nd
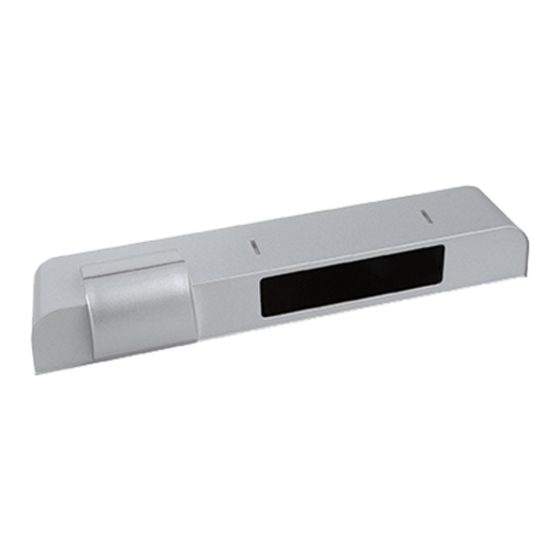
Radar Antenna
Radar motion sensor
Radar Antenna clip
Radar tilt angle indication
2
Symbols
LED turns on
LED display during normal function
GREEN LED
RED LED
ORANGE LED
3
Installation
1
Tips
Use the Remote-Control to
adjust the sensor.
Avoid vibrations!!!
COMBINED RADAR OPENING AND ACTIVE INFRARED SAFETY SENSOR FOR ESCAPE ROUTE DOORS
15°
30°
45°
LED flashing slowly
LED flashing quickly
Motion detection
Presence detection
Short flash after a motion or presence detection : Monitoring process active
See chapter 5: Troubleshooting
Use the Spotfinder to locate
the safety curtains.
Do not cover the sensor!
Motion detection
Avoid touching electronical
parts!
Avoid moving objects in
proximity to the sensor!
ACTIV8 THREE ON
USER'S GUIDE
Cover
Push-Buttons
IR-Presence sensor
IR-Prism
Main Connector
IR curtain adjustment screw
Presence detection
Avoid touching optical
Make sure the operator
parts!
cover is fixed properly and
Avoid HF lamps and
fluorescent lighting in the
objects in the infrared field!
infrared field!
Tip
electrically earthed.
Avoid highly reflective
1/8
Advertisement
Table of Contents

Related Manuals for Halma BEA ACTIV8 THREE ON


Summary of Contents for Halma BEA ACTIV8 THREE ON
- Page 1 ACTIV8 THREE ON USER’S GUIDE COMBINED RADAR OPENING AND ACTIVE INFRARED SAFETY SENSOR FOR ESCAPE ROUTE DOORS Description Cover Push-Buttons Radar Antenna Radar motion sensor IR-Presence sensor Radar Antenna clip IR-Prism Radar tilt angle indication Main Connector 15° 30° 45° IR curtain adjustment screw Symbols LED turns on...
-
Page 2: Mounting The Sensor
Mounting the sensor Mount the sensor at a maximum height of 5cm from the bottom line Use the mounting template to drill holes and position the sensor. of the door operator. Wiring the sensor SENSOR DOOR CONTROLLER Green Sensor Power 12-24V AC/DC Supply Brown... - Page 3 IR presence sensing field : width Make sure to introduce the front 2 curtains of 12 overlapping spots 2 curtains of 24 overlapping spots prism into the foreseen slides (no holes between spots) (no holes between spots) in front of the lenses! Above 3 m mounting height, use the narrow prism! IR presence sensing field : depth (negative angle available) +4°...
- Page 4 Remote Control adjustments (only when factory settings do not match) Unlock the sensor to enter into adjustment session (if no access code has been Press Unlock key RED LED entered) flashes slowly To change the value of a parameter (ex. Maximum duration of presence Select parameter RED LED Enter new value...
- Page 5 Launch a setup (to take a reference picture) Unlock the sensor to enter into adjustment session Press Unlock key RED LED flashes slowly To launch an assisted setup recommended after mechanical The sensor performs a door opening and closing cycle to check adjustments of the IR sensor module.
-
Page 6: Installation Tips
Installation Tips TÜV Requirements in To be TÜV compliant for the German market, please make sure to adjust the sensor as follows: Germany Number of IR curtains Max. duration of presence detection 1 or higher (min. 1minute) External Monitoring Enabled 1 (ON) Sensitivity (size of detection field) Min. -
Page 7: Troubleshooting
Troubleshooting SYMPTOMS POSSIBLE CAUSES CORRECTIVE ACTION Red LED flashing quickly after an assisted The sensor ‘sees’ the door movement and Adjust the position of the IR curtains. setup. can not finish its setup. Orange LED permanently ON after an The sensor encounters a signal saturation. Use the wide-field prism and/or slightly increase the IR curtains angle assisted setup. -
Page 8: Technical Specifications
Technical Specifications Supply voltage : 12V (– 5%) to 24V (+10%) AC/DC Mains frequency : 50 - 60 Hz Power consumption : < 3 W Mounting height : 1.8m to 4m Sensitivity of the monitoring input : 10-30V DC Delay of the output activation after stimulation : <...
Need help?
Do you have a question about the BEA ACTIV8 THREE ON and is the answer not in the manual?
Questions and answers