Table of Contents
Advertisement
Quick Links
Advertisement
Table of Contents

Related Manuals for Foxpro XWAVE


Summary of Contents for Foxpro XWAVE
- Page 2 Customer Service: (717) 248-2507 Toll Free Orders Only: 866-463-6977 General Inquiry E-mail: sales@gofoxpro.com Stay up to date with the latest sounds by visiting our online sound library. Watch for new products and upgrades from FOXPRO ® . Visit us online: www.gofoxpro.com...
-
Page 3: Table Of Contents
Navigating the XWave .............. 18 Playing Sounds Manually ............19 Moving the Speakers ..............19 Using a Tripod ................19 Accessing the XWave Parameter Menu ........20 Parameter Menu: Options & Details........20 Bluetooth ................. 21 3-10 External Speaker Jacks Specifications ........22... - Page 4 3-12 Integrated Mini USB Port ............22 XWave Remote Operation .............. 23 What are FOX FEATURES? ............23 Turning on the XWave Remote ..........23 Navigating the XWave Remote ..........23 Understanding the XWave Remote Display ......23 Accessing XWave Remote Configuration Menu ...... 26 Smart Light ................
- Page 5 AUX ................... 40 View ..................40 Temperature Units ..............40 Barometer Measurement Units ..........41 About Info ................41 10. XWave Remote USB Operation ............41 10-1 Editing the Presets File ............. 42 10-2 Viewing the FOXDATA File ............42...
- Page 6 11. Programming the XWave ..............43 12. Creating FOXCAST Sequence Files ........... 43 13. Product Care & Maintenance ............45 14. Troubleshooting ................46 15. Maximizing Remote Range.............. 47 16. FCC & IC Information ............... 49 17. Warranty Statement ............... 51...
-
Page 7: Getting Started
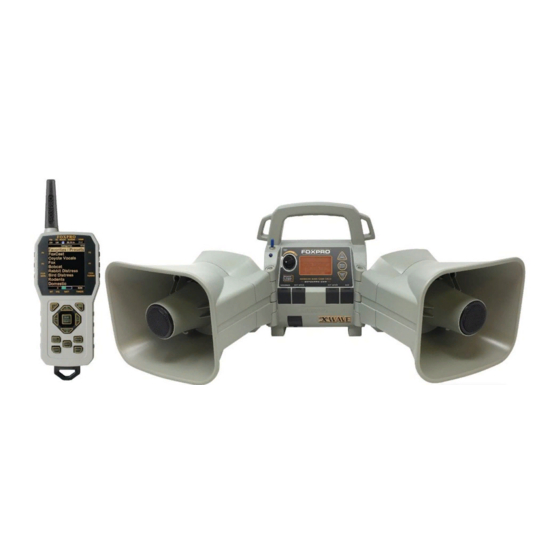
1. Getting Started To get the full advantage of the XWave and its array of capabilities, please read and understand the operating instructions in full. 1-1 XWave: First Glance The graphic on the next page depicts the XWave. Certain aspects of the XWave will be marked with a number which corresponds to the chart defining that element. - Page 8 7. The right horn and tweeter speakers are located on the right side of the XWave. 8. The XWave is fitted inside of a rugged ABS housing. 9. Along the bottom of the main control panel are four horizontally oriented jacks protected by rubber covers. The farthest one to...
-
Page 9: Xwave: Requirements
To install batteries in the XWave, Access the battery compartment by removing the door on the back of the XWave. Once the door is removed, locate the power wire that is inside the battery compartment. It will have a white, plastic connector on the end. Connect the battery pack to the power wire and place the battery pack into the XWave. -
Page 10: Charging The Xwave
This is perfectly normal. • Never attach an unapproved or a non-FOXPRO® charger to your XWave! • Never connect your XWave to an unregulated 12V system (i.e., automotive systems, high current power supplies, etc.) • Do not mix battery types! •... -
Page 11: Xwave Remote: First Glance
1-4 XWave Remote: First Glance The following image depicts the XWave remote. Certain aspects of the XWave remote will be marked with a number which corresponds to a numbered list appearing after the image that defines each element. - Page 12 1. The second item from the left on the top status line is the FOXBANG/FOXGRIP status indicator. 2. Next item to the right is the moon phase indicator. 3. The next item to the right is the barometric pressure indicator. 4.
- Page 13 11. On the lower portion of the remote is the handle/buttons portion. The first button to the upper right is the Back/Menu button. 12. In the middle of the handle is a large square shaped button. Directly above and below this button are the scroll up and down buttons.
-
Page 14: Xwave Remote: Requirements
2. Quick Start Guide The XWave user manual is rather lengthy, covering all aspects of the XWave and remote control. We realize that some of you may wish to jump directly into basic operations, such as playing sounds manually, remotely, and using presets. This is a very brief overview, and it is strongly recommended that you read this manual entirely to fully understand all the capabilities of the system. -
Page 15: Xwave Remote Setup
XWave Remote Setup Each time you install new batteries in the XWave remote, it is recommended that you make it a routine to take a moment to set up the date and time settings. This section will explain these setup configurations. -
Page 16: Using Presets/Favorites
“Recall” button. Using Presets/Favorites The XWave remote can store up to 50 unique presets or favorites. A preset is a shortcut to a particular sound which has a defined volume level. The XWave remote has 4 quick access preset buttons. By default, your XWave remote will have no presets established. -
Page 17: Xwave Manual Operation
To initiate playback of preset 1-4, make sure that both the XWave and XWave remote are turned on, and then push the corresponding preset button (P1 – P4) on the top sides of the remote. The XWave will then instantly switch to that sound and volume level. To initiate playback of any preset, select the “Favorites/Presets”... -
Page 18: Navigating The Xwave
1. The XWave display is located on the main access panel. 2. The sound list (displays names or names and numbers depending upon setup) consumes most of the screen. 3. The Sound indicator (lower left side of the screen) displays the currently selected sound or FOXCAST file. -
Page 19: Playing Sounds Manually
“M” will appear to the right of the volume level. Moving the Speakers The XWave speakers are secured to the back of the XWave housing by rubber straps. You can release the straps from their mounting points to move the speakers. -
Page 20: Accessing The Xwave Parameter Menu
Saving a value change is done by pushing the “Menu/Select” button a single time. Parameter Menu: Options & Details This section will explore all XWave menu items and associated values of each. • Exit: Exits the XWave menu. -
Page 21: Bluetooth
FOXCAST sequence files. Bluetooth The FOXPRO XWave game call is not only a predator caller. It also can function as an external Bluetooth speaker. To enable the Bluetooth function, first make sure the caller is powered on. Once it is powered on, flip the blue switch that’s located on the front of the caller forward. -
Page 22: External Speaker Jacks Specifications
3-11 Auxiliary Device Jack Specifications The XWave is equipped with an auxiliary jack labeled “AUX”. This jack is located on the front of the XWave. The purpose of this jack is to allow for the connection of certain external devices (such as Jack Predator Decoys) for triggering their action on and off by using the XWave remote control. -
Page 23: Xwave Remote Operation
Navigating the XWave Remote The XWave remote has a scroll up and scroll down button for cycling through the on-screen display. A selected menu item is highlighted with a horizontal bar and, by pressing the scroll up or down arrow button, that horizontal bar will move up or down through the menu items list. - Page 24 The following image shows the top status line of the XWave remote. A description of each element follows the image: • FM: FOXMOTION status indicator. Displays either On or Off.
- Page 25 The image above shows the primary display area for the XWave remote. Above the menu items you will see “Categories” which is the title of this screen. When you enter other menu sections, the title will change accordingly. The two main items on the screen “Favorites/Presets” and “FoxCast”...
-
Page 26: Accessing Xwave Remote Configuration Menu
Prior to using the XWave remotely, it is important that you first verify that both the XWave and XWave remote are set to operate on the same channel. If the two devices are not on the same channel, then radio communication will not be possible. -
Page 27: Playing Sounds With The Remote
TX1000 Settings item in the main menu. The method of playing a sound is identical for both modes; the way the sounds are displayed on the screen is the only difference. By default, the XWave remote is setup to display the sounds by categories. To change how the sounds are displayed, access the TX1000 Settings menu and locate the menu item titled “View”. -
Page 28: Presets / Favorites
These are located on the top left and right sides of your remote control marked with “P1”, “P2”, “P3” and “P4”. If the XWave is muted when selecting a preset, it will remain muted. You can change this configuration with the Preset Mute Override within the menu. -
Page 29: Foxfusion
FOXFUSION button on the remote allows you to switch back and forth between the primary and FOXFUSION sound. To Fuse Two Sounds: Turn on the XWave and XWave remote. Select a sound and volume like normal—this is the primary sound. Push the “FOXFUSION”... -
Page 30: Foxmotion
You cannot turn the speakers off or on with the XWave remote while operating with FOXMOTION. FOXMOTION can be stacked with FOXPITCH to provide an incredibly unique sound playback experience. -
Page 31: Foxbang
.30 and higher. High sensitivity should be used for smaller calibers such as .17 to .22. Everything else should work fine with the medium setting. The FOXBANG sensor is located inside of the XWave remote. For it to detect the gunshot, the remote needs to be relatively close to the firearm (within 5 feet). -
Page 32: Foxpitch
unexpected activation of FOXBANG. For this reason, you should choose the lowest sensitivity that affords reliable activation from the muzzle blast. FOXBANG is intended to work when the transmitter is located within about 5 feet of the firearm muzzle. Before using FOXBANG in the field, head out to your local shooting range and test the different sensitivity levels to find the one best suited to your firearm. -
Page 33: User Button
The recorded data is stored in a CSV file within the remote control. You can access this file by connecting the XWave remote to a PC. CSV files can be opened with popular software titles such as Microsoft Excel. - Page 34 To use FOXDATA, at the beginning of a hunt, before you start calling, push and hold the FOXDATA button for 1-2 seconds. This button is located on the side of the XWave remote. Select “Hunt Started”. After selecting this option, FOXDATA recording begins. To check whether FOXDATA is actively recording, access the FOXDATA menu screen.
-
Page 35: Foxgrip
Volume Step The XWave remote has a range of volumes from 0 – 40. Increasing the volume in the field by increments of 1 may be too slow for some and... -
Page 36: Primary & Secondary (Foxfusion) Mode
The modes are Stereo, Mono, and Sep Mon (Separate Mono). By default, the device will be setup for stereo speaker mode. As the XWave has a quad speaker setup (left horn/tweeter and right horn/tweeter) a stereo audio file will be split so that the left channel plays through the left speakers while the right channel plays through the right speakers. -
Page 37: Right And Left Speaker
With the physical speaker on/off switches, you have even more control of how the XWave distributes sound. If you flip the speaker switch to the “off” position, it will turn off the built-in speaker, but the external speaker jack will still be controlled remotely through the “Right and Left Speaker”... -
Page 38: Display / Power
This controls the intensity of the keypad back light. You can adjust the intensity from 0% - 100%. Theme The XWave remote has three operational themes built in. These themes are designed to help optimize the appearance of the on-screen display based upon factors such as time of day. -
Page 39: Date / Time(R)
The timer displays as: “MMM:SS” (“M” stands for minutes and “S” for seconds). The stand timer begins tracking time as soon as the XWave remote is turned on. To get the clock back on the display, simply set the stand timer to off. -
Page 40: Tx1000 Settings
Radio Channel The XWave remote can be configured to operate on one of 16 different radio channels (0-15). If you change the radio channel for the XWave remote, you must also change the radio channel for the XWave digital game call—otherwise the two devices will not be able to communicate. -
Page 41: Barometer Measurement Units
Make sure the batteries are fresh to prevent any damage from occurring. To connect the XWave remote to your computer, connect the USB cable from the jack on the XWave remote to a USB port in the computer. -
Page 42: Editing The Presets File
Windows users will see a new drive appear named “TX1000”. Mac users will see a new icon appear on their desktop called “TX1000”. After the XWave remote is connected to a computer, you can browse through the device just as you would any other USB storage device. -
Page 43: Programming The Xwave
12. Creating FOXCAST Sequence Files A FOXCAST sequence file is a simple text-based file that contains unique instructions to guide your XWave through a stand. These instructions include commands to change the sound, change the volume level, enter a passage of silence, and so forth. The following list shows the possible instructions, value ranges, and descriptions. - Page 44 “J”, once the sequence has played through a single time, it will automatically begin playing the next FOXAST sequence. “Q” represents quit. Once the sequence has been played entirely, the XWave will go silent. “R” represents repeat. Once the sequence has been played entirely, the XWave will play that sequence again until it is interrupted by the operator.
-
Page 45: Product Care & Maintenance
Browse to the XWave and open it up. Locate the “Sounds” folder. Copy your sequence files from wherever they are stored on your hard drive, into this folder (drag and drop). If you are using the online FOXCAST file generator, you can save the file directly from the website right into the “Sounds”... -
Page 46: Troubleshooting
Problem: XWave does not produce audio. Solution: Check that the speakers are not turned off in the XWave remote control. Check to see if you can play sounds manually (without the remote). If you cannot play sounds manually, connect the XWave to a computer and inspect the sound files for missing files or signs of corruption. -
Page 47: Maximizing Remote Range
NiMH batteries to get the best performance in cold weather. Problem: Cannot control volume on XWave. Solution: Check your XWave remote configuration to see if Auto Volume is activated. If it is, it would seem like you have no volume control ability. 15. Maximizing Remote Range Remote range can be affected by many factors. - Page 48 Achieving this can be done by use of the integrated tripod mount located on the bottom of the XWave. • If you are using the XWave remotely from a long distance, be sure to allow enough time for device reaction before sending multiple signals.
-
Page 49: Fcc & Ic Information
16. FCC & IC Information FCC Information NOTE: This equipment has been tested and found to comply with the limits for a Class B digital device, pursuant to Part 15 of the FCC Rules. These limits are designed to provide reasonable protection against harmful interference in a residential installation. - Page 50 The XWave transmitter is not intended to be operated closer than 20cm (about 8 inches) to your body. The transmitter can produce a radiated RF field similar to that of a standard cell telephone, although the duty cycle of this RF field is much lower than that of a cell telephone. Using the transmitter closer than 8 inches to your body can increase your exposure to RF energy levels thought by some to be harmful.
-
Page 51: Warranty Statement
14 Fox Hollow Drive Lewistown, PA 17044 Online Warranty Registration You can register your XWave digital game call online at the following address (locate the Warranty Registration link on the left of this page): http://www.gofoxpro.com/warranty Make sure that you retain a hard copy of your proof of purchase (i.e.,...
Need help?
Do you have a question about the XWAVE and is the answer not in the manual?
Questions and answers