Table of Contents
Advertisement
Quick Links
Advertisement
Table of Contents

Related Manuals for Foxpro HELLCAT PRO


Summary of Contents for Foxpro HELLCAT PRO
- Page 2 Facebook: https://www.facebook.com/Foxpro.Furtakers YouTube: @FOXPROINC Instagram: @foxpro_inc Twitter: @FOXPROInc TikTok: @foxpro_inc Website: www.gofoxpro.com This manual, the animal sounds stored in your caller, and animal sounds purchased from FOXPRO Inc. ® are protected by copyright. Copyright ©℗ 2023 by FOXPRO Inc. ®...
-
Page 3: Table Of Contents
Auxiliary Device Jack Specifications ............13 HellCat Pro Remote in Depth ..............13 4-1 Navigating the HellCat Pro Remote ............13 4-2 Understanding the HellCat Pro Remote-Control Display ......13 4-3 HellCat Remote Configurations Menu ............ 14 4-4 Channel of Operation ................15 4-4 Smart Light .................... - Page 4 5-5 FOXGRIP ....................24 Programming the HellCat Pro ..............24 Maximizing Remote Range ............... 24 Product Care & Maintenance..............25 FCC & IC Information................. 26 10. Warranty Information ................28...
-
Page 5: Getting Started
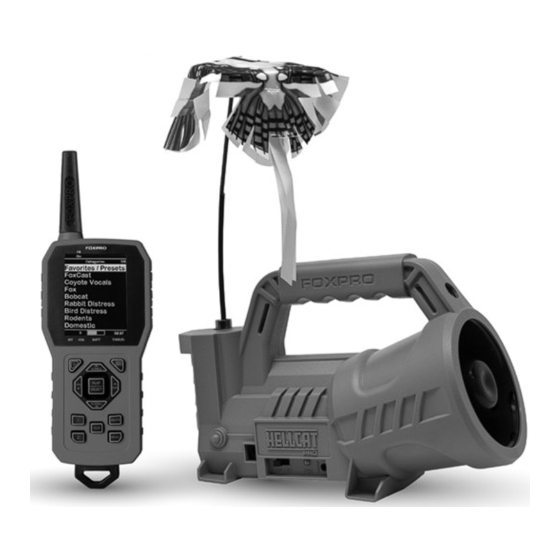
1. Getting Started Congratulations on your purchase of the FOXPRO Hellcat Pro digital game call! Included with the box you should find the following list of items: HellCat Pro digital game call, HellCat Pro remote control, Operator’s manual, Warranty registration card, 11.1V lithium-ion battery pack/charger kit, Built-in decoy with a blue bird topper. - Page 6 Turning on the HellCat Pro To turn on the HellCat Pro, move the power switch to the right or “on” position. The green LED will illuminate solid green to indicate that it is now powered on.
-
Page 7: Charging The Hellcat Pro
Hellcat Pro will not be covered by the warranty. • Never connect your Hellcat Pro to an unregulated 12V system (i.e., automotive systems, high current power supplies, etc.) Serious damage will occur which is not covered by the warranty. -
Page 8: Hellcat Pro Remote: First Glance
• Connect the approved FOXPRO charger to the charger jack on the Hellcat Pro and attach the transformer to the appropriate outlet. • Do not leave charging batteries unattended. • Recharge your batteries periodically—even when not in use—to prevent deep discharge. - Page 9 Figure 2 Image of the HellCat Pro Remote 1. FOXBANG/FOXGRIP status indicator is in the upper left side of the screen. 2. The upper portion of the remote features the screen. The screen contains sound categories, a menu system, and numerous runtime data related to operation.
- Page 10 Also, in the battery compartment, is the USB port. Installing Batteries in the HellCat Pro Remote The HellCat Pro remote requires 3 ‘AA’ batteries. It is recommended that you use high-quality lithium or alkaline batteries for the best performance. To install the batteries, remote the battery compartment...
-
Page 11: Quick Start Guide
2-1 Playing Sounds Turn on the Hellcat Pro by sliding the power switch to the “On” position. Notice the pilot light will illuminate green. The pilot light also acts as a low battery indicator. -
Page 12: Favorites/Presets
2-3 Integrated Decoy Operation The HellCat Pro features an integrated decoy and blue bird decoy topper. To install the decoy, insert one end of the decoy support rod into the coupler on the HellCat Pro (to the left of the handle, on the... -
Page 13: Auxiliary Device Jack Specifications
Locate the decoy on/off toggle switch on the side of the HellCat Pro and ensure that it is in the “on” position (to the right). Turn on the HellCat Pro and HellCat Pro remote. The AUX button on the HellCat Pro remote control is responsible for remotely toggling the decoy motion off and on. -
Page 14: Hellcat Remote Configurations Menu
4-3 HellCat Remote Configurations Menu From the sounds screen, push the “Back/Menu” button a single time. This will get the Hellcat Pro configuration menu to appear. There are a total of six elements that will appear on this menu: FOX FEATURES, Sound Settings, Display/Power, Date/Time(r), TX1000 Settings, and Smart Light. -
Page 15: Channel Of Operation
If the two devices are not on the same channel, then radio communication will not be possible. In order to change the channel of operation of the HellCat Pro, you will need to connect it to a computer and use the FOXPRO Programming Utility. -
Page 16: Display/Power
“On” or “Off.” Press the “Select” button a final time to lock it Preset Mute Override During normal operation, if the Hellcat Pro is muted and you play a preset, the preset is queued for playback, but it cannot be heard until the caller is un-muted. - Page 17 Theme The Hellcat Pro remote has three operational themes built in. These themes are designed to help optimize the appearance of the on-screen display based upon factors such as time of day. The two main themes to address this are: night and day.
-
Page 18: Date/Time(R)
Hellcat Pro remote is turned on. Alarm The Hellcat Pro remote features a visual alarm that can be set to go off after a span of time. The available times are represented in minutes: 1 – 60. When the alarm is set and the configured time span passes, the stand timer (or clock if set to display the clock) will begin to flash alerting you. -
Page 19: Tx1000 Settings
Time The Hellcat Pro remote has a real time clock. This clock must be set when you first install or change batteries. The clock can be displayed in either the standard 12-hour format or 24-hour format (military time). - Page 20 Any time you reprogram the Hellcat Pro digital game call to add new sounds or new FOXCAST sequence files, you must download a new copy of the play list to the Hellcat Pro remote. This menu item will guide you through that process.
-
Page 21: Hellcat Pro Remote Usb Port Operation
Restore Defaults To reset your Hellcat Pro remote control back to factory defaults, use this option. Please be aware that restoring factory defaults will result in loss of your presets/favorites, sound list, and categories. 4-9 HellCat Pro Remote USB Port Operation The Hellcat Pro remote control features a mini-USB port inside of the battery compartment, just above the batteries. -
Page 22: Foxbang
When activated, FOXBANG reacts to the report of a firearm by automatically switching to an assigned function established within the Hellcat Pro remote. There are 7 different settings for FOXBANG. The available functions you can link to FOXBANG activation include mute (toggles mute on/off), auxiliary (toggles auxiliary device on/off), preset 1, preset 2, preset 3, preset 4, and preset 5. -
Page 23: User Buttons
5-3 User Buttons The User buttons are located on the bottom left side of your Hellcat Pro remote keypad labeled 1 and 2. These buttons can be assigned a function of your choice for quick one button access. You can choose... -
Page 24: Foxgrip
FOXGRIP device with your Hellcat Pro remote control. 6. Programming the HellCat Pro The HellCat Pro has a USB port and can be connected to a home computer for reprogramming. FOXPRO offers free software for both PC and Mac that assists you in this process. The FOXPRO website contains an extensive library of free sounds and sounds that can be purchased and installed in the HellCat Pro. -
Page 25: Product Care & Maintenance
• Keep the transmitter a minimum of six inches away from your body, gun barrel, and metal shooting sticks as these things can detune the transmitter. • Hold the transmitter vertically with the antenna pointing skyward (reference image below): Figure 3 Example of proper transmitter orientation •... -
Page 26: Fcc & Ic Information
9. FCC & IC Information RF Exposure Safety Notice The HellCat Pro transmitter is not intended to be operated closer than 20cm (about 8 inches) to your body. The transmitter can produce a radiated RF field similar to that of a standard cell telephone, although the duty cycle of this RF field is much lower than that of a cell telephone. - Page 27 installed and used in accordance with the instructions, may cause harmful interference to radio communications. However, there is no guarantee that the interference will not occur in a particular installation. If this equipment does cause harmful interference to radio or television reception, which can be determined by turning the equipment off and on, the user is encouraged to correct the interference by one or more of the following measures: •...
-
Page 28: Warranty Information
10. Warranty Information Your FOXPRO® game call is warranted to be free from defects in materials and workmanship for a period of 3 years from the date of purchase if the item was purchased from a FOXPRO Authorized Retailer.
Need help?
Do you have a question about the HELLCAT PRO and is the answer not in the manual?
Questions and answers