
Related Manuals for Fronius Welducation Simulator


Summary of Contents for Fronius Welducation Simulator
- Page 1 Operating Instructions Welducation Simulator Welducation Campus EN-US Operating instructions 42,0426,0444,EA 002-25102023...
-
Page 3: Table Of Contents
Objectives and features of the standard equipment Optional accessories Intended use Warning notices on the device Software and product updates Operating controls and connections Connections on the Welducation Simulator Installation IT settings IT settings Before installation and initial operation Safety... - Page 4 Description of TIG Operating Modes 4-step mode Symbols and explanations Rod Electrode Commissioning MMA welding commissioning MMA welding Laying the hosepacks correctly Support Fronius Support team Fronius Support team Update Software update Troubleshooting, maintenance, and disposal Troubleshooting General Safety Troubleshooting...
-
Page 5: Safety Instructions
Safety Instructions... -
Page 7: Safety Instructions
Safety Instructions Explanation of DANGER! safety instruc- tions Indicates an immediate danger ▶ Death or serious injury will result if appropriate precautions are not taken. WARNING! Indicates a potentially dangerous situation ▶ Death or serious injury may result if appropriate precautions are not taken. CAUTION! Indicates a potentially harmful situation ▶... -
Page 8: Environmental Conditions
Your personal safety is at stake! Environmental Operation or storage of the device outside the stipulated area will be deemed as conditions not in accordance with the intended purpose. The manufacturer accepts no liab- ility for any damage resulting from improper use. Installation and operation may only take place within closed and dry rooms. -
Page 9: Danger From Mains Current
Danger from An electric shock can be fatal. mains current Do not touch voltage-carrying parts inside or outside the device. All cables and leads must be secured, undamaged, insulated, and adequately di- mensioned. Replace loose connections and scorched, damaged, or inadequately dimensioned cables and leads immediately. -
Page 10: Particular Hazard Areas
Check and evaluate possible problems and the interference immunity of equip- ment in the vicinity according to national and international regulations. For ex- ample, of: Safety devices Grid power lines, signal lines, and data transfer lines IT and telecommunications equipment Devices for measuring and calibrating Supporting measures to avoid EMC problems: Grid power supply... -
Page 11: Safety Measures In Normal Operation
(e.g., relevant product standards of the EN 60 974 series). Fronius International GmbH declares that the device complies with Directive 2014/53/EU. The full text of the EU Declaration of Conformity is available on the following website: http://www.fronius.com Devices marked with the CSA test mark satisfy the requirements of the relevant standards for Canada and the USA. -
Page 12: Copyright
Copyright Copyright of these Operating Instructions remains with the manufacturer. Text and illustrations were accurate at the time of printing. Fronius reserves the right to make changes. The contents of the Operating Instructions shall not provide the basis for any claims whatsoever on the part of the purchaser. If you... -
Page 13: General Information
General information... -
Page 15: Important Notes About This Document
Purpose of the These Operating Instructions describe the functionality, installation, operation, document and maintenance of the Welducation Simulator and the Welducation Campus software. The document is aimed at all authorized teachers and trainees who are entrusted with teaching or learning welding by means of the training concept consisting of the Welducation Simulator and Welducation Campus software. - Page 16 If this equipment does cause harmful interference to radio or television recep- tion, which can be determined by turning the equipment off and on, the user is encouraged to try to correct the interference by one of the following measures: Reorient or relocate the receiving antenna.
-
Page 17: Industry Canada Statement
Industry Canada This device complies with ISED’s licence-exempt RSSs. Operation is subject to Statement the following two conditions: This device may not cause harmful interference, and This device must accept any interference received, including interference that may cause undesired operation. FOR MOBILE DEVICE USAGE (>... - Page 18 The following antenna types are permissible:...
-
Page 19: Functional Principle
MIG/MAG, TIG, and MMA. The Welducation Campus software provides an overview of the trainees' learning progress and supports evaluation and as- sessment. Trainees can study the learning content at any time and complete the practical exercises assigned to them on the Welducation Simulator. -
Page 20: User Concept
Fronius is not liable for the risk of economic disadvantage or dam- age, of whatever nature, resulting from the use of the Welducation Campus soft- ware by such persons. Likewise, Fronius shall not be held liable for any lack of training success. - Page 21 Internet use. Fronius shall also not be liable for any damage caused by misuse or improper use of the account, by incomplete or incorrect information, or by disregard of the due diligence obligations set out in the contract.
-
Page 22: Data, Security, And Safety
When creating the password, comply with the applicable password guidelines. CAUTION! Executing learning content Risk of injury and possible damage to the Welducation Simulator, accessories, end device, and surrounding objects due to operation during the simulated weld- ing process or other activities (e.g., connecting the welding torch) ▶... -
Page 23: Software Updates
The manufacturer shall not be liable for any resulting damage. Intended use also means: Carefully reading and adhering to all instructions in these Operating Instruc- tions Carefully reading and adhering to the Welducation Simulator Operating In- structions Carefully reading and understanding all warnings on the Welducation Simu- lator The manufacturer shall not be liable for any lack of or incorrect training success. -
Page 24: Training Concept
Training concept Product concept The Welducation Simulator allows trainees to learn welding skills in a realistic en- vironment, resulting in the following advantages: Very low cost of training. Consumables are not required (wire electrodes, shielding gas, etc.). The trainees are not exposed to the dangers of welding (heat, welding fume, welding spatter, noise, etc.). -
Page 25: Interaction With The Welducation Campus Software
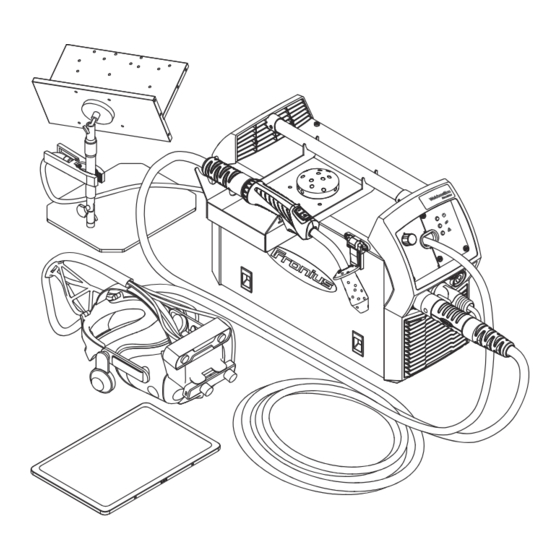
Objectives and The standard equipment of the Welducation Simulator offers a wide range of features of the welding scenarios. In addition to the MIG/MAG, TIG, and MMA processes, the standard equip-... - Page 26 Connections analogous to a real welding system Interfaces for networking Interfaces for external displays, such as projectors or monitors Fronius tablet with case Operation of the simulation and the Welducation Campus software NEXT welding helmet Optical camera: for producing a...
- Page 27 The visualization corresponds to the perspective from a real welding helmet, with information displayed in the manner of a head-up display, e.g., welding current (A) and wire speed (m/min). Best possible level of comfort with even weight distribution on the head and cable distanced from the body by the optimized cable holder.
- Page 28 TIG welding torch and filler metal Electrode holder and stick elec- trode for manual metal arc weld- Realistic familiarization with the pre- paratory tasks: All connections and cable connec- tions are faithfully reproduced. Thus, the return lead cable with workpiece clamp is also present and can be connected.
- Page 29 T-joint, fillet weld Corner weld Lap joint...
- Page 30 Butt joint Square butt weld Y-butt weld Overlay welding Pipe-to-plate connection Diameter 80 mm T-joint, fillet weld Pipe-to-pipe connection Square butt weld Y-butt weld Materials: Steel Chrome-nickel Aluminum Common workpiece thicknesses, such as: 3 mm 6 mm 10 mm To practice a wide variety of welding positions: Supplied table stand with magnetic holder to fix the workpieces in almost any position...
-
Page 31: Optional Accessories
External visualization: Possible to connect additional external displays, such as projectors or monit- Storage tray: Conveniently positioned on the top of the Welducation Simulator Easily attaches to the handle tube and remains stable Large tray for NEXT welding helmet,... -
Page 32: Warning Notices On The Device
Warning notices and safety symbols are located on the device. Removing or on the device painting over the warning notices and safety symbols is not permitted. They warn against incorrect operation, as this may result in serious injury and property dam- age. Welducation Simulator 4,050,005 Part No.: www.fronius.com 33148632 Ser.No.:... -
Page 33: Software And Product Updates
Incorrect operation and incorrectly performed work can cause serious injury and property damage. Only trained and qualified personnel may perform installation, repair, and maintenance work. Read and under- stand the following documents in full: These Operating Instructions All Operating Instructions for the system components, in particular the safety rules Software and Because of updates, certain functions may be available on your device but not... -
Page 34: Operating Controls And Connections
Operating controls and connections Connections on Ventilation openings: the Welducation Device cooling Simulator MIG/MAG welding torch con- nection: For connecting the MIG/MAG welding torch Storage tray: For storing the NEXT welding helmet, the interaction target, and other items Holder for the welding torch or electrode holder Shielding gas simulation: Knob to simulate the adjustment of the shielding gas quantity by means... - Page 35 (11) USB port: For loading a tablet For exporting data Service interface (12) Power switch: For switching the Welducation Simulator on and off (13) WLAN antenna (14) Mains cable connection socket (15) Knurled screw For securing the MIG/MAG...
-
Page 37: Installation
Installation... -
Page 39: It Settings
IT settings IT settings Necessary settings must be made by IT administrators, for example, in a com- pany network. The default delivery state is always Offline Standalone. Online Cloud must be set up separately. -
Page 40: Before Installation And Initial Operation
Danger from devices or system components falling or toppling over This can result in severe personal injury and damage to property. ▶ Set up the Welducation Simulator, the stands, and all system components in a stable position. ▶ Ensure the interaction target and the workpieces are held securely in place. -
Page 41: Waiting Time Until The Power Connection Is Established
The mains lead and its fuse protection should be designed to suit the existing mains supply. The technical data on the rating plate applies. Installing basic Position the storage tray on top of the Welducation Simulator and attach it to system compon- the handle tube. ents If desired, hang the welding torch or electrode holder in the designated hold- er on the storage tray. - Page 42 The workpiece is held magnetically on the magnetic holder of the table stand. The clamp for the return lead cable is attached in a suitable place on the table stand. The table stand offers the following positions and setting options: Rotate Swivel Telescopic adjustment...
-
Page 43: Switching On, Operation
The device may remain inoperative after being switched on or may fail during op- eration. ▶ When connecting the mains cable to the Welducation Simulator as explained below, make sure that the mains cable audibly clicks into place at the con- nection on the Welducation Simulator. -
Page 44: Operation
Wait until the green status indicator on the Welducation Simulator no longer flashes, but lights up constantly. The Welducation Simulator is available. Pair the end device with the Welducation Simulator. Offline: Pairing directly via a WLAN hotspot of the Welducation Simulat-... -
Page 45: Mig/Mag
MIG/MAG... -
Page 47: Commissioning
Commissioning MIG/MAG weld- ing commission- Open the cover on the Welducation Simulator as shown. CAUTION! Danger if the welding torch is not fully inserted This can result in damage to property. ▶ After inserting the welding torch, ensure it is in the correct end position. - Page 48 Tighten the knurled screw for the welding torch to 3 Nm. Close the cover on the Welducation Simulator as shown. Insert the return lead cable into the (+) current socket and lock.
-
Page 49: Laying The Hosepacks Correctly
Laying the hosepacks cor- rectly... -
Page 50: Description Of Mig/Mag Operating Modes
Description of MIG/MAG Operating Modes 2-step mode 4-step mode... -
Page 51: Special 4-Step Mode
Special 4-step mode "Special 4-step mode" takes into account the high thermal conductivity of alu- minum and is therefore particularly suitable for welding aluminum materials. Symbols and ab- breviations Press the torch trigger | Hold the torch trigger | Release the torch trigger Gas pre-flow time Starting-current phase: rapid heating of the base material despite high heat dis- sipation at the start of welding... - Page 52 heat accumulation at the end of welding. This prevents possible sagging of the weld. Final current duration End of arc length correction Slope 2: continuous reduction of the welding current to the final current Gas post-flow...
-
Page 53: Mig/Mag Standard Manual Welding
Selecting the welding processes Selecting and setting the welding parameters The display of the amount of shielding gas set by means of the knob on the Welducation Simulator Select the MANUAL process. Select the desired MIG/MAG operating mode: 2-step mode... - Page 54 Attach the clamp for the return lead cable in a suitable place on the stand. Set the required amount of shield- ing gas by means of the knob on the Welducation Simulator. The Welducation Simulator is ready.
-
Page 55: Mig/Mag Synergic Welding
Welducation Campus software: Selecting the welding processes Selecting and setting the welding parameters The display of the amount of shielding gas set by means of the knob on the Welducation Simulator Select the process. Standard Synergic Pulse Synergic... - Page 56 Attach the clamp for the return lead cable in a suitable place on the stand. Set the required amount of shield- ing gas by means of the knob on the Welducation Simulator. The Welducation Simulator is ready.
-
Page 59: Commissioning
Selecting the welding processes Selecting and setting the welding parameters The display of the amount of shielding gas set by means of the knob on the Welducation Simulator Select the TIG process. Select and set the welding current parameter. Select the polarity. - Page 60 Attach the clamp for the return lead cable in a suitable place on the stand. Set the required amount of shield- ing gas by means of the knob on the Welducation Simulator. The Welducation Simulator is ready.
-
Page 61: Laying The Hosepacks Correctly
Laying the hosepacks cor- rectly... -
Page 62: Description Of Tig Operating Modes
Description of TIG Operating Modes 4-step mode Start of welding with starting current I : Pull back the torch trigger and hold it in this position. Welding with main current I : Release the torch trigger. Lowering to final current I : Pull back the torch trigger and hold it in this po- sition. - Page 63 (4) Push the torch trigger forward and hold it in this position. (5) Release the torch trigger. Gas pre-flow Spot welding time Starting current: The temperature is raised gently at low welding current, so that the filler metal can be positioned correctly Final current: To avoid local overheating of the base material caused by heat accumula- tion at the end of welding.
-
Page 65: Rod Electrode
Rod Electrode... -
Page 67: Commissioning
(+) or (-) welding can be found on the stick electrode packaging. With the Welducation Simulator, the supplied stick electrode can be used for all available scenarios on (+) and (-). Depending on the type of electrode, insert the return lead cable into the (-) current socket or into the (+) current socket and turn it clockwise to lock. -
Page 68: Laying The Hosepacks Correctly
Place the stand securely on the ta- ble / surface. Fix the workpiece in the desired welding position using the stand. Attach the clamp for the return lead cable in a suitable place on the stand. The Welducation Simulator is ready. Laying the hosepacks cor- rectly... -
Page 69: Support
Support... -
Page 71: Fronius Support Team
Fronius Support team Fronius Support Fronius offers remote support to help customers with the installation, commis- team sioning, and configuration of the Welducation Simulator and the Welducation Campus software. Remote support is the first point of contact for faults and er- rors that occur, as well as for troubleshooting. -
Page 72: Update
Update Software update The manufacturer releases regular updates to optimize the products. These are available on the Fronius website in the DownloadCenter. -
Page 73: Troubleshooting, Maintenance, And Disposal
Troubleshooting, maintenance, and disposal... -
Page 75: Troubleshooting
Restart the Welducation Simulator. Pair the end device with the Welducation Simulator again. If the error occurs again despite several attempts and the troubleshooting meas- ures listed below are unsuccessful, contact the Fronius Support team with a de- tailed error description. Safety WARNING! An electric shock can be fatal. -
Page 76: Troubleshooting
Troubleshooting The device is not working. The power switch is on, the status indicators remain dark, the device fan remains still. Cause: The mains lead is disconnected, the mains plug is not plugged in. Remedy: Check the mains lead and insert the mains plug if necessary. Cause: The mains cable is not properly locked in place at the Welducation Simulator connection. - Page 77 Connect the welding torch. Cause: The welding torch cable or plug is defective. Remedy: Replace the welding torch cable or plug. The Welducation Simulator signals a fault on the status indicators (red). Cause: Software error Remedy: Perform an update. Information on this can be found in the Operating Instructions for the Welducation Campus software.
-
Page 78: Maintenance And Disposal
Maintenance and disposal General The device only requires a minimum of service and maintenance under normal operating conditions. However, several points must be observed in order for the device to remain operational for years to come. Safety WARNING! Danger from incorrect operation and work that is not carried out properly This can result in severe personal injury and damage to property. -
Page 79: Technical Data
(22.05 x 8.46 x 14.57 in.) Weight 13 kg (28.66 lb) without standard and optional accessories NEXT welding Mains voltage Supply via Welducation Simulator helmet EMC emission class Mark of conformity Weight 1.5 kg (3.31 lb) Standards The device has been tested according to the following standard in line with the...
Need help?
Do you have a question about the Welducation Simulator and is the answer not in the manual?
Questions and answers