Table of Contents
Advertisement
Available languages
Available languages
Quick Links
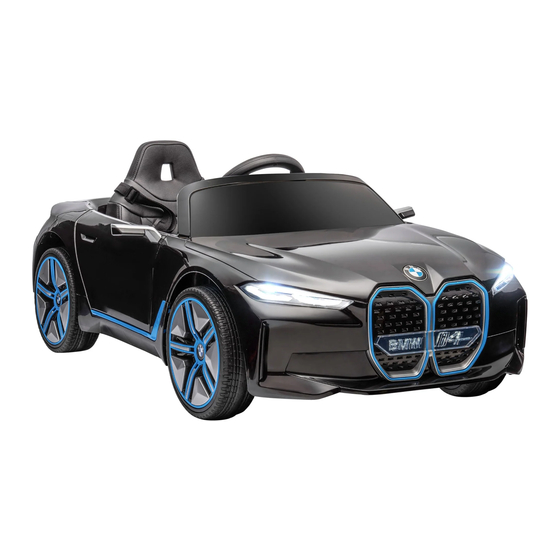
BMW i4
BATTERY POWERED RIDE-ON
IN230600445V01_UK_370-294V70
Owner's Manual
with Assembly Instructions
Styles and colo(u)rs may vary.
Made in China.
The owner's manual contains important safety information as well as assembly, use and
maintenance instructions.
The Ride-on Car must be assembled by an adult who has read and understands the
instructions in this manual.
Keep the package away from children and dispose of properly before use.
Keep this manual for future reference.
Advertisement
Table of Contents

Subscribe to Our Youtube Channel
Related Manuals for HOMCOM BMW i4


Summary of Contents for HOMCOM BMW i4
- Page 1 BMW i4 BATTERY POWERED RIDE-ON IN230600445V01_UK_370-294V70 Owner’s Manual with Assembly Instructions Styles and colo(u)rs may vary. Made in China. The owner’s manual contains important safety information as well as assembly, use and maintenance instructions. The Ride-on Car must be assembled by an adult who has read and understands the instructions in this manual.
- Page 2 Please follow the recommendations in this manual, they are designed to improve the safety and operation of your ride-on car and it’s rider. BMW i4 Children Battery Powered Ride-On manufactured by Zhejiang Jiajia Ride-On Co., Ltd. (Add: Xincang Industrial Zone, Pinghu City, Zhejiang Province, P.R.China).
-
Page 3: User Notice
User Notice │ 2 WARNING! • CHOKING HAZARD - Small parts. Not suitable for children under 36 months. The product contains small parts, keep children away when assembling. • ADULT ASSEMBLY REQUIRED. • Always remove protective material and poly bags and dispose before assembly. •... -
Page 4: Parts Diagram
Parts Diagram │ 3 HINT: Some parts shown are assembled on both sides of vehicle Assembly tools required (not included): Screwdriver... -
Page 5: Parts List
Parts List │ 4 Vehicle body x1 Ø10 washer x1 Wheel x4 Wheel driver x2 Lock nut x4 Hubcap x4 Side mirror x2 Windshield x1 Steering wheel x1 M5x35 machine screw x1 Ø5 nut x1 Seat x1 Ø4x16 screw x3 Dash x1 Spanner x1 Charger x1... -
Page 6: Attach The Rear Wheels
Attach the Rear Wheels │ 5 Rear Bottom View Rear gear boxes Rear gear boxes Remove all the parts from the rear axle. 1-2. Fit the wheel driver to the wheel. Insert and tigthen three Ø4x16 screws to secure the wheel driver to the wheel. 3. -
Page 7: Attach The Front Wheels
Attach the Front Wheels │ 6 Remove all the parts from the front axle. Front Bottom View 1. Slide a Ø10 washer onto the front axle. 2. Slide a wheel onto the front alxe. 3. Slide a Ø10 washer onto the front axle. 4. - Page 8 Attach the Dash & Steering Wheel │ 7 1. Plug the light unit connector on the dash into light connector on the vehicle body. Hide the pluged connectors into the hole in the vehicle body. 2. Fit the tabs on the dash into the holes in the vehicle body, and push until you hear it “click”...
- Page 9 Attach the Steering Wheel, Windshield & Side Mirrors │ 8 Attach the Steering Wheel Remove the M5x35 machine screw and Ø5 nut from the steering wheel. Turn the vehicle body upright. 1. Place the steering wheel over the the steering column, protruding from the middle of the steering wheel base.
- Page 10 Connect the Power Supply & Attach the Seat │ 9 1. Plug the vehicle connector into the connector on the battery. 2. Fit the tabs on the seat back into the grooves on the rear of the vehicle. 3. With a screwdriver tighten the M5x16 screws on the top of the seat into the holes in the vehicle.
- Page 11 Use Your Ride-on │ 10 1. Power button: Turns the product on and off. 2. Foot pedal: Applies power (speed) to the product. ● To move the product, press the pedal down. ● To brake or slow down, release pressure from the pedal. 3.
-
Page 12: Battery Disposal
Charging │ 11 WARNING! • ONLY an adult is allowed charge and recharge the battery! • This product with Charging Protection: when charging, all functions will be cut off. • The POWER SWITCH must be turned in OFF position when charging. •... -
Page 13: Troubleshooting Guide
Troubleshooting Guide │ 12 Possible Cause Solution Problem Vehicle does not run Battery low on power Recharge battery. Thermal fuse has tripped Reset fuse, see <Fuse> Check that the battery connectors are firmly plugged Battery connector or wires into each other. If wires are loose around the motor are loose contact your distributor please. - Page 14 Maintaining │ 13 • It is parents' responsibility to check main parts of the toy before using, Must regularly examine for potential hazard, such as the battery, charge, cable or cord, plug, screws are fastening enclosure of other parts and that in the event of such damage, the toy must not be used until that damage had been properly removed.
- Page 15 Model identifie 370-294V70 Input voltage AC 100-240 Input AC frequency 50/60 Output voltage DC 12 Output current Output power Average active efficiency 79.2 Efficiency at low load (10 %) 72.4 No-load power consumption 0.08 If you have any questions, please contact our customer care center.
-
Page 16: Manuel D'instructions
BMW i4 AUTOPORTÉE ALIMENTÉE PAR BATTERIE IN230600445V01_FR_370-294V90 Manuel d’Instructions Avec instructions d’assemblage Les styles et les couleurs peuvent varier. Fabriqué en Chine. Le manuel d’instructions contient des informations importantes sur la sécurité, ainsi que des instructions d’assemblage, d'utilisation et de maintenance. -
Page 17: Spécifications
La voiturette à batterie BMW i4 pour enfants est fabriquée par Zhejiang Jiajia Ride-On Co, Ltd. (adresse : Xincang Industrial Zone, Pinghu City, Zhejiang Province, R.P.Chine). Le logo BMW et les lettres BMW sont des marques déposées de BMW AG et sont utilisées sous licence. -
Page 18: Avis Aux Utilisateurs
Avis aux utilisateurs │ 2 AVERTISSEMENT! • DANGER ÉTROIT - Petites pièces. Ne convient pas aux enfants de moins de 36 mois. Le produit contient de petites pièces, tenez les enfants à l'écart lors du montage. • ASSEMBLAGE PAR UN ADULTE REQUIS. •... -
Page 19: Schéma Des Pièces
Schéma des pièces │ 3 CONSEIL: Certaines pièces illustrées sont assemblées des deux côtés du véhicule. Outils de montage requis: (non inclus): Tournevis... -
Page 20: Liste Des Pièces
Liste des Pièces │ 4 Carosserie x1 Rondelle Ø10 x1 Roue x4 Contre-écrou x4 Enjoliveur x4 Entraîneur de roue x2 Rétroviseurx2 Pare-brisex1 Volant de directionx1 Vis mécanique M5x30 Ecrou Ø5 x1 Siège x1 Tableau de bord X1 Vis Ø4x16 x3 Clé... - Page 21 Fixez les roues arrière │ 5 Vue du fond arrière Oîtes de vitesses arrière Retirer toutes les pièces de l'essieu arrière. 1-2. Monter l'entraîneur de roue sur la roue. Insérer et serrer trois vis Ø4x16 pour fixer l'entraîneur de roue à la roue. 3.
- Page 22 Fixez les roues avant │ 6 Retirez toutes les pièces de l'essieu avant. Front Bottom View 1.Faites glisser une rondelle Ø10 sur l'essieu avant. 2. .Faire glisser une roue sur l'axe avant. 3. Faites glisser une rondelle Ø10 sur l'essieu avant. 4.
- Page 23 Montage du tableau de bord et du volant │ 7 1. Brancher le connecteur de l'unité d'éclairage sur le tableau de bord dans le connecteur de l'éclairage sur la carrosserie du véhicule. Cacher les connecteurs branchés dans le trou de la carrosserie du véhicule. 2.
- Page 24 Fixation du volant, du pare-brise et des rétroviseurs latéraux │ 8 Attacher le volant Retirez la vis à métaux M5x35 et l'écrou Ø5 du volant. Redressez la carrosserie du véhicule. 1. Placez le volant sur la colonne de direction, en saillie du milieu de la base du volant. 2.
- Page 25 Brancher l'alimentation et fixer le siège │ 9 1. Brancher le connecteur du véhicule sur le connecteur de la batterie. 2. Insérer les languettes du dossier dans les rainures situées à l'arrière du véhicule. 3. À l'aide d'un tournevis, serrez les vis M5x16 situées sur le dessus du siège dans les trous du véhicule.
- Page 26 Utilisez votre véhicule │ 10 1. Bouton d’alimentation : mettre le véhicule sous tension et hors tension. 2. Pédale : Appliquer la puissance (vitesse) au véhicule. ● Pour déplacer la voiture, appuyez sur la pédale vers le bas. ● Pour freiner ou ralentir, relâchez la pression de la pédale. 3.
- Page 27 Chargement │ 11 AVERTISSEMENT ! • SEUL un adulte est autorisé à charger et à recharger la batterie ! • Ce produit avec protection de la charge : lors de la charge, toutes les fonctions seront coupées. • Le COMMUTATEUR D'ALIMENTATION doit être mis en position OFF lors de la charge. •...
-
Page 28: Guide De Dépannage
Guide de Dépannage │ 12 Problème Cause Possible Solution Pile faible sur le pouvoir Rechargez la pile. Le fusible thermique s'est Réinitialisez le fusible, voir <Fusible> déclenché Le connecteur de pile ou les Le véhicule ne court Vérifiez que les connecteurs de la pile sont fermement connectés les uns aux autres. - Page 29 Maintaining │ 13 •Il incombe aux parents de vérifier les pièces principales du jouet avant utilisation. Examinez régulièrement les risques potentiels tels que la pile,la charge, le câble ou le cordon, la fiche dommage, le jouet ne doit pasêtre utilisé avant que ces dommages aient été...
- Page 30 Model identifie 370-294V90 Input voltage AC 100-240 Input AC frequency 50/60 Output voltage DC 12 Output current Output power Average active efficiency 79.2 Efficiency at low load (10 %) 72.4 No-load power consumption 0.08 Si vous avez la moindre question, veuillez contacter notre centre d'assistance à la clientèle.
- Page 31 BMW i4 AKKU-GETRIEBENES AUFSITZFAHRZEUG IN230600445V01_DE_370-294V90 Bedienungsanleitung mit Montageanleitungen Stile und Farben können variieren. In China hergestellt. Die Bedienungsanleitung enthält wichtige Sicherheitsinformationen sowie Anweisungen zur Montage, Verwendung und Wartung. Das Fahrzeug muss von einem Erwachsenen zusammengestellt werden, der die Anweisungen in dieser Anleitung gelesen und verstanden hat.
-
Page 32: Spezifikationen
Befolgen Sie die Empfehlungen in diesem Handbuch, um die Sicherheit und den Betrieb Ihres Fahrzeugs und seines Fahrers zu verbessern. BMW i4 Akkubetriebenes Aufsitzfahrzeug für Kinder hergestellt von Zhejiang Jiajia Ride-On Co., Ltd. (Add: Xincang Industrial Zone, Pinghu City, Zhejiang Province, Volksrepublik China). Das BMW Logo und die BMW Wortmarke sind Marken der BMW AG und werden unter Lizenz verwendet. - Page 33 Benutzerhinweis │ 2 WARNUNG! •ERSTICKUNGSGEFAHR - Kleinteile. Nicht geeignet für Kinder unter 36 Monaten. Das Produkt enthält Kleinteile, halten Sie Kinder beim Zusammenbau fern. •ZUSAMMENBAU DURCH ERWACHSENE ERFORDERLICH. •Immer Schutzmaterial und Polybeutel entfernen und vor dem Zusammenbau entsorgen. •Sie sollten Schutzausrüstung tragen. Tragen Sie immer Schuhe und setzen Sie sich auf den Sitz, wenn Sie das Fahrzeug betreiben.
- Page 34 Teilediagramm │ 3 HINWEIS: Einige der abgebildeten Teile müssen beidseitig am Fahrzeug montiert werden. Benötigtes Montagewerkzeug: (nicht im Lieferumfang enthalten): Schraubenzieher...
- Page 35 Stückliste │ 4 Fahrzeugkarosserie x 1 Ø10 Unterlegscheibe x1 Rad x 4 Kontermutter x 4 Radkappe x 4 Radmitnehmer x2 Seitenspiegel x2 Windschutzscheibe x 1 Lenkrad x 1 Sitz x1 M5x35 Ø5 Mutter x 1 Maschinenschraube x1 Armaturenbrett x 1 Ø4x16 Schraube x3 Schraubenschlüssel x 1 Ladegerät x1...
-
Page 36: Montage Der Hinterräder
Montage der Hinterräder │ 5 Hintere Unteransicht Hintere Getriebeboxen Entfernen Sie alle Teile von der Hinterachse. 1-2. Montieren Sie den Radmitnehmer am Rad. Setzen Sie drei Ø4 x 16 Schrauben ein und ziehen Sie sie fest, um den Radmitnehmer am Rad zu befestigen. 3. - Page 37 Montage der Vorderräder │ 6 Entfernen Sie alle Teile von der Vorderachse. Montage der Vorderräder 1. Schieben Sie eine Unterlegscheibe Ø10 auf die Vorderachse. 2. Schieben Sie ein Rad auf die Vorderachse. 3. Schieben Sie eine Unterlegscheibe Ø10 auf die Vorderachse. 4.
- Page 38 Armaturenbrett & Lenkrad befestigen │ 7 1. Stecken Sie den Anschluss der Beleuchtung am Armaturenbrett in den Anschluss der Beleuchtung an der Fahrzeugkarosserie. Verstecken Sie die eingesteckten Anschlüsse im Loch in der Fahrzeugkarosserie. 2. Stecken Sie die Laschen am Armaturenbrett in die Löcher der Fahrzeugkarosserie und drücken Sie sie ein, bis sie hörbar „klicken“.
- Page 39 Befestigen Sie das Lenkrad, die Windschutzscheibe und die Seitenspiegel │ 8 M ontage des Lenkrads Entfernen Sie die Maschinenschraube M5x35 und die Mutter Ø5 vom Lenkrad. Fahrzeugkarosserie aufrecht stellen. 1. Platzieren Sie das Lenkrad über der Lenksäule, die aus der Mitte der Lenkradbasis herausragt.
- Page 40 Schließen Sie das Netzteil an und befestigen Sie den Sitz │ 9 1. Stecken Sie den Fahrzeugsanschluss in den Anschluss am Akku. 2. Setzen Sie die Laschen der Sitzlehne in die Nuten an der Rückseite des Fahrzeugs ein. 3. Ziehen Sie die M5 x 16-Schrauben auf der Oberseite des Sitzes mit einem Schraubendreher in die Löcher im Fahrzeug ein.
- Page 41 Nutzung │ 10 1. Ein/Aus-Schalter: Schaltet das Fahrzeug ein und aus. 2. Fußpedal: Schaltet das Fahrzeug ein und aus: Führt dem Fahrzeug Leistung (Geschwindigkeit) zu. ● Um das Fahrzeug zu bewegen, drücken Sie das Pedal nach unten. ● Um zu bremsen oder zu verlangsamen, lassen Sie den Druck vom Pedal ab. 3.
- Page 42 Au laden │11 WARNUNG! • NUR ein Erwachsener darf den Akku laden und aufladen! • Dieses Produkt kommt mit Ladeschutz: Beim Aufladen werden alle Funktionen abgeschaltet. • Der BETRIEBSSCHALTER muss während des Ladevorgangs auf AUS gestellt werden. •Vor dem ersten Gebrauch sollten Sie den Akku 4-6 Stunden lang aufladen. Laden Sie den Akku nicht länger als 10 Stunden auf, um eine Überhitzung des Ladegeräts zu vermeiden.
-
Page 43: Fehlerbehebung Guide
Fehlerbehebung Guide │ 12 Mögliche Ursache Lösung Problem Batterie gering Batterie aufladen. Thermische Sicherung ist Neu erstellen Fuse, sehen <Fuse> ausgetrippt Fahrzeug läuft nicht Batterie-Stecker oder Drähte Überprüfen Sie, ob die Batterieanschlüsse fest ineinander sind lose gesteckt sind. Wenn die Drähte rund um den Motor locker sind, wenden Sie sich bitte an Ihren Händler. - Page 44 Instandhaltung │ 13 •Es liegt in der Verantwortung der Eltern, die Hauptteile des Spielzeugs vor dem Einsatz zu überprüfen. Muss regelmäßig auf mögliche Gefahren,wie z. B. Batterie, Aufladung, Kabel oder Kabel, Stecker, überprüfen.Schrauben dienen zum Befestigen von Gehäusen an anderen Teilen undim Fall von solchen Beschädigungen darf das Spielzeug nicht verwendetwerden, bis die Schäden ordnungsgemäß...
- Page 45 Model identifie 370-294V90 Input voltage AC 100-240 Input AC frequency 50/60 Output voltage DC 12 Output current Output power Average active efficiency 79.2 Efficiency at low load (10 %) 72.4 No-load power consumption 0.08 Wenn Sie Fragen haben, wenden Sie sich bitte an unser Kundendienstzentrum. Unsere Kontaktdaten stehen unten: 0049-0(40)-88307530 service@aosom.de...
Need help?
Do you have a question about the BMW i4 and is the answer not in the manual?
Questions and answers
My remote control seems to bind ok but the buttons to move forward/back and left/right di not work
The issue with the HOMCOM BMW i4 remote control buttons not working for forward, backward, left, and right movement could be due to the R/C - PEDAL switch not being set to remote control mode. You need to open the protective cover and ensure the switch is set to R/C mode. Also, make sure the vehicle is powered on and the battery is charged.
This answer is automatically generated