Advertisement
Quick Links
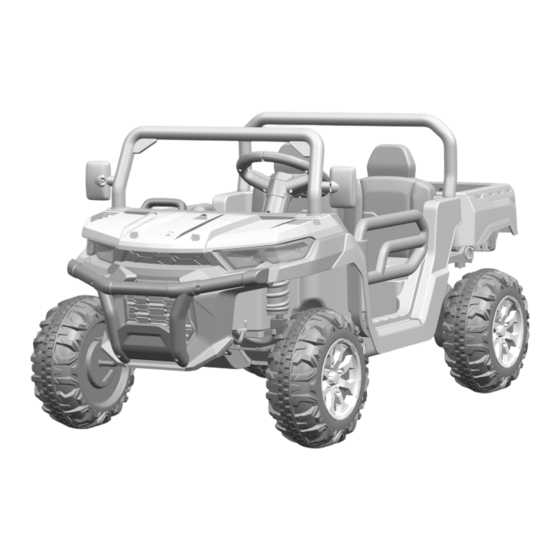
INflb001_UK
370-239V70
4 Wheels Dump Truck
Battery Powered Ride-on
50
Read and understand this entire manual before using!
Please keen this manual for future reference as it contains important information.
Before first time use. charge the battery for at least 4-6 hours, but no more than 10
hours.
IMPORTANT, RETAIN FOR FUTURE REFERENCE: READ CAREFULLY
ASSEMBLY INSTRUCTION
Advertisement

Related Manuals for HOMCOM 370-239V70


Summary of Contents for HOMCOM 370-239V70
- Page 1 INflb001_UK 370-239V70 4 Wheels Dump Truck Battery Powered Ride-on Read and understand this entire manual before using! Please keen this manual for future reference as it contains important information. Before first time use. charge the battery for at least 4-6 hours, but no more than 10 hours.
- Page 2 About your new vehicle On the purchase of your new ride-on. To ensure the user rides safely, please read these instructions carefully. Keep this manual for future reference. 100-240V 50/60Hz 0.3A 12V 1000mA 12V #550*2(12000RPM) ●Do not recharge non-rechargeable batteries. ●Before charging rechargeable batteries, remove them from the vehicle.
- Page 5 PREVENTING POSSIBLE INJURY OR DEATH: ● NEVER LEAVE CHILDREN UNATTENDED. ADULT SUPERVISION IS ALWAYS REQUIRED. Keep children in your view when they use this vehicle. ● A certain amount of skill is required when using this vehicle, preventing falls or collisions.
- Page 6 Remove all parts from the front axle. 1.Place a Ø12 washer onto the front axle. 2.Place the front wheel onto the front axle. 3.Place a Ø10 washer onto the front axle. 4.Tighten a locknut to the end of the front axle with a spanner. DO NOT over tighten.
- Page 7 Insert the rear axle into the correct hole on the rear side of the body.
- Page 8 24V rear gear box 1. Plug the connector of the rear box to the connector from the body. Fit the rear gearbox onto the rear axle. 2. Place the driving wheel onto the rear axle. 3. Slide a Ø10 washer onto the rear axle. 4.
- Page 9 1-2. Fit the front bumper to the vehicle body, then insert four 4x14 black screws and tighten. 3. Insert the handle into the holes on the dash. 4. Plug the sound unit connector on the steering wheel into the connector on the body. Hide the connectors and wires into the steering wheel.
- Page 10 Connect the Power Supply & Attach the Seat Bottom of seat 1. Plug the connecter from the vehicle body into the connector on the battery. 2. Place the seat back into the vehicle body. 3-4. Press and hold the button on the bottom of the seat until it is attached to the body.
- Page 11 1-2. Insert the mirrors to the windshield. TIP: The mirrors only fit on the vehicle one way. Insert and tighten two Ø4x14 screws on each mirror. 3. Insert the tabs from the windshield into the holes on the vehicle body. Push until you hear it 'click' into place.
- Page 12 1. Power button: Turn the product on and off. 2. Forward/stop/reverse lever: Changes the direction of the ride-on. ●To move forward, shift the lever to top position. ●To move backward, shift the lever to down position. ●In the middle position, the ride-on will not move. 3.
- Page 13 A. Previous/ Hold to decrease volume. B. Play/ hold to pause. C. Skip/ Hold to increase volume. D. On a 12V product – rocking button: Turn rocking mode on and off. Product will not move under this mode. On 24V product – Bluetooth button. E.
- Page 14 Inserting batteries Lift the battery compartment cover, which is on the back of the controller, then insert two AAA (LR03) batteries. NOTE: Batteries not included. Refer to battery information on page 1. 1. Connecting Press the connection button for two seconds – the indicator will flash. Turn on the power switch on the vehicle dash.
- Page 15 AN ADULT MUST CHARGE THE BATTERY! This product has a charging protection: when charging, all functions will cut off. ● The power switch must be off when charging. ● Before the first use, charge the battery for 4-6 hours. Do not charge the battery for more than 10 hours to avoid overheating.
- Page 16 Battery is not fully charged. The maximum load has been exceeded. Check the battery connectors are firmly plugged into each other. If wires are loose around the Loose wires or connectors. motor, please contact the distributor. 'Dead spot' means the electric power is not being delivered to the terminal connection, which means the ride-on needs repairing.
- Page 17 ● It is the adult's responsibility to check main parts of this ride-on before using. It is important to regularly inspect the battery, charger, cable or cord and plug. Ensure screws are tightened. If any damages occur, do not use this ride-on until properly fixed. ●...
- Page 18 The battery has a thermal fuse with a rest fuse, which automatically cuts all power to the vehicle if the motor, electric system or battery overloads. The fuse will reset and power will be restored after the unit has been off for 20 seconds, the turned on.
Need help?
Do you have a question about the 370-239V70 and is the answer not in the manual?
Questions and answers