Sinexcel SEC Series User Manual
Dc distributed charger
Hide thumbs
Also See for SEC Series:
- Maintenance manual (19 pages) ,
- Maintenance manual (27 pages) ,
- User manual (42 pages)

Subscribe to Our Youtube Channel
Related Manuals for Sinexcel SEC Series


Summary of Contents for Sinexcel SEC Series
- Page 1 SEC Series DC Distributed Charger User Manual Issue Date 2022-03-01 Copyright 2022 Sinexcel. All rights reserved ©...
- Page 2 SEC Series DC Distributed Charger – User Manual Disclaimers: Sinexcel shall not be liable for any consequence caused by any of the following events: Warranty expiration of the warranty service; Failure to follow the operation instructions and safety precautions in this document, and ...
- Page 3 SEC Series DC Distributed Charger – User Manual Foreword Reader This document (this guide) is primarily intended for the following engineers: Technical Support Engineer Maintenance Engineer Installation team Symbol Conventions The following symbols may appear in this document and their description are as follows:...
-
Page 4: Table Of Contents
SEC Series DC Distributed Charger – User Manual Catalog 1 Safety Precautions ............................4 1.1 Special symbols for warnings and dangers ..................4 1.2 Safety instructions for use ........................5 1.3 Safety instructions for operation ......................5 2 Product Overview ............................7 2.1 Briefing .............................. - Page 5 SEC Series DC Distributed Charger – User Manual 3.5.5 Internal wiring diagram ......................... 40 3.5.6 Internal wiring details ........................42 3.6 Inspection after installation ......................... 45 4 Operation interface ........................... 46 4.1 Notes before charging ......................... 46 4.2 Charging process ..........................46 4.2.1 Main interface ..........................
-
Page 6: Safety Precautions
SEC Series DC Distributed Charger – User Manual 1 Safety Precautions 1.1 Special symbols for warnings and dangers Symbol Symbol word Description Since some parts of this power system are under Danger high voltage during operation, it is fatal for direct... -
Page 7: Safety Instructions For Use
1.2 Safety instructions for use The SEC series DC charger is a distributed charger that you can use to supply electricity to an EV in well ventilated indoor and outdoor areas. - Page 8 Without Sinexcel permission, do not do any unauthorized modification to the product or remove of the components. Sinexcel will not be liable for any consequence caused by these unproper operations. Do not touch the EV charging connector or vehicle inlet. Keep it dry and clean.
-
Page 9: Product Overview
In this way, the SEC distributed charger can realize the flexible power distribution among the connectors. SEC series charger can provide liquid cooling and air cooling User Terminal, as well as CCS2 and JAP charging standard. The charger can meet the charging demand of larger capacity and high endurance from electric vehicle on the market. -
Page 10: Models Description
SEC Series DC Distributed Charger – User Manual U: User Terminal Charging standard: Only optional for User Terminal. Null for Power Bank. C: CCS, referring to CCS Combo connector J: JAP, referring to Japan standard connector N: Null Can choose C/CC/CJ/N... -
Page 11: Product Technical Specifications
SEC Series DC Distributed Charger – User Manual Maximum Output Power Distribution Current Model Connector Connector Connector A Connector B CCS2:240kW or SEC1000/500U-CC-P CCS2:200KW or 0KW 500A 200A 480KW CCS2:240kW or SEC1000/500U-CC-D CCS2:200KW or 0KW 500A 200A 480KW CCS2:240kW or... - Page 12 SEC Series DC Distributed Charger – User Manual Technical Specifications of Power Bank Category Item Parameter Weight ≤850kg Communication OCPP1.6/2.0(Upgrade) Protocol Cooling Method Forced air cooling Operating Environmental -25℃~+65 ℃ (Derating over 50℃) Temperature Conditions Humidity 5%~95% Altitude ≤2000m, derating over 2000m...
- Page 13 SEC Series DC Distributed Charger – User Manual Technical Specification of User Terminal Category Item Parameter Energy Meter DC meter Connector Type 1(CCS2) OR 2 (CCS2+JAP or CCS2+CCS2) Network Interface 4G/LAN Dimensions W750*D400*H2100 mm Protection Level IP55 Others Weight ≤225kg Cable Length 5m (Optional for liquid cooling in 3.5m)
-
Page 14: Product Features
SEC Series DC Distributed Charger – User Manual 2.5 Product Features The maximum charging power can reach 480kW, and there are various power configurations from 360kW to 480kW to meet the customized needs. The system includes Power Bank and User Terminals, one Power Bank can provide power to ... -
Page 15: Product View
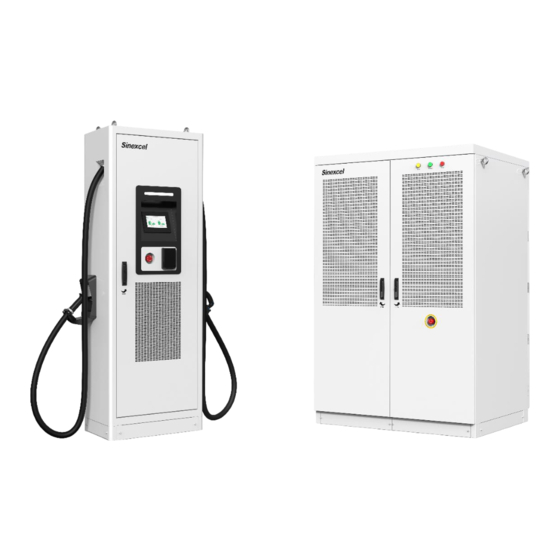
SEC Series DC Distributed Charger – User Manual 2.6 Product View 1. SEC Series Power Bank Figure 2.6.A SEC Series Power Bank LED indicator Eye bolts for lifting Ventilation area Emergency button Door handle/ lock... - Page 16 SEC Series DC Distributed Charger – User Manual SEC Series User Terminal Figure 2.6.B EC Series User Manual Eye bolts for lifting Ventilation area LED indicator Antenna Human machine interface Card reader Emergency button Charging connector Door handle/ lock...
-
Page 17: Installation Instruction
SEC Series DC Distributed Charger – User Manual 3 Installation Instruction 3.1 Dimensions 3.1.1 Power Bank Figure 3.1.1-A Views and dimensions of SEC Series Power Bank 3.1.2 User Terminal Figure 3.1.2-A Views and dimensions of SEC Series User Terminal... -
Page 18: Installation Requirement
SEC Series DC Distributed Charger – User Manual 3.2 Installation Requirement 3.2.1 Power Bank Space needs to be reserved for the opening of front and rear doors of the Power Bank. Please refer to Figure 3.2.1-A for the reserved space dimensions;... - Page 19 SEC Series DC Distributed Charger – User Manual Figure 3.2.1-B hole positions and dimensions at the bottom of Power Bank Figure 3.2.1-C Hole positions and dimensions of the Power Bank concrete foundation...
- Page 20 SEC Series DC Distributed Charger – User Manual Figure 3.2.1-D Power bank concrete foundation height and the reserved length of the input and output cables...
-
Page 21: User Terminal
SEC Series DC Distributed Charger – User Manual 3.2.2 User Terminal Space needs to be reserved for the opening of front and rear doors of the User Terminal. Please refer to Figure 3.2.2-A for the reserved dimensions; Figure 3.2.2-B shows the hole drilling positions and dimensions at the bottom of the User Terminal;... - Page 22 SEC Series DC Distributed Charger – User Manual Figure 3.2-2-B Hole positions and dimensions at the bottom of User Terminal Figure 3.2.2-C Hole positions and dimensions of the User Terminal concrete foundation...
- Page 23 SEC Series DC Distributed Charger – User Manual Figure 3.2.2-D User Terminal concrete foundation height and the reserved length of the input and output cables...
-
Page 24: Installation Steps
SEC Series DC Distributed Charger – User Manual 3.3 Installation Steps Tools required : Tools Drawing Tools Drawing Cross Claw screwdrive hammer Electric drill Herringbo Equipped with φ ne ladder 16mm drill bit Insulating Cable gloves clipper Insulation Hydraulic shoes... -
Page 25: Installation Process
SEC Series DC Distributed Charger – User Manual 3.4 Installation Process 3.4.1 Power Bank Unpacking the outer package of the cabinet Tools required: herringbone ladder, claw hammer, art knife, protective gloves 1)With the help of the herringbone ladder, straighten the metal card on the top of the packing material with a claw hammer, and remove the upper cover plate. - Page 26 SEC Series DC Distributed Charger – User Manual 2)Straighten all metal cards with a claw hammer, remove the surrounding wood boards, cut the PE bags wrapped around the cabinet with the art knife, and remove the PE bags and foam. As shown in Figure 3.4.1-B.
- Page 27 SEC Series DC Distributed Charger – User Manual 3)Use a wrench to remove the 4 M12 bolts around the foundation, as shown in Figure 3.4.1-C Figure 3.4.1-C 2. Foundation drilling Tools required: electric drill, φ16mm drill bit, protective gloves 1)The foundation is constructed according to the positions and dimensions of the holes shown in Figures 3.2.1-C and 3.2.1-D.
- Page 28 SEC Series DC Distributed Charger – User Manual Figure 3.4.1-E 3. Placement of the power cabinet 1)Use a forklift to transport the Power Bank to the mounting foundation. Use a crane to lift the cabinet, as shown in Figure 3.4.1-F.
- Page 29 SEC Series DC Distributed Charger – User Manual 3)Install 4 M12*80 expansion bolts on the drilled mounting holes around the foundation, and tighten the bolts to ensure the cabinet is fixed reliably, as shown in Figure 3.4.1-G Figure 3.4.1-G...
- Page 30 SEC Series DC Distributed Charger – User Manual 4)Install the front and rear sealing plates of the foundation, as shown in Figure 3.4.1-H. Figure 3.4.1-H...
- Page 31 SEC Series DC Distributed Charger – User Manual 5)Install the sealing plates on the left and right sides, as shown in Figure 3.4.1-I. Figure 3.4.1-I Note: Install the front and rear sealing plates in the direction shown in the figure first. Then install...
-
Page 32: User Unit
SEC Series DC Distributed Charger – User Manual 3.4.2 User unit 1. Unpacking the outer package of the cabinet Tools required: herringbone ladder, claw hammer, art knife, protective gloves 1)With the help of the herringbone ladder, straighten the metal card on the top of the packing material with a claw hammer, and remove the upper cover plate. - Page 33 SEC Series DC Distributed Charger – User Manual 2)Straighten all metal cards with a claw hammer, remove the surrounding wood boards, cut the PE bags wrapped around the cabinet with the art knife, and remove the PE bags and foam. As shown in Figure 3.4.1-B.
- Page 34 SEC Series DC Distributed Charger – User Manual 3)Use a wrench to remove the 4 M12 bolts around the foundation, as shown in Figure 3.4.2-C. Figure 3.4.2-C 2. Foundation drilling Tools required: electric drill, φ16mm drill bit, protective gloves 1)The foundation is constructed according to the positions and dimensions of the holes given in Figures 3.2.2-C and 3.2.2-D.
- Page 35 SEC Series DC Distributed Charger – User Manual Figure 3.4.2-D 3. Placement of the User Terminal 1)Use a forklift to transport the User Terminal to the mounting foundation. Use a crane to lift the cabinet, as shown in Figure 3.4.2-E.
- Page 36 SEC Series DC Distributed Charger – User Manual ②The cable entry sealing plate of the cabinet can be removed. It is recommended to remove the sealing plate before entering the cable, and then pass the cable through the waterproof gland.
- Page 37 SEC Series DC Distributed Charger – User Manual 3)Install 4 M12*80 expansion bolts on the drilled mounting holes around the foundation, and tighten the bolts to ensure the cabinet is fixed reliably, as shown in Figure 3.4.2-G Figure 3.4.2-G...
- Page 38 SEC Series DC Distributed Charger – User Manual 4)Install the front and rear sealing plates of the foundation, as shown in Figure 3.4.2-H. Figure 3.4.2-H 5)Install the sealing plates on the left and right sides, as shown in Figure 3.4.2-I.
-
Page 39: Construction Of Power Cables
SEC Series DC Distributed Charger – User Manual 3.5 Construction of power cables 3.5.1 Layout requirements of power cables 1、The AC input and DC output cables of the Power Bank enter from the Input and output hole at the bottom of the charger, and the cable shall be laid through the cable trench. -
Page 40: Recommended Cable Specifications
SEC Series DC Distributed Charger – User Manual smooth without damage and crack. Before setting the hot-shrinking tube, the foreign objects on the cable should be removed ( e.g., burr and iron filings) on the surface to prevent damage to the tube. -
Page 41: Connection Diagram Of Whole Device
SEC Series DC Distributed Charger – User Manual 3.5.4 Connection diagram of whole device Figure 3.5.4-A Power Bank wiring diagram Connection Instructions of equipment: 1) The shield of CAN Communication cable must be grounded reliably. 2) The power cable and CAN communication cable need to be laid separately to avoid interference. -
Page 42: Internal Wiring Diagram
SEC Series DC Distributed Charger – User Manual 3.5.5 Internal wiring diagram 1、Internal wiring diagram of Power Bank main circuit breaker grounding copper bar to User Terminal copper bar of AC input cable copper bar of DC output cable grounding copper bar... - Page 43 SEC Series DC Distributed Charger – User Manual 2、Internal wiring diagram of User Terminal auxiliary power source and CAN cable Input hole transfer terminal grounding copper bar DC input copper bar...
-
Page 44: Internal Wiring Details
SEC Series DC Distributed Charger – User Manual 3.5.6 Internal wiring details 1、Internal wiring details of Power Bank The Power Bank's internal AC input cables are located behind the front door, and the circuit breaker cables are N、L1、L2、L3 from left to right. The cabinet grounding parts are divided into three parts, two of which are the grounding copper bars inside, and the other one is at the external casing. - Page 45 SEC Series DC Distributed Charger – User Manual The Power Bank's internal DC output power cables are located behind the rear door. The output cables are divided into six groups which are DC1、DC2、DC3、DC4、DC5、DC6 from left to right. The grounding wire of each User Terminal needs to be laid out from Power Bank separately, as shown in Figure 3.5.6-B.
- Page 46 SEC Series DC Distributed Charger – User Manual Power Bank User #1 User #1 User #2 User #2 User #3 User #3 User Terminal TerminalDC1 TerminalDC2 TerminalDC1 TerminalDC2 TerminalDC1 TerminalDC2 Table 3.5.6 Power Bank output and User Terminal input connection correspondence 2、Internal wiring diagram of User Terminal...
-
Page 47: Inspection After Installation
SEC Series DC Distributed Charger – User Manual 3.6 Inspection after installation 1. Tightness According to the requirements of design and protection level, the junction between the input sealing plate and the input cable at the bottom of the cabinet should be sealed with waterproof gland to ensure tightness. -
Page 48: Operation Interface
SEC Series DC Distributed Charger – User Manual 4 Operation interface 4.1 Notes before charging 1) Before charging, make sure that the charger system is in a normal state. 2) Before charging, make sure that the charging cable is not damaged, and the charging connector is free of water. -
Page 49: Main Interface
SEC Series DC Distributed Charger – User Manual 4.2.1 Main interface Tip: Select CCS connector or JAP connector according to the socket type of the car. Following is the process of selecting CCS, to which the JAP’s is similar. 4.2.2 Waiting for connector insertion interface Tip: Connecting the connector to the car will jump to the connector insertion interface. -
Page 50: Connecting Interface
SEC Series DC Distributed Charger – User Manual 4.2.3 Connecting interface Tip: Click next button to jump to charging mode selection interface. 4.2.4 Select charging mode interface Tip: Click the button to choose the payment method you want for next charging... - Page 51 SEC Series DC Distributed Charger – User Manual 1 Code scanning charging interface process Scan the QR to enter the start charging interface. Charging interface Click "end" to end charging and enter the settlement interface. Tip: After charging, click Back button. If the other charging connector is in charging state, it will jump to the charging interface of that connector, otherwise it will jump to the main interface.
- Page 52 SEC Series DC Distributed Charger – User Manual 2 Pay by card charging interface process Select or enter the precharge amount to jump to the card swiping interface. Swipe the card following the interface prompts to jump to the charging...
- Page 53 SEC Series DC Distributed Charger – User Manual 3 Password charging interface process Enter the password to jump to the start charging interface. Charging interface Click End button to charging and jump to settlement interface. Tip: Click the password blank and a small keyboard will show up. Enter the password through the keyboard and click the OK button.
-
Page 54: Simple Troubleshooting
SEC Series DC Distributed Charger – User Manual 5 Simple troubleshooting Analysis and treatment of common faults Refer to the maintenance manual for detailed treatment Alarm or fault Processing method Check the status of lightning arrested. If the visual Lightning protection... - Page 55 SEC Series DC Distributed Charger – User Manual Check the auxiliary power source and check whether the power supply circuit is normal. If the PDU board restarts automatically, the auxiliary power source may be abnormal, or the power supply circuit is faulty.
-
Page 56: After-Sales Service
SEC Series DC Distributed Charger – User Manual 6 After-sales service If you have any questions or questions, please contact the equipment supplier. Before contacting the equipment supplier: Please check the troubleshooting measures in the chapter 5" Simple troubleshooting". Please record the model and serial number of the equipment (name plate of the... - Page 57 SEC Series DC Distributed Charger – User Manual Appendix A---Module Group Number Setting Guide 480 kW Front View Left side modules Right side modules M24(G0 A24) M23(G0 A23) M12(G0 A12) M11(G0 A11) M22(G0 A22) M21(G0 A21) M10(G0 A10) M9(G0 A9)
Need help?
Do you have a question about the SEC Series and is the answer not in the manual?
Questions and answers