Table of Contents
Advertisement
Quick Links
Advertisement
Table of Contents

Subscribe to Our Youtube Channel
Related Manuals for Sinexcel Izar


Summary of Contents for Sinexcel Izar
- Page 1 Izar AC Charger User Manual...
-
Page 2: Table Of Contents
4.Sinexcel AC APP 4.1 Download APP For Apple users, please search for Sinexcel AC in the Apple App Store to download and install it. For Android users, please search for Sinexcel AC in the Google App Store to download and install it. -
Page 3: About The Document
About the document 1.This manual is specifically for the Izar AC charger series products, providing comprehensive guidance for users of new energy vehicles users to use and maintain this charging equipment. 2.This manual will provide detailed product information and operating instructions for users. Users should read the contents of the manual carefully before use this product and ensure that you understand all the instructions. -
Page 4: Liability Statement And Disclaimer
1. Liability statement and disclaimer 1.1 Liability statement Requirements of users and field operators: ・Please operate charging stations with adequate safeguards in place and ensure that safeguards are prop- erly installed and regularly maintained. ・Please prepare an emergency plan that instructs people on what to do in an emergency. ・Please prepare the installation site of the charging pile, according to the requirements described in this manual. - Page 5 1.Without the permission of our company, users are strictly prohibited from modi- fying the parameters by themselves. Other unpredictable faults caused by the user modifying the parameters without authorization will be solved by the user himself. 2.It is forbidden to use any other adaptors to charge an electric vehicle that does not comply with the standards of this product! If the user does not comply with the warnings in this manual, the user will be responsible for any risks from the use of the adaptor!
-
Page 6: Safety Instructions
2. Safety Instructions 2.1 Symbol Conventions Identification Description Warning Indicates a potentially hazardous situation which, if not avoided, could result in death or serious injury. Danger Caution electricity Caution of fire Note A note gives more details to make easily use. It means that the machine cannot be discarded after use and should be delivered to a dedicated recycling place, otherwise it may cause environmental pollution. -
Page 7: Instructions For Equipment Use
2.2 Instructions for equipment use ・This product is an all-in-one machine that can charge electric vehicles in indoor and outdoor areas. ・Please use and save the product information and accessories provided with the equipment from the fac- tory. ・If the user has any problems or failures during use, please consult the equipment provider directly. During the warranty period, if you find a third party or non-professionals for maintenance without autho- rization, the user will be responsible for any safety consequences. - Page 8 Do not use the charger in the following situations and contact the manufacturer immediately: ・Outer shell damage Electric vehicle charging cable or charging gun damage ・Lightning strikes the charger ・Accident or fire near the charger ・Water has entered the charger Warning: If an emergency occurs during the use of this product, please press the emergency stop button immediately, it is strictly forbidden to use the emergency stop button in non-emergency situations! After pressing it, do not reset the emergen-...
-
Page 9: Product Overview
3.1 Brief introduction Izar is an AC charger for electric vehicles. It is mainly composed of a charger body and an optional ped- estal, including Socket and Cable version. The IP grade of the Socket version is IP55, and the IP grade of the Cable version is IP65. -
Page 10: Product Use
3.3 Product use Izar is used for AC charging of electric vehicles and is suitable for use in indoor or outdoor environments. Izar should only be used with accessories supplied by the manufacturer or in compliance with local stan- dard specifications. -
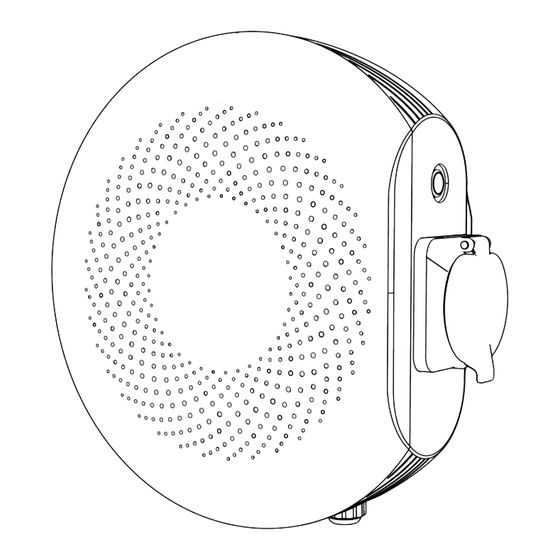
Page 11: Product Image
3.5 Product image 1.Emergency stop button 2. ocket 3.Card swiping area 4. LED 5.Connector holder 6.Charging connector Name Functions Emergency stop button Emergency press to stop charging immediately Socket Connect connector wire Card swiping area RFID card identification area(optional) Display charging and standby status Connector holder Fix charging connector Charging connector... -
Page 12: Product Specifications
Note:Izar Socket and Izar Cable have the same shell size. 3.6 Product specifications European standard AC charger (residential )Izar Type SEA 230/32I-E-S SEA 230/32I-E-C Product name Izar Socket Izar Cable Rated power 7.4kW 7.4kW Basic Specifications Input/output current Input/output voltage Single phase 230V(±10%)... - Page 13 emergency stop, input overvoltage and undervoltage, grounding, connector Recoverable failure lock abnormality, overfrequency and underfrequency fault, restart charging after recovery, onboard metering abnormality, CT abnormality (optional) Class B(Residential environment) Support power system TN-CS, TN-C, TN-S, TT Certification CE, TUV mark, TR25, RCM, UKCA Color Snow white Noise...
-
Page 14: Sinexcel Ac App
4.1 Download APP For Apple users, please search for Sinexcel AC in the Apple App Store to download and install it. For An- droid users, please search for Sinexcel AC in the Google App Store to download and install it. -
Page 15: Unbind
4.4 Unbind 4.5 Setting charging start time On the "Device Details" page, click "Scheduled Charging", and click the "Start Scheduled Charging" button to start the scheduled charging function. When the time reaches the set time point and the gun is inserted, the pile will auto- matically start charging. -
Page 16: Authorization Management
4.6 Authorization management 4.7 Configuration setting Click "Authorization Management" in the Click "configuration Settings" in the "Device De- "Device Details" interface, click "Add Authoriza- tails" interface, and you can view or set the fol- tion" in the upper right corner, enter the email ac- lowing parameters in this interface. -
Page 17: Firmware Upgrade
4.8 Firmware upgrade Click "Firmware Upgrade" in the "Device Details" interface to enter the "Firmware Upgrade" interface. Select the version, upgrade or downgrade to the corresponding version of the software, and click Up- grade or Downgrade, according to the needs. When the software is being upgraded, please wait patiently for the upgrade progress bar to complete, which is expected to take 2-3 minutes. -
Page 18: Charging Instructions
5. Charging instructions 5.1 Charging steps 5.1.1 Charge with APP Step 1: Insert the connector Insert the connector into the socket of the electric vehicle, and the indicator light changes from green to blue. Step 2: Start charging After opening the APP and connecting the charger, click "Start charging" in the device details interface, and the indicator turns blue, then the charging will be successfully started. - Page 19 Step 3: Stop charging When the battery is fully charged or click "Stop charging" on the device details interface of the APP, the indicator light will turn blue and stay on, and the battery will stop charging. Pull out the connector and return it to the socket of the charger.
- Page 20 Step 3: Stop charging When the charge is fully charged or the card is swiped in the card reading area, the indicator light turns blue and stays on, and the charging is stopped. Pull out the connector and return it to the socket of the charger.
- Page 21 Step 2: Insert the connector Insert the charging connector into the connector of the electric vehicle, the indicator light will change from green to blue, and water will flow, and the connector will immediately enter the charging state. Step 3: Stop charging When the charging is fully charged/swipe the card in the card reading area/click "Stop charging"...
-
Page 22: Indicator Status
5.2 Indicator status Charger Indicator status status Standby Green light is on Blue light is on Connect Charge Blue breathing light Emergency stop Red light is on Note: the indicator light status of socket version and cable version AC charger is consistent —... - Page 23 Indicator status overview State Breathing light indication Standby Green light is on Connect Blue light is on Charge Blue breathing light Emergency stop Red light is on Under/over voltage Red light is on,blue flashes for 2s RCD failure Red flashes for 2s Over current Red flashes for 500ms Relay adhesion...
-
Page 24: Cable Management
5.3 Cable management The cable management system solves the user's trouble in actual use, keeps the cable clean and tidy, and avoids touching the floor. After charging, the user can easily wrap the cable around the hook on the column for easy operation. As shown in the figure below. —... -
Page 25: Installation Mode For Disabled
5.4 Installation mode for disabled In order to provide convenience for the disabled, the installation height of the charger can be adjusted so that the disabled can have a better product use experience, as shown in the figure below. — —... -
Page 26: Fault Diagnosis And Resolution
6、Fault diagnosis and resolution When the indicator light of the charger has the following fault light effect, the corresponding fault treat- ment method is as follows. Error code Error type Description Treatment method 1. Check whether the e m e r g e n c y s t o p button is pressed, and if so, reset the emer- Emergency stop button... - Page 27 The output current is Contact Technical Error 4 Overcurrent fault greater than the overcurrent Support value(35A) The relay contact is Contact Technical Relay adhesion fault Error 6 overheated, causing adhe- Support sion or failure Abnormal communication Meter Contact Technical or fault of electric energy Error 7 communication Support...
-
Page 28: Network Security
7. Network security 7.1 Warning The security protocol mentioned in this manual must be used for connection. If the security protocol is not used, there will be network security risks. 7.2 Product network security disclaimer The product is designed to connect with the network interface and transmit information and data through the network interface. -
Page 29: Warranty
8.Warranty 8.1 Warranty period The warranty period of this product is subject to the contract. Our products are within the warranty period, and the customer should take the initiative to show the invoice, date and SN number of the purchased product to our service personnel during maintenance. - Page 30 Izar AC Charger User Manual...
Need help?
Do you have a question about the Izar and is the answer not in the manual?
Questions and answers