Table of Contents
Advertisement
Quick Links
Advertisement
Table of Contents

Related Manuals for Sinexcel Mira


Summary of Contents for Sinexcel Mira
- Page 1 Mira AC Charger User Manual...
-
Page 2: Table Of Contents
3.4 Overview of product naming ....................7 3.5 Product diagram ........................ 8 3.6 Product specifications and parameters ................9 3.7 Product accessories and list ....................11 4.Sinexcel AC APP ......................... 12 4.1 Download APP ........................12 4.2 Registration/Login ......................12 4.3 Binding ..........................13 4.4 Unbinding ......................... -
Page 3: About The Manual
About the Manual 1. This manual is only for Mira AC charger series products developed and produced by Sinexcel, providing comprehensive guidance for new energy vehicle users to use and maintain this charging device. 2. This manual will provide users with detailed product information and operating instructions for using the AC charger. -
Page 4: Liability Statement And Disclaimer
1.2 Disclaimer If the product equipment needs to be used normally within a certain range of conditions, Sinexcel will not be liable for any accident or damage caused by one of the following circumstances: Products and accessories not identified by our company;... -
Page 5: Safety Instructions
2. Safety instructions 2.1 Identification description identification describe warning Indicates a potential danger that, if not effectively avoided, may result in death or serious injury. danger Be careful of electric shock. Fire Hazard Area. notes Provide detailed explanations to help users use this product more simply and safely. -
Page 6: Instructions For Equipment Use
2.2 Instructions for equipment use This product is an all-in-one machine that can charge electric vehicles in indoor and outdoor areas. Please properly use and keep the product data and accessories provided with the equipment. If the user has any problems and failures in the use process, please directly ... -
Page 7: Product Overview
There are two versions: Socket and Cable. The IP level of the socket is IP55, and the IP level of the cable is IP65. Mira has multiple security protections to ensure the smooth operation of the equipment. -
Page 8: Overview Of Product Naming
3.4 Overview of product naming... -
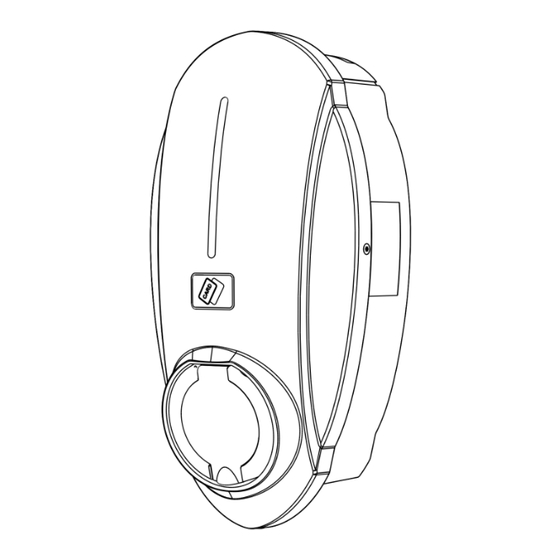
Page 9: Product Diagram
3.5 Product diagram 1. Emergency stop button 2. Connector holder 3. Card swiping area 4. LED water lamp 5. Connector holder 6. Connector Serial name function Emergency stop button In case of emergency, press to stop charging immediately Connector base Connecting cabal Card swiping area RFID card identification area... -
Page 10: Product Specifications And Parameters
Note: The shell dimensions of SEA 230/32M-E-S and SEA 230/32M-E-C are the same. 3.6 Product specifications and parameters European standard AC charger (home) Mira Model SEA 230/32M-E-S SEA 230/32M-E-C power Basic parameters Rated input/output current Rated input/output Single phase 230V (± 10%) - Page 11 Communication Bluetooth, WiFi, 4G/LTE (optional) mode working temperature -30℃—+55℃ relative humidity 5%—95% Altitude <2000m Installation method Support wall mounted type (column type installation is optional) Degree of protection IP55/IK09 IP65/IK09 Protection function Overcurrent protection, overvoltage/undervoltage protection, lightning protection, short circuit protection, ground fault protection (built-in PEN fault device, supporting British PEN Fault protection), etc Recoverable fault...
-
Page 12: Product Accessories And List
3.7 Product accessories and list 1) Charger Serial name Specification/material quantity Finished host Charger body (PC) Wall mounted directional L425*W300mm paper Charging card Charging card cable ties Bagged Installation and Operation Neutral User Manual Manual certificate certificate Anti-theft wrench Stainless steel T20 Expansion pipe ¢6*30mm(PE)... -
Page 13: Sinexcel Ac App
Apple users should search for Sinexcel AC download and installation in Apple Store, and Android users should search for Sinexcel AC download and installation in Google Store. 4.2 Registration/Login To log in to Sinexcel AC APP for the first time, you need to register first. -
Page 14: Binding
Enter the App interface, as shown in the figure, click "+" in the upper right corner to enter the binding page. Enter a user-defined name, click the charger model and select Mira; bind the charger number by scanning the code, and automatically obtain the charger number by scanning the specified QR code;... -
Page 15: Unbinding
4.4 Unbinding... -
Page 16: Setting The Timing Start
4.5 Setting the timing start Click "Scheduled Charging" on the "Device Details" page, and click the "Start Scheduled Charging" button to start the scheduled start charging function. When the time is up to the set time point and the connector has been inserted, the charger will automatically start charging. -
Page 17: Authorization Management
4.6 Authorization management Click "Authorization Management" in the "Device Details" interface, click "Add Authorization" in the upper right corner, enter the email account of the authorized user (registered), and click "Save and Apply" to complete the authorization; The authorized user only has some functions such as start stop charging, timed charging, plug and play charging, and data analysis, but has no other functions. -
Page 18: Parameter Search
4.7 Parameter Search Click "Parameter Setting" under the interface of "Device Details", you can check or set the following parameters in this interface (Note: Users should not modify the parameters without permission to avoid unnecessary trouble). -
Page 19: Firmware Upgrade
4.8 Firmware upgrade Click "Firmware Upgrade" in the "Device Details" interface to enter the "Firmware Upgrade" interface, select the version as required, upgrade or downgrade to the corresponding version of software, and click "Upgrade or downgrade". When the software is being upgraded, please wait patiently for the upgrade progress bar to complete, which is expected to take 2-3 minutes. -
Page 20: Charging Instructions
5. Charging instructions 5.1 Charging steps 5.1.1 APP charging Step 1: Insert the connector Insert the connector into the socket of the electric vehicle, and the indicator light changes from green to blue, that is, it enters the connector insertion state. Step 2: Start charging After opening the APP and connecting the charger, click "Start charging"... - Page 21 Step 3. Stop charging When the battery is fully charged or click "Stop charging" on the device details interface of the APP, the indicator light will turn blue and stay on, and the battery will stop charging. Pull out the connector and return it to the socket of the charger. The indicator light turns green and is always on, and it enters the standby state.
- Page 22 5.1.2 Charge by swiping card Step 1: Insert the connector Insert the connector into the socket of the electric vehicle, and the indicator light changes from green to blue, that is, it enters the connector insertion state. Step 2: Start charging Place the RFID card in the card reading area.
- Page 23 5.1.3 Plug and Charge Step 1: Set the mode After opening the APP and connecting the charger, click the "off" button of plug and play in the device details interface to start the plug and play mode.
- Page 24 Step 2: Insert the connector Insert the charging connector into the connector of the electric vehicle, the indicator light will change from green to blue, and water will flow, and the connector will immediately enter the charging state. Step 3. Stop charging When the charging is fully charged/swipe the card in the card reading area/click "Stop charging"...
-
Page 25: Indicator Status
5.2 Indicator Status Charger Indicator status status Standby Green is always connect Always bright blue charge Blue water lamp Emergency Red is always stop Remark: the indicator light status of connector thread plate and connector base plate is consistent. Indicator Status Overview state Breathing light indication Standby... -
Page 26: Cablemanagement
stop Under/over Red is always on, blue flashes for 2s voltage RCD failure Red flashing for 2s Over current Red flashing for 500ms Relay adhesion Red is always on, green flashes for 500ms Meter fault Red is always on, green flashes for 2s Ground fault Red is always on. -
Page 27: Disabled Installation Mode
5.4 Disabled Installation Mode In order to provide convenience for the disabled, the installation height of the charger can be adjusted so that the disabled can have a better product use experience, as shown in the figure below. -
Page 28: Fault Diagnosis And Resolution
6. Fault diagnosis and resolution When the indicator light of the charger has the following fault light effect, the corresponding fault treatment method is as follows. error sketch describe processing method code 1. Check whether the emergency stop button is pressed, and if it is pressed, reset the Emergency stop button is... - Page 29 adhesion or failure Meter Abnormal communication Contact Technical Error 7 communication or fault of electric energy Support failure metering module Card reader The card reader is faulty or Contact Technical Error 8 communication damaged Support failure The RDC leakage detection module fails or there is Contact Technical Error 10...
-
Page 30: Network Security
SINEXCEL ELECTRIC CO., LTD. shall not be liable for any damage and/or loss caused by the above security vulnerabilities, any unauthorized access, interference, intrusion, data or information disclosure and/or theft. -
Page 31: Quality Assurance
8. Quality assurance 8.1 Warranty period The warranty period of this product is subject to the contract. During the warranty period of our products, the customer should take the initiative to show our service personnel the invoice, date and SN number of the products purchased. -
Page 32: Contact Us
Our company provides customers with all-round technical support. If you have any questions about our products and technical problems, please contact us in time. Shenzhen Sinexcel Electric Co., Ltd Address: Building 6, Zone 2, Baiwangxin Hi tech Industrial Park, No. 1002, Songbai Road, Xili Street, Nanshan District, Shenzhen Company website: https://www.sinexcel.com...
Need help?
Do you have a question about the Mira and is the answer not in the manual?
Questions and answers