Table of Contents
Advertisement
Quick Links
Advertisement
Table of Contents

Subscribe to Our Youtube Channel
Related Manuals for Harmar Mobility MODRAMP


Summary of Contents for Harmar Mobility MODRAMP
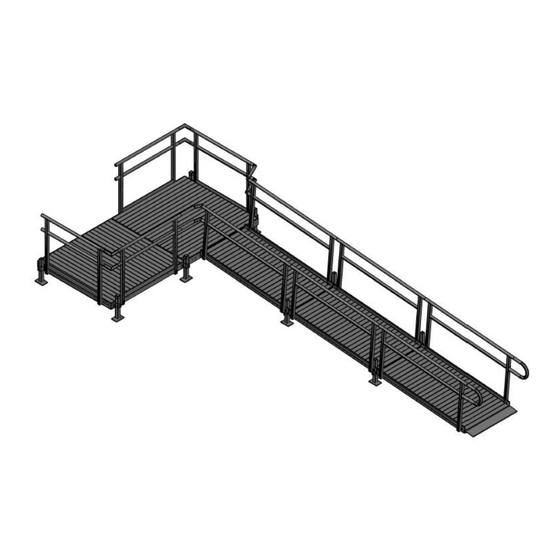
- Page 1 ELEVATION RAMP INSTALLATION MANUAL 04OCT19 | 630-00103-01 Rev B...
- Page 2 Safety Notice: Personal Protective Equipment should be worn when handling or installing modular ramping. Installers should wear long pants with appropriate footwear that provides toe protection. Gloves should always be worn when handling the equipment. Eye and ear protection should be used whenever cutting or drilling metal. Compliancy Notice: The dealer is responsible to verify and meet all applicable codes pertaining to this ramp installation.
-
Page 3: Table Of Contents
TABLE OF CONTENTS Product Specifications Before You Start Installation Flowchart Recommended Tools Platform Assembly Mounting The J-Hook Ramp Run Assembly 10-11 Ramp Run Handrail Assembly End Loop Handrail Assembly Platform Handrail Assembly 14-15 Final Inspection Warranty Information Harmar, warrants to the “original purchaser” a three-year limited warranty for any Elevation Ramps modular ramping and its components that are deemed “warranted”... -
Page 4: Product Specifications
Product Specification Drawings P a g e 04OCT19 | 630-00103-01 Rev B... -
Page 5: Before You Start
Before You Start 1. Review all relevant documentation. a. Site photos b. Field drawings c. Assessment form d. Harmar configuration drawing e. Harmar components list 2. Verify all site work has been completed in advance. 3. Consider if paver stones or a landing pad will be needed. 4. -
Page 6: Installation Flowchart
Installation Flowchart Confirm site Install bottom Assemble prep, tools, landing pad if handrails and materials necessary Unload ramp Attach ramp Confirm and lay on runs to everything is ground near landings tight and level install location Train customer Assemble any Assemble any and review platforms... -
Page 7: Recommended Tools
Recommended Tools & Supplies □ Impact wrench + drill (battery powered) □ Socket adapter for impact wrench □ Drill bits (metal, masonry, wood) □ #2 Phillips bit with driver guide Tip: Driver Guides make drilling into pipe much □ 7/16”, 1/2”, 9/16” sockets w/ ratchet easier and safer! □... -
Page 8: Platform Assembly
Platform Assembly 1. Before attaching leg brackets to platform, determine the orientation of the platform. Consider size, the direction of the non-skid, and leg location. 2. Install leg brackets with legs to platform. Pull brackets up before tightening the two bolts with nuts. -
Page 9: Mounting The J-Hook
Mounting The J-Hook 1. Properly securing the J-Hook is critical for ensuring the safety of the ramp system. The J-Hook is responsible for supporting the top of the upper most ramp section. The J-Hook also ensures the ramp does not pull away from the landing. -
Page 10: Ramp Run Assembly
Ramp Run Assembly 1. Attach J-hook to the upper landing using the appropriate fasteners. The upper landing may be an existing structure or a Harmar platform. Installation Method 1: a. Install first section of ramp into J-Hook and then attach leg brackets with legs. It is helpful to rest the bottom end of the ramp section on top of something while mounting the brackets/legs. - Page 11 Ramp Run Assembly 1. Attach J-hook to the upper landing using the appropriate fasteners. The upper landing may be an existing structure or a Harmar platform. Installation Method #2: a. On flat ground, connect all ramp sections within a ramp run by way of the tongue and groove system.
-
Page 12: Ramp Run Handrail Assembly
Ramp Run Handrail Assembly 1. Secure handrails to ramp section with the 2” carriage bolt, washer, and 1/2” nut. When possible, install rails with ramp lying flat on the ground, but this can also be done on an incline. If bolt holes do not line up, use an alignment tool or bar clamp to assist. -
Page 13: End Loop Handrail Assembly
End Loop Handrail Assembly 1. With handrails completed along both sides of the ramp run, you can now install any end loops specified by your application drawing. 2. Begin end loop installation by installing connection sleeves into end loop. Use predrilled holes and provided self-tapping screws. -
Page 14: Platform Handrail Assembly
Platform Handrail Assembly 1. Per application drawing, install standard rails and secure with provided 2” bolts, washers, nut. When installing platform 1/2” handrails, ensure the flat side of the wheel guard is facing in towards the ramp surface. Turning platforms will appear as illustrated while a straight platform will have rails on the opposite sides of each other. - Page 15 Platform Handrail Assembly 1. Before connecting the platform handrails to ramp handrails, you will first need to assemble the adjustable elbows. 2. Slide assembled elbow into upper platform handrail and secure with self-tapping screw. Repeat process for lower handrail as well. 3.
-
Page 16: Final Inspection
Final Inspection Before the customer uses the ramp, it is critical that the installer(s) perform a final inspection of the ramp system. □ Attachment to home is solid and adequately fastened. □ All hardware is installed and tightened appropriately. It is recommended to walk the length of the ramp (both sides) and snug all bolts with a ratchet/socket combo.
Need help?
Do you have a question about the MODRAMP and is the answer not in the manual?
Questions and answers