
Subscribe to Our Youtube Channel
Related Manuals for ETC Echoflex ELED2-BU


Summary of Contents for ETC Echoflex ELED2-BU
- Page 1 Tunable White Dimming Controller Models: ELED2-BU and ELED2H-AU Configuration Guide Part Number: 8189M2411 Rev.B Released: 2023-07...
- Page 2 To view a list of Echoflex trademarks and patents, go to echoflexsolutions.com/ip. All other trademarks, both marked and not marked, are the property of their respective owners. For a complete list of all third-party licenses that are fully incorporated herein to the extent required by each third-party license terms and conditions, please visit etcconnect.com/licenses.
-
Page 3: Table Of Contents
Table of Contents Introduction Document Conventions Help from Technical Services Control Features Dim-to-Warm Explicit Color Control Automated Color Tuning Characterized Color Tuning Configuration Options Simple Tap Instructions Radio Communications Repeater Function Status Message Dimming Intensity Tunable White Control Near-Cross Technology Switch Operation Multi-Scene Station Buttons Color Tuning Functions... - Page 4 Grace Timer Photo Inhibit Dual Technology Occupancy Sensors Occupancy Sensors and Partial-ON Occupancy Sensors and Partial-OFF Occupancy Sensors with Switches Open-Plan Shared Occupancy Create a Shared Occupancy Space Hospitality Applications Daylight Harvesting Applications Daylighting Control Override Closed Loop Control Open Loop Control Controller Presets User Interface Power LED and Learn LED...
- Page 5 Linking Activities Compliance FCC Compliance ISED Compliance Conformité ISDE Table of Contents...
- Page 6 Tunable White Dimming Controller Configuration Guide...
-
Page 7: Introduction
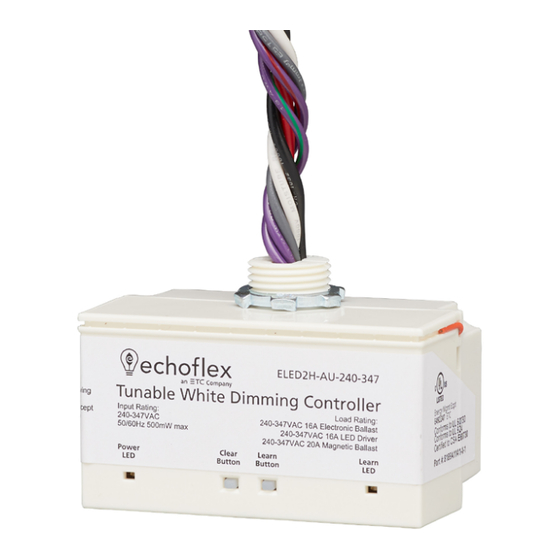
Introduction The Tunable White Dimming Controller is a wireless lighting controller designed for spaces/areas where intensity and correlated color temperature (CCT) control are required. The ELED2 controller creates a range of desired lighting effects based on occupancy state, manual switch action, ambient light levels, and timeclock or gateway commands for a single LED fixture or entire zone. -
Page 8: Document Conventions
Document Conventions Echoflex's user documentation is designed for print or electronic use. Cross-references highlighted in this document are links to the referenced section of the guide. Configuration parameters are emphasized in italics. Switch actions (ON/OFF) and dimmer events (lights ON/OFF) are emphasized in ALL CAPS. Buttons are emphasized in [Bold Bracket]. This document uses the following conventions to draw your attention to important information. -
Page 9: Control Features
Control Features Dim-to-Warm Dim-to-Warm operates if at least one switch station is linked to the intensity channel and nothing is linked to the color temperature channel. Color temperature moves according to the change in light intensity. An increase in intensity also moves color temperature to cooler. A decrease in intensity moves color temperature to warmer. -
Page 10: Configuration Options
Configuration Options The ELED2(H) is a complete stand-alone lighting controller requiring only remote linked devices to provide input on light level, color temperature, occupancy state and switch operation. In addition to the tunable white color operations, the controller will perform the following common lighting control applications: •... -
Page 11: Status Message
1. Press and hold the [C lear] button on the controller. 2. Tap the [Learn] button: • Once to disable repeating • Twice to enable single-hop repeating • Three times to enable dual-hop repeating 3. Release the [C lear] button. The Power and Learn LEDs blink the corresponding number of [Learn] button presses. -
Page 12: Multi-Scene Station Buttons
• Press and hold [ON] to fade to the maximum dimming level. • Press and hold [OFF] to fade to the minimum dimming level. If a photo sensor is linked to the dimming channel it will have control priority over manually dimming the output towards the maximum output value. -
Page 13: Occupancy-Based Lighting Applications
Occupancy-Based Lighting Applications When occupancy sensors linked to the controller do not detect motion, they send a vacancy message to the controller. After the occupancy Auto-OFF timer expires, the controller turns the lights OFF or fades to a preset level. For information about coordinated control of a space, Open-Plan Shared Occupancy on page Occupancy Sensor Auto-OFF Timer The occupancy Auto-OFF timer is set to 15 minutes by default. -
Page 14: Photo Inhibit
Photo Inhibit The photo inhibit feature requires a linked photo sensor and an occupancy sensor with Partial-ON enabled. See Occupancy Sensors and Partial-ON below. When photo inhibit is enabled, the Partial-ON feature is ignored when the natural light level measured by the photo sensor is above the lights ON set point. -
Page 15: Open-Plan Shared Occupancy
Open-Plan Shared Occupancy The open-plan shared occupancy feature provides energy saving control over large open spaces that have been segmented into zones to comply with local energy code requirements. It allows connected lighting controllers to share the occupancy state of the zone they control. Only after all the controllers in the space report a vacant state are the lights turned off at the same time. -
Page 16: Hospitality Applications
3. Press and hold the [C lear] button and then press the [Learn] button four times on the sending controller. The controller sends a shared occupancy ID for controllers in Link mode to receive and record. Alternatively, if the project is set up in Garibaldi Pro, you can copy the sending controller's shared occupancy ID field to each of the controllers in the space. -
Page 17: Daylight Harvesting Applications
Daylight Harvesting Applications The controller modulates light intensity from a dimming fixture based on the ambient light level in the space when a photo sensor is linked to the dimming channel. When daylighting is active, a switch, gateway command, or occupancy sensor cannot force the light level higher. However, a switch, occupancy sensor, or gateway command can override the light OFF or dim to a level below the daylighting control value. - Page 18 To set the closed loop set point: 1. Turn the light ON. 2. Use a handheld photometer to measure the light on the task plane. 3. Use a linked switch to adjust the fixture's light level until it matches the target light level and give the sensor a moment to register the level.
-
Page 19: Open Loop Control
Open Loop Control A sensor's default setting (open loop or closed loop) depends on what it is linked to and the daylighting operating mode setting on the controller: automatic, open loop, or closed loop. In open loop daylighting, the sensor monitors the natural light contribution. The sensor must be mounted so it is not affected by the controlled fixture's light output. -
Page 20: Controller Presets
To change the default setting: 1. Turn the light ON. 2. Tap the photo sensor [Teach] button three times to change the default. The light ramps up to full ON and then dims to OFF once. a. If you stop and exit the menu here (after three taps), the daylighting mode is set to closed loop. -
Page 21: User Interface
User Interface Note: Garibaldi Pro software is the ideal tool to set up your project and configure settings, or even to make edits if your project has been pre-commissioned. Garibaldi Pro is available for download at echoflexsolutions.com. Two buttons on the controller activate features and set specific configurations directly on the device. -
Page 22: Remote Linking Solution
Remote Linking Solution Use the following method to link the first switch if you cannot access the [Learn] button on a controller that has not been pre-commissioned and you do not have Garibaldi Pro software. This method only works if there are no switches linked to the controller. You cannot link a scene station using this method. -
Page 23: Blink Indications
Blink Indications The following tables describe the LED codes that identify linked devices and the LED indications that describe linking activities. Red: Linking Channel 1 (Intensity) Device Type Power LED Learn LED 1 long blink followed by short blinks Switches that count the switches 2 long blinks followed by short blinks Occupancy sensors that count the sensors... - Page 24 Compliance For complete regulatory compliance information, see the Echoflex Tunable White Dimming Controller datasheet at echoflexsolutions.com. FCC Compliance Echoflex Tunable White Dimming Controller (For any FCC matters): Echoflex Solutions, Inc. 3031 Pleasant View Road Middleton, WI 53562 +1 (608) 831-4116 echoflexsolutions.com This device complies with Part 15 of the FCC Rules.
- Page 25 Compliance...
- Page 26 Corporate Headquarters n Middleton, WI, USA | +1 608 831 4116 © 2023 Echoflex Solutions, Inc. | Trademark and patent info: echoflexsolutions.com/ip echoflexsolutions.com | Email info@echoflexsolutions.com | Support service@echoflexsolutions.com Third-party license agreement info: etcconnect.com/licenses | Product information and specifications subject to change. Echoflex intends this document to be provided in its entirety. 8189M2411 Rev B Released 2023-07...
Need help?
Do you have a question about the Echoflex ELED2-BU and is the answer not in the manual?
Questions and answers