Advertisement
Quick Links
Technical Support and E-Warranty Certificate www.vevor.com/support
AC EV CHARGER
USR MANUAL
MODEL:EV-B06-US003A/EV-B06-US003B/EV-B06-US007B
We continue to be committed to provide you tools with competitive price.
"Save Half", "Half Price" or any other similar expressions used by us only represents an
estimate of savings you might benefit from buying certain tools with us compared to the major
top brands and doses not necessarily mean to cover all categories of tools offered by us. You
are kindly reminded to verify carefully when you are placing an order with us if you are
actually saving half in comparison with the top major brands.
Advertisement

Related Manuals for VEVOR EV-B06-US003A


Summary of Contents for VEVOR EV-B06-US003A
- Page 1 Technical Support and E-Warranty Certificate www.vevor.com/support AC EV CHARGER USR MANUAL MODEL:EV-B06-US003A/EV-B06-US003B/EV-B06-US007B We continue to be committed to provide you tools with competitive price. "Save Half", "Half Price" or any other similar expressions used by us only represents an estimate of savings you might benefit from buying certain tools with us compared to the major top brands and doses not necessarily mean to cover all categories of tools offered by us.
- Page 3 CustomerService@vevor.com This is the original instruction, please read all manual instructions carefully before operating. VEVOR reserves a clear interpretation of our user manual. The appearance of the product shall be subject to the product you received. Please forgive us that we won't inform you again if there are any technology or software updates on our product.
-
Page 4: Safety Precautions
Before the operation, please read the operation manual carefully to know the equipment and the correct method of use. Please keep it for future reference. SAFETY PRECAUTIONS 1. Before installation, please check the grid for single-phase 230 v ±10% (50 Hz)". Otherwise unable to use it. 2. -
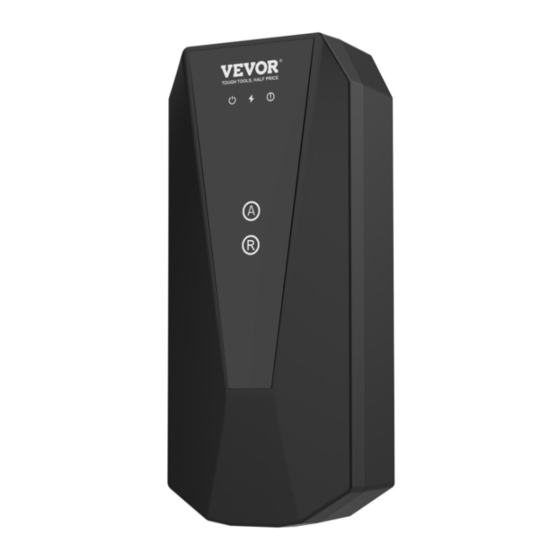
Page 5: Product Introduction
6. Keep dry and clean on the charging point. If there is any dirt, please use a clean, dry cloth to wipe it. It is forbidden to touch the point pin. 7. Hybrid car, please recharge again after flame out. In the process of charging, vehicle driving is prohibited. - Page 6 1. Product Parameters Type no. EV-B06-US003A EV-B06-US003B EV-B06-US007B AC 120V or In put voltage AC 240V AC 240V AC 240V AC 120V or Ou tput voltage AC 240V AC 240V AC 240V Power output 3.8KW 7.7kw Maximum output current Class of...
- Page 7 QUIPMENT INSTRUCTIONS 2. After the device is powered on, it enters the standby state. The device standby interface is shown below: 2.1 After inserting the charging gun head into the vehicle charging port, the charging interface is shown below: 2.2 Adjust the charging current: click the button to adjust the charging gear:16A-13A-10A-8A-16A Cycle the current in this order.After switching the usage current, plug in the gun head to charge.
- Page 8 2.3 Appointment charging: Click to increase the reservation time.You can choose between 0 and 12H.After the appointment time, it will automatically enter the charging state.All models included in this manual can be charged by APP Appointment charging. OBILE PHONE APP CHARGING OPERATION INSTRUCTIONS 3.
- Page 9 follow the APP according to the prompts. 3.1 Binding and Using Devices Open the installed APP, click Agree privacy Statement, you can register with your mobile phone number, social software binding registration, and log in to the APP after a successful registration. Long press A on the charging panel, and APP START appears on the display screen to enter the APP mode;...
- Page 10 c. Click Add to add the device, enter the WIFI pairing interface, automatically identify the WIFI name of the phone.Click Next, and the device will be automatically bound. After the binding is successful, a message will be displayed indicating that the device has been successfully added.
- Page 11 Yellow light flashing Switch current gear status: Press the current button and the yellow light will flash once (8A ); EV-B06-US003A Press the current button and the yellow light will flash twice (10A); EV-B06-US003B Press the current button and the yellow light will flash 3 times (13A);...
- Page 12 4.1 Fault display description(EV-B06-US007B) 4.2 Ground Fault: The ground wire is not connected or the ground wire is poor. 4.3 CP Fault:The device detects that the CP voltage exceeds 6V ± 0.8 or 9V ± 0.8, reports a CP fault, recovers the voltage to within range, and recovers the fault.
- Page 13 4.4 Overcurrent Fault: If the charging current of the device exceeds the threshold and continues to exceed 5s, the device will disconnect charging and report a fault, which cannot be automatically restored. 4.5 Undervoltage Fault: The rated input voltage is 240V, and a fault is reported if the voltage value is lower than 192V±5V.
-
Page 14: Installation Instructions
1 copy Storage bag Portable hard case travel bag 1 PCS Adapter plug cable (equipped Adapter line from 6-20 socket to 1PCS with EV-B06-US003A) 5-15 plug Wall mount installation Wall mount Wall mounted fasteners 1 PCS M8*60 expansion Expansion screw... - Page 15 5.1 The installation method is wall hanging a.Take out the provided wall mounting fasteners and carefully check the installation dimensions of the screw holes. b.Select the installation location of the device. The lowest position of the equipment is a wall mounted fastener 1200 mm above the ground. c.Drill 2 holes with a diameter of 8mm according to the location of the fixed screw holes of Wall mounted fasteners, and tap in the expansion rubber plugs.
- Page 16 Technical Support and E-Warranty Certificate www.vevor.com/support...
Need help?
Do you have a question about the EV-B06-US003A and is the answer not in the manual?
Questions and answers