Advertisement
Quick Links
Technical Support and E-Warranty Certificate www.vevor.com/support
WEIGHT DISTRIBUTION HITCH
MODEL: HL10000
We continue to be committed to provide you tools with competitive price.
"Save Half", "Half Price" or any other similar expressions used by us only represents an
estimate of savings you might benefit from buying certain tools with us compared to the major
top brands and doses not necessarily mean to cover all categories of tools offered by us. You
are kindly reminded to verify carefully when you are placing an order with us if you are
actually saving half in comparison with the top major brands.
Advertisement

Subscribe to Our Youtube Channel
Related Manuals for VEVOR HL10000


Summary of Contents for VEVOR HL10000
- Page 1 Technical Support and E-Warranty Certificate www.vevor.com/support WEIGHT DISTRIBUTION HITCH MODEL: HL10000 We continue to be committed to provide you tools with competitive price. "Save Half", "Half Price" or any other similar expressions used by us only represents an estimate of savings you might benefit from buying certain tools with us compared to the major top brands and doses not necessarily mean to cover all categories of tools offered by us.
- Page 2 CustomerService@vevor.com This is the original instruction, please read all manual instructions carefully before operating. VEVOR reserves a clear interpretation of our user manual. The appearance of the product shall be subject to the product you received. Please forgive us that we won't inform you again if there are any technology or software updates on our product.
- Page 3 Warning-To reduce the risk of injury, user must read instructions manual carefully. WARNING: 1. Read and understand all instructions. Failure to follow all instructions listed below may result in serious injury. 2. Various dangers may occur if the hand lever grease gun is improperly handled during installation, commissioning and daily operation.
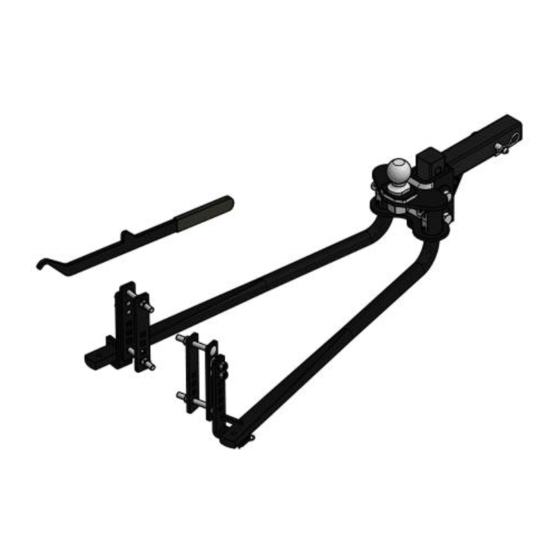
- Page 4 MODEL AND PARAMETERS Model: HL10000 Gross Trailer Weight: 10000 lbs Tongue Weight: 1000 lbs Hitch Ball: 2-5/16" Adjustable Shank: 2" COMPONENTS - 3 -...
- Page 5 Parts List Item Quantity Description Hitch head Spring bar Spring bar support bracket assembly Adjustable shank Snap-up handle Hitch pin & clip Hitch ball, 2-5/16" Lock washer,1-1/4" Hex nut, 1-1/4"-12 Hex bolt, 3/4"-10x5" Serrated conical washer 3/4" Nylock nut,3/4"-10 Hex bolt, 5/8"-11 x 1-3/4" - 4 -...
-
Page 6: Assembly And Installation
ASSEMBLY & INSTALLATION Step 1: Insert adjustable shank bar(#4) into receiver tube on tow vehicle and secure with hitch pin&clip(#6). NOTE:To obtain proper ball height on high ground clearance vehicles,shank may be inverted as shown below.If shank is used in the inverted position,check for adequate ground clearance. - Page 7 Step 4: Install the head on the shank at marked position.Insert the 3/4”-10 x 5” hex bolt(#10) through the 3/4” conical washer(#11)and then through the lower hole in the head channel.Rotate the head forward as far as it will go. The ball should be vertical or tilted slightly back.If it is not,adjust set screws(#13).Install the remaining 3/4”-10 x 5”...
- Page 8 support some of the tongue weight. Raise the front of the trailer and back of the tow vehicle approximately 3" with tongue jack or until the rear bumper is back to the initial measured height. This will allow easier installation of the spring bars onto the support brackets.
- Page 9 Step 11: Pry the spring bar onto the L-bracket by rotating the lift bar to vertical. With the spring bar supported by the L-bracket, remove the lift handle. Secure the spring bar by installing the retainer clip and cotter pin. Step 12: Check the vehicle height and adjust the angle of the head using the set screws (#13) as required until desired loading is reached.
-
Page 10: Maintenance
should settle evenly. Remeasure the front and rear bumper reference points. If the front has settled much more than the rear, adjust the set screws until the vehicle and trailer are level. The spring bars should be nearly horizontal when correct height is achieved. Step 13:... - Page 11 2. Keep the head assembly exterior clean. Do not allow dirt or stones to lodge between the spring bars and the head. 3. Keep hitch parts painted to prevent rust and maintain good appearance. Do not paint over labels. 4.Keep lift brackets clean and lubricated to ensure ease of operation. MADE IN CHINA - 10 -...
- Page 12 Technical Support and E-Warranty Certificate www.vevor.com/support...
Need help?
Do you have a question about the HL10000 and is the answer not in the manual?
Questions and answers
Just need to know if there's a Video on how to install.
Do you'll have a video on how to Install the Model: HL 10000