Advertisement
Quick Links
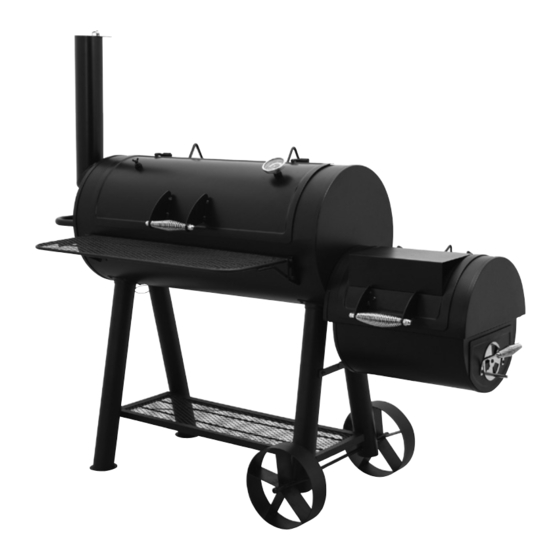
Grill, roast or smoke generous amounts of food on the 990 x 440mm cooking area
Durable high temperature powder coated solid steel 2.5mm hood and 1.5mm firebox
Porcelain coated cooking racks in main area and offset firebox area
Heavy duty lid mounted temperature gauge with secondary port
Easy access to firebox to add fuel and flavour and for ash removal
Drop down front shelf for preparation and bottom shelf for storage
Sturdy and stable saw horse leg stand design with heavy duty steel wheels
Assembled dimensions (mm): 1760 W x 1520 H x 860 D
FOR OUTDOOR USE ONLY
DO NOT OPERATE THIS APPLIANCE BEFORE READING THE INSTRUCTION BOOKLET
DO NOT PLACE ARTICLES ON OR AGAINST THIS APPLIANCE
DO NOT STORE CHEMICALS OR FLAMMABLE MATERIALS OR SPRAY AEROSOLS NEAR THIS APPLIANCE
DO NOT OPERATE THE APPLIANCE INDOORS
DO NOT OPERATE IN AN ENCLOSED AREA. ACCESSIBLE PARTS MAY BE VERY HOT. KEEP YOUNG CHILDREN AWAY.
MINIMUM CLEARANCES FROM COMBUSTIBLE MATERIALS: 3 METRES
is a registered trademark of: Sitro Group Australia Pty Ltd - www.sitro.com.au & Aber Living, Hamilton, N.Z - www.charmate.co.nz
4915-06/18
Wrangler
Offset Smoker & BBQ
Model No. CM160-031
Important: Retain these instructions for future use.
@CHARMATENATION
@CHARMATENATION
@CHARMATENATION
CHARMATENZ
CHARMATENZ
CHARMATENZ
CHARMATE
CHARMATE
CHARMATE
Advertisement

Related Manuals for Charmate Wrangler CM160-031


Summary of Contents for Charmate Wrangler CM160-031
- Page 1 DO NOT OPERATE IN AN ENCLOSED AREA. ACCESSIBLE PARTS MAY BE VERY HOT. KEEP YOUNG CHILDREN AWAY. MINIMUM CLEARANCES FROM COMBUSTIBLE MATERIALS: 3 METRES is a registered trademark of: Sitro Group Australia Pty Ltd - www.sitro.com.au & Aber Living, Hamilton, N.Z - www.charmate.co.nz Important: Retain these instructions for future use.
-
Page 2: Important Safety Warnings
Important Safety Warnings We want you to assemble and use your Charmate Smoker • Do not use gasoline, kerosene or alcohol for lighting as safely as possible. charcoal. Use of any of these or similar products can cause an explosion possibly leading to severe bodily When you see this safety alert symbol please injury. - Page 3 Operating Instructions • Before Smoker can be left unattended, remaining • Place the Smoker outdoors on a hard, coals and ashes must be removed from Smoker. level and non-combustible surface away Use caution to protect yourself and property. Place from roof overhangs or any combustible remaining coals and ashes in a non-combustible material.
- Page 4 1. Always use high quality charcoal. We recommend surfaces with vegetable oil will aid in the protection using a Charmate Chimney Starter which speeds of your unit. Also, occasional touch up of the exterior up the lighting process and avoids the dangers paint will be required.
- Page 5 Bark should be avoided or turned off first as it contains Food Safety a high acid content and imparts an acrid flavour. Food safety is a very important part of enjoying the After allowing the fire to burn down, close the outdoor cooking experience.
- Page 6 Assembly Instructions Hardware For Easiest Assembly: • To avoid losing any small components or hardware, assemble your product on a hard level surface that does not have cracks or openings. You may wish to lay down a blanket or similar, to avoid possible damage to AA.
-
Page 7: Exploded View
Exploded View No. Description No. Description No. Description Cooking Grates 13 Firebox Top 25 Front Table Bracket L Charcoal Grates 14 Firebox Base 26 Grease Cup Holder Temperature Gauge 15 Ash Drawer 27 Bottle Opener Smoking Chamber Lid 16 Air Vent Handle 28 Side Handle Smoking Chamber 17 Ash Drawer Handle... - Page 8 Assembly Instructions Step 1 Washer Bolt Smoking chamber Remove the lid from the smoking chamber by removing bolt Washer Bolt Smoking chamber and washer and sliding the hinge pins on the lid out of the hinge holes on the smoking chamber. Set bolts and washers aside for step 18.
- Page 9 Assembly Instructions Step 4 Attach wheels to legs with wheel axle and M12 nuts (CC). M12 Nut Wheel axle M12 Nut Wheel axle Hardware Used M12 Nut 2pcs Step 5 Attach firebox support to short legs with M6 x 12 bolts (AA). Firebox support Firebox support Hardware Used...
- Page 10 Assembly Instructions Step 6 Firebox lid stop Firebox lid stop Attach firebox lid stop to firebox top with M6 x 12 bolt (AA) and M6 nut (DD). Firebox lid stop Hardware Used M6x12 Bolt M6 Nut Step 7 Attach firebox base, heat insulation cottons 1 and heat insulation cottons 2 to firebox top with M6 x 12 bolts (AA).
- Page 11 Assembly Instructions Step 9 Attach firebox assembly to smoking chamber by aligning the slots on the smoking chamber to the two M6 x 12 bolts and slide into place as shown. M6 x 12 Bolt M6 x 12 Bolt M6 x 12 Bolt Step 10 Attach firebox to smoking chamber with M6 x 12 bolts (AA).
- Page 12 Assembly Instructions Step 12 Attach side handle to the smoking chamber with M6 x 12 botls (AA) and M6 nuts (DD). Hardware Used M6x12 Bolt 4pcs M6 Nut 4pcs Step 13 Cap nut Attach smoke stack and smoke stack gasket to the smoking Spring chamber with M6 x 12 bolts (AA) and M6 nuts (DD).
- Page 13 Assembly Instructions Step 14 Attach bottle opener to smoking chamber with M5 x 12 bolts (BB) and M5 nuts (FF). Hardware Used M5x12 Bolt 2pcs M5 Nut 2pcs Step 15 Insert grease cup holder through the hole inside the smoking chamber on the left side to hang under the smoking chamber.
- Page 14 Assembly Instructions Step 16 Attach front table bracket L to smoking chamber with M6 x 12 bolts (AA) and M6 nuts (DD). Attach front table bracket R by inserting the hooks of front table ends through the slots on front table bracket R & L as shown, and then attaching to smoking chamber with M6 x 12 bolts (AA) and M6 nuts (DD).
- Page 15 Assembly Instructions Step 18 Attach smoking chamber lid by sliding the hinge pins into the lid hinge holes on the smoking chamber as shown. Bolt Secure with one hinge bolt and one washer. Washer Bolt Washer Step 19 Remove pre-attached bolts and nuts from firebox lid handle. Then attach firebox lid handle to the firebox lid with two bolts, nuts and washers.
- Page 16 Assembly Instructions Step 20 Remove pre-attached hinge bolt and washer from firebox lid Washer hinge pins. Then attach firebox lid by sliding the hinge pins into Bolt into the lid hinge holes on the firebox chamber as shown. Washer Secure with one hinge bolt and one washer. Bolt Step 21 Attach air vent to ash drawer with M6 x 12 bolt (AA) and...
- Page 17 Assembly Instructions Step 22 Attach ash drawer handle to ash drawer with M5 x 12 bolts (BB) and M5 nuts (FF). Hardware Used M5x12 Bolt 2pcs M5 Nut 2pcs Step 23 Insert ash drawer assembly into firebox assembly as shown.
- Page 18 Assembly Instructions Step 24 Attach four “S” hooks to side handle. Step 25 Place three charcoal grates into the smoking chamber. Place three cooking grates over the charcoal grates. Place firebox charcoal grate into the firebox. Place two firebox cooking grates over the charcoal grate.
-
Page 19: Recipe Ideas
Recipe Ideas Smoked Chicken Smoked Mussels 1 chicken Steam required quantity of mussels open. Marinate in 50ml olive oil sweet chilli sauce for 4 – 24 hours with a little brown Juice of one lemon sugar added. Smoke for approximately 20 minutes. Salt &...
Need help?
Do you have a question about the Wrangler CM160-031 and is the answer not in the manual?
Questions and answers