Table of Contents
Advertisement
Quick Links
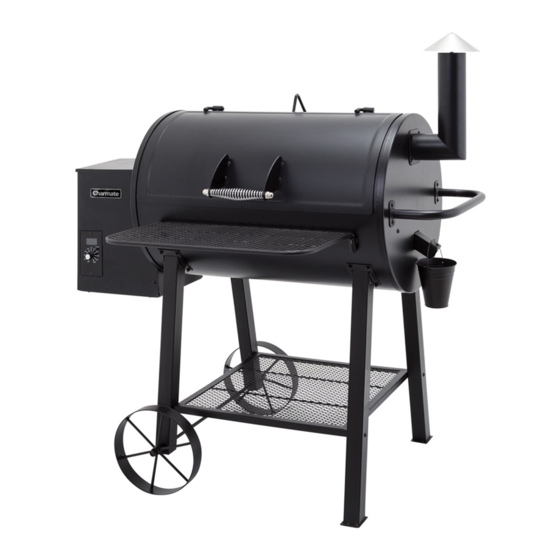
Smokes a variety of foods including fish, meat, chicken
■
and vegetables
Digital controller for precise temperature control and
■
set and forget cooking/smoking
Matt high temperature powder coated solid steel
■
construction – 2.5mm hood and firebox
Adjustable smoke setting for added flavour
■
7kg pellet hopper provides up to 15 hours of cooking
■
Porcelain enamel coated cooking grills
■
Removable front shelf for extra preparation space and
■
bottom shelf for storage
Sturdy and stable saw horse leg stand design with
■
heavy duty wheels
Rating: 220-240V ~ , 50Hz
■
Approved to NZ Standards
■
Assembled dimensions (mm): 1210W x 1290 H x 900 D
■
is a registered trademark of: Sitro Group Australia Pty Ltd - www.sitro.com.au & Aber Living, Hamilton, N.Z - www.charmate.co.nz
4925-08/18
Hopper
Pellet Smoker
Model No. CM160-028
E3771
Important: Retain these instructions for future use.
CARBON MONOXIDE HAZARD
• Burning pellets give off carbon monoxide,
which has no odour and can cause death.
• DO NOT burn pellets inside homes, vehicles,
tents, garages or any enclosed areas.
• Use only outdoors where it is well ventilated.
FOR OUTDOOR USE ONLY
DO NOT OPERATE THIS APPLIANCE BEFORE READING
THE INSTRUCTION BOOKLET
DO NOT PLACE ARTICLES ON OR AGAINST THIS
APPLIANCE
DO NOT STORE CHEMICALS OR FLAMMABLE MATERIALS OR
SPRAY AEROSOLS NEAR THIS APPLIANCE
DO NOT OPERATE THE APPLIANCE INDOORS
DO NOT OPERATE IN AN ENCLOSED AREA. ACCESSIBLE PARTS
MAY BE VERY HOT. KEEP YOUNG CHILDREN AWAY.
MINIMUM CLEARANCES FROM COMBUSTIBLE MATERIALS: 3M
Advertisement
Table of Contents

Subscribe to Our Youtube Channel
Related Manuals for Charmate Hopper


Summary of Contents for Charmate Hopper
- Page 1 Assembled dimensions (mm): 1210W x 1290 H x 900 D ■ MINIMUM CLEARANCES FROM COMBUSTIBLE MATERIALS: 3M is a registered trademark of: Sitro Group Australia Pty Ltd - www.sitro.com.au & Aber Living, Hamilton, N.Z - www.charmate.co.nz Important: Retain these instructions for future use. 4925-08/18...
- Page 2 Important Safety Warnings We want you to assemble and use your Charmate • Avoid using unit on wooden or flammable surfaces. Smoker as safely as possible. • Do not leave unit unattended. • Keep a fire extinguisher accessible at all times while When you see this safety alert symbol please operating unit.
- Page 3 • If a longer detachable power-supply cord or extension • If the Pellet Hopper runs out, or the fire goes out, let cord is used: the smoker completely cool and then follow the Initial Lighting Instructions.
-
Page 4: Exploded Diagram
11 Right Leg (Long) 12 Wagon Wheels 13 Wagon Wheel Axle 14 Left Leg (Wheel Legs) 15 Front Table 16 Gasket 17 Pellet Hopper 18 Internal Thermometer 19 Power Cord Bracket 20 Hook For Fat Cup 20 Heat Baffle 21 Drip Tray... - Page 5 25 Fire Pot 26 Auger 27 Auger Tube 28 Draft Inducer Fan 29 Auger Drive Motor 30 Bottom Panel Of Pellet Hopper 31 Control Knob 32 Digital Temperature Control Panel 33 Heat Insulation Board 34 Hopper Lid Latch 35 Pellet Hopper...
- Page 6 ASSEMBLY INSTRUCTIONS WARNING: THE MANUFACTURER HAS MADE EVERY EFFORT TO ELIMINATE ANY SHARP EDGES. HOWEVER, YOU SHOULD HANDLE ALL COMPONENTS WITH CARE TO AVOID ANY POTENTIAL ACCIDENTAL INJURY. Please read all instructions thoroughly before Tools Needed: proceeding. Find a large, clean area in which to assemble •...
- Page 7 ASSEMBLY INSTRUCTIONS Step 1 CC BB Stand the Barrel Body up on a cushioned surface with its right side downwards (with label A) and its left side CC BB upwards (with label B). Attach right legs (marked with label A) and left legs (marked with label B) to Barrel Body with M6 x 12 bolt (BB) and M6 nut (CC).
- Page 8 ASSEMBLY INSTRUCTIONS Step 3 Keep the Barrel Body upright as step 1 when assembling. Wagon Wheel Assemble the bottom shelf first, then attach the wagon wheels to the legs with the wheel axle and an M12 nut (HH) and M12 flat washer (DD). Wagon Wheel Wheel Axle Wheel Axle...
- Page 9 ASSEMBLY INSTRUCTIONS Step 5 Chimney stack Place the Chimney Gasket over the Chimney Stack and attach to the right side of the Barrel Body with M6 x Chimney stack 8 bolt (EE) and M6 cap nut (GG). Then attach the side Gasket handle to the side of Barrel Body with M6 x 8 bolt (EE) and M6 cap nut (GG).
- Page 10 Barrel Body Pellet Hopper Pellet Hopper Attach the Pellet Hopper to the Barrel Body by screwing two of the M6 x 20 bolts (FF) on the bottom and keep them loose. Then screw the other two M6 x 20 bolts (FF) to the top.
- Page 11 Chimney Cap Step 9 Screw the Chimney Cap onto the Chimney stack. Attach the Front Table to the Barrel Body. Front Table Front Table Final Assembled Smoker Note: The Hopper lid must be closed for the pellet auger to operate.
-
Page 12: Operation
SMOKER PREPARATION HOW IT WORKS INITIAL LIGHTING INSTRUCTION • Wood pellets are moved from the Hopper (23) and fed These instructions should be followed the first time the into the Fire Pot (30) by the Auger (29). smoker is ignited and each time the smoker runs out of pellets. -
Page 13: Getting Started
Before you cook on your smoker for the first time and after the Initial Lighting Instructions are completed HOPPER CONTROL OVERVIEW (see page 12), it is recommended that the smoker be seasoned. Begin by removing grills, baffle etc. Wipe a ACTUAL TEMP. -
Page 14: Cooking Instructions
Hopper, which is approximately half of the hopper’s The pellet smoker has two modes to control the pellet loading capacity. Close the pellet hopper lid. Turn the feeding speed. These are designated as the Cook Mode Temperature Control Knob from “Off” to “Smoke”. - Page 15 SMOKER LIGHTING INSTRUCTIONS SMOKE MODE TURNING OFF THE SMOKER Turn the Temperature Control Knob To ensure your Smoker will perform at its best for years to “Smoke”, the smoker will now be to come, it is important to self-clean. To do this allow the “P”SET in Smoke Mode.
-
Page 16: Care And Maintenance
Pellet Hopper. Wood pellets expand greatly when they get wet and will jam the auger. Remove any wet pellets prior to use and be certain that the inner part of the Pellet Hopper is dry. -
Page 17: Troubleshooting Guide
Then initiate the INITIAL LIGHTING INSTRUCTIONS (page 12). Check that there are pellets in the Pellet Hopper. If this is Pellets aren’t the first time operation, or if the smoker has run out of being delivered... - Page 18 Smoker is not Check that there are pellets in pellet Add pellets and allow sufficient time for the pellets to getting hot hopper. reach the Fire Pot (can take up to 7 minutes). enough Fire goes out on “SMOKE” setting.
- Page 19 • SMOKE Mode: If smoker Flashing to out. temperature below 430C temperature on • Check the hopper for sufficient fuel or blockage. • COOK Mode: If smoker temperature LED Screen • Check burn grate and pot for ash build-up or obstructions. below 660C •...
- Page 20 Check and clear the hopper and burn pot of moist pellets, smoke Wood pellet quality replacing them with fresh dry pellets. Fire Pot Check for build-up of pellets in the Fire Pot.
-
Page 21: Approximate Cooking Time
COOK TIME GUIDELINES Below are some guidelines for where to start with Style of Cooking Range different types of meat. Experiment to find the best Hot Smoking 93-135°C (199-275°F) results for your chosen meat. Hot Smoking means a Roast 135-162°C (275-324°F) longer cooking time and results in a more natural wood Baking (Medium) 162-190°C (324-374°F) -
Page 22: Tips And Tricks
The Charmate Hopper Smoker has a 7kg capacity • Seafood: Hickory, Alder, Oak, Pecan, Mesquite hopper, this should give you a cook time of around • Veges: Apple, Pecan, Alder, Maple, Hickory 15 hours depending on your heat output. Most wood •... - Page 23 NOTES...
- Page 24 24 24...
Need help?
Do you have a question about the Hopper and is the answer not in the manual?
Questions and answers