Table of Contents
Advertisement
Quick Links
Advertisement
Table of Contents

Related Manuals for Charmate CM160-001


Summary of Contents for Charmate CM160-001
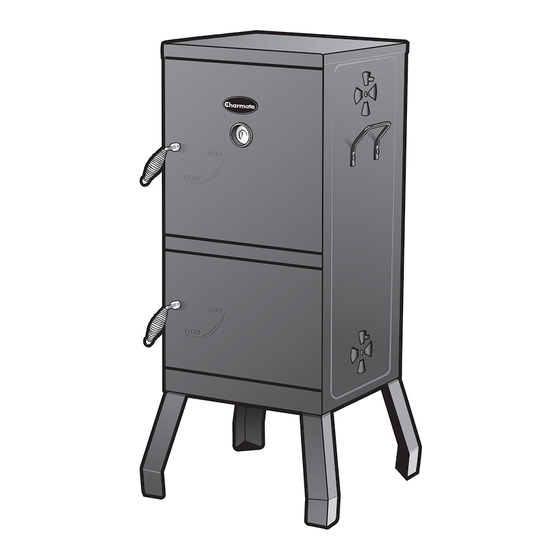
- Page 1 Charcoal Smoker Oven Model No. CM160-001 FOR OUTDOOR USE ONLY 3467-05/12...
-
Page 2: Important Safety Warnings
IMPORTANT SAFETY WARNINGS • Do not store or use smoker near gasoline or other WE WANT YOU TO ASSEMBLE AND USE YOUR flammable liquids, gases or where flammable vapors SMOKER AS SAFELY AS POSSIBLE. may be present. THE PURPOSE OF THIS SAFETY ALERT SYMBOL IS • Smoker is hot when in use. To avoid burns: TO ATTRACT YOUR ATTENTION TO POSSIBLE • DO NOT attempt to move the smoker. HAZARDS AS YOU ASSEMBLE AND USE YOUR • Wear protective gloves or oven mitts. -
Page 3: Parts List
PARTS LIST Inspect contents of the box to ensure all parts are included and undamaged. We recommend two people work together when assembling this unit. Description Smoker box Cooking grills Water pan Water pan bracket Charcoal pan Legs Charcoal pan bracket Door handles with springs, washers and door retaining brackets Temperature gauge Side handles Side rails Air vent dampers PARTS BAG CONTAINS: • 20 M6 X 16 mm Phillips head bolts • 4 M5 X 16 mm Phillips head bolts • 4 M6 nuts • 4 Gaskets ASSEMBLY INSTRUCTIONS Before assembling the smoker, read these Instructions carefully. Assemble the smoker on a flat, clean surface. The smoker is heavy. NOTE: Do not fully tighten all the nuts during the initial stages of assembly. Caution: Sheet metal can cause injury. Wear gloves when assembling the smoker. Tools required: Philips head screwdriver (or cordless drill and bits). Flat head screwdriver. - Page 4 ASSEMBLY INSTRUCTIONS Step 1 Slide washers and spring onto latch end of handle as illustrated. Insert handle through hole in door and slide Smoker Box door retaining bracket over handle. Secure door retaining Handle bracket using two M6 X 16 mm Phillips head bolts. Washer Spring Repeat for other door. Note: Door handles must be pushed in while turning handles to “CLOSE” position. Door Retaining Smoker Box Bracket Door Step 2 Insert two M5 X 16 mm bolts and gaskets from the outside and thread into holes in the side cabinet as illustrated. Tighten securely. Complete steps for both of the cabinet assembly. WARNING: Use caution when lifting or moving smoker to prevent strains and back injuries. Moving smoker may require the help of an additional person. Note: With the help of a friend, turn the smoker box upside down. Make sure door is securely latched to avoid injury. Step 3 Attach legs to bottom of smoker using twelve M6 X 16 mm Phillips head bolts.
- Page 5 ASSEMBLY INSTRUCTIONS Step 4 WARNING: Use caution when lifting or moving smoker to prevent strains and back injuries. Moving smoker may require the help of an additional person. Note: With the help of a friend, turn the smoker box with legs to an upright position. Attach four air vent dampers to sides of smoker box using four M6 X 16 mm Phillips head bolts and M6 nuts. Step 5 Insert eight side rails into smoker box sides. These will form Side Rails the shelves for the cooking grills and water/charcoal pan brackets. Step 6 Place the charcoal pan into the charcoal pan bracket. Place the charcoal pan bracket onto the bottom shelves of the Cooking Grill smoker box. Cooking Grill Step 7 Place the water pan into the water pan bracket. Place the water pan bracket onto the shelves above the charcoal pan. Water Pan Water Pan Bracket Step 8 Place the cooking grills onto the two upper smoker box Charcoal Pan shelves.
- Page 6 ASSEMBLY INSTRUCTIONS Vertical Smoker (assembled)
-
Page 7: Preparation For Use & Lighting Instructions
PREPARATION FOR USE & LIGHTING INSTRUCTIONS PLACE THE SMOKER OUTDOORS ON A HARD, IF USING A CHARCOAL CHIMNEY STARTER, LEVEL, NON-COMBUSTIBLE SURFACE AWAY PROCEED TO STEP 5 FROM ROOF OVERHANG OR ANY COMBUSTIBLE MATERIAL. NEVER USE ON WOODEN OR OTHER If you choose to use charcoal lighting fluid, ONLY use SURFACES THAT COULD BURN. PLACE THE SMOKER charcoal lighting fluid approved for lighting charcoal. AWAY FROM OPEN WINDOWS OR DOORS TO Do not use gasoline, kerosene, alcohol or other PREVENT SMOKE FROM ENTERING YOUR HOUSE. - Page 8 OPERATING INSTRUCTIONS Note: Depending on the weather, a full pan of charcoal will PLACE THE SMOKER OUTDOORS ON A HARD, burn for 5-6 hours. LEVEL, NON-COMBUSTIBLE SURFACE AWAY FROM ROOF OVERHANG OR ANY COMBUSTIBLE 5. Replace the water pan bracket and water pan. MATERIAL. NEVER USE ON WOODEN OR OTHER SURFACES THAT COULD BURN. PLACE THE SMOKER WARNING: To avoid overturning/spilling pan of hot AWAY FROM OPEN WINDOWS OR DOORS TO liquid, never pull water pan bracket out more than PREVENT SMOKE FROM ENTERING YOUR HOUSE. 4”. Refer to the illustration in “Adding Water During IN WINDY WEATHER, PLACE THE SMOKER IN AN Cooking” section of this manual.
- Page 9 OPERATING INSTRUCTIONS Flavoring Wood To obtain your favorite smoke flavor, experiment by using chunks, sticks or chips of flavor producing wood such as manuka, apple or cherry. Most fruit or nut tree wood may be used for smoke flavoring. Do not use resinous wood such as pine as it will produce an unpleasant taste. Wood chunks or sticks 3” to 4” long and 1” to 2” thick work best. Unless the wood is still green, soak the wood in water for 30 minutes or wrap each piece in foil and tear several small holes in the foil to produce more smoke and prevent the wood from burning too quickly. A lot of wood is not required to obtain a good smoke flavor. A recommended amount for the Vertical Smoker is 5 to 6 wood chunks or sticks. Experiment by using more wood for stronger 4” smoke flavor or less wood for milder smoke flavor. Additional flavoring wood should not have to be added during the cooking process. However, it may be necessary when cooking very large pieces of food. Follow instructions and cautions in the “Adding Charcoal/Wood During Cooking” section of this manual to avoid injury while adding wood. 3. Fill water pan to 1” below the rim. Pour slowly to avoid Regulating Heat splashing or over-filling. To maintain or increase temperature, fully open air vent 1" dampers on sides of smoker box. If increased air circulation does not raise the temperature sufficiently, more wood and/or charcoal may need to be added during the cooking cycle. Follow instructions in “Adding Charcoal/Wood During Cooking” section of this manual. 4. Carefully slide water pan bracket in completely, close Note: Dry wood burns hotter than charcoal, so you may smoker box door and allow food to continue cooking.
-
Page 10: After-Use Safety
PROPER CARE & MAINTENANCE AFTER-USE SAFETY • Cure your smoker periodically throughout the year to • Always allow smoker and all components to cool protect against excessive rust. completely before handling. • To protect your smoker from excessive rust, the unit • Never leave coals and ashes in smoker must be properly cured and covered at all times when unattended. Make sure coals and ashes are not in use. completely extinguished before removing. • Wash cooking grills and water pan with hot, soapy • Before smoker can be left unattended, water, rinse well and dry. Lightly coat grills with remaining coals and ashes must be removed vegetable oil or vegetable oil spray. from smoker. Use caution to protect yourself • Clean inside and outside of smoker by wiping off with a and property. Place remaining coals and ashes damp cloth. Apply a light coat of vegetable oil or in a non-combustible metal container and vegetable oil spray to the interior surface to prevent completely saturate with water. Allow coals and rusting. Do not coat charcoal pan. water to remain in metal container 24 hours prior to disposing. • If rust appears on the exterior surface of your smoker, clean and buff the affected area with steel wool or fine • Extinguished coals and ashes should be placed a grit emery cloth. Touch-up with a good quality high-... -
Page 11: Recipe Ideas
RECIPE IDEAS Smoked Mussels Smoked Chicken Steam required quantity of mussels open. Marinate in 1 chicken sweet chilli sauce for 4 – 24 hours with a little brown 50ml olive oil sugar added. Smoke for approximately 20 minutes. Juice of one lemon Salt & Pepper Smoked Mushrooms Mix the olive oil and lemon juice together in a cup or 4 cups mushrooms ramekin and then use a meat injector to inject into the 2 tablespoons lemon pepper breast and the thighs. Use the last few drops of the mix to 2 tablespoons garlic powder rub over the skin and then sprinkle with salt and pepper. Load the chicken onto the cooking rack and place it in the Cut mushroom stems off and wash. Sprinkle lemon pepper smoker at 110°C or 225°F for 60 minutes per .5 kilo. and garlic powder lightly over mushrooms. Smoke at 225°F for 45 minutes. Cool; serve immediately. It’s important to make sure the chicken is properly cooked so ensure the juices run clear when a skewer is placed in Smoked Corn on the Cob the meat or use a thermometer. Breast meat should be at 165°F and thigh meat at 175°F. 6 to 12 ears of corn with husks on 1/2 cup olive oil Smoked Herbed Chicken 1 bunch finely chopped green onions (including tops) 1 (approx. 2 kilos) whole chicken Gently pull back the husks on the each ear. Remove the... - Page 12 figures - the same principles apply to any other shaped area. the same principles apply to any other shaped area. Gasmate ® is a registered trademark of: Sitro Group Australia Pty Ltd www.sitro.com.au Charmate® is a registered trademark of: Sitro Group Australia Pty Ltd. www.sitro.com.au Aber, Hamilton, N.Z. www.gasmate.co.nz Aber, Hamilton, N.Z. www.gasmate.co.nz...
Need help?
Do you have a question about the CM160-001 and is the answer not in the manual?
Questions and answers