Godox LD75R, LD150R, LD150RS - LED VIDEO LIGHT MANUAL
- Instruction manual (24 pages) ,
- Instruction manual (25 pages)
Advertisement
Foreword
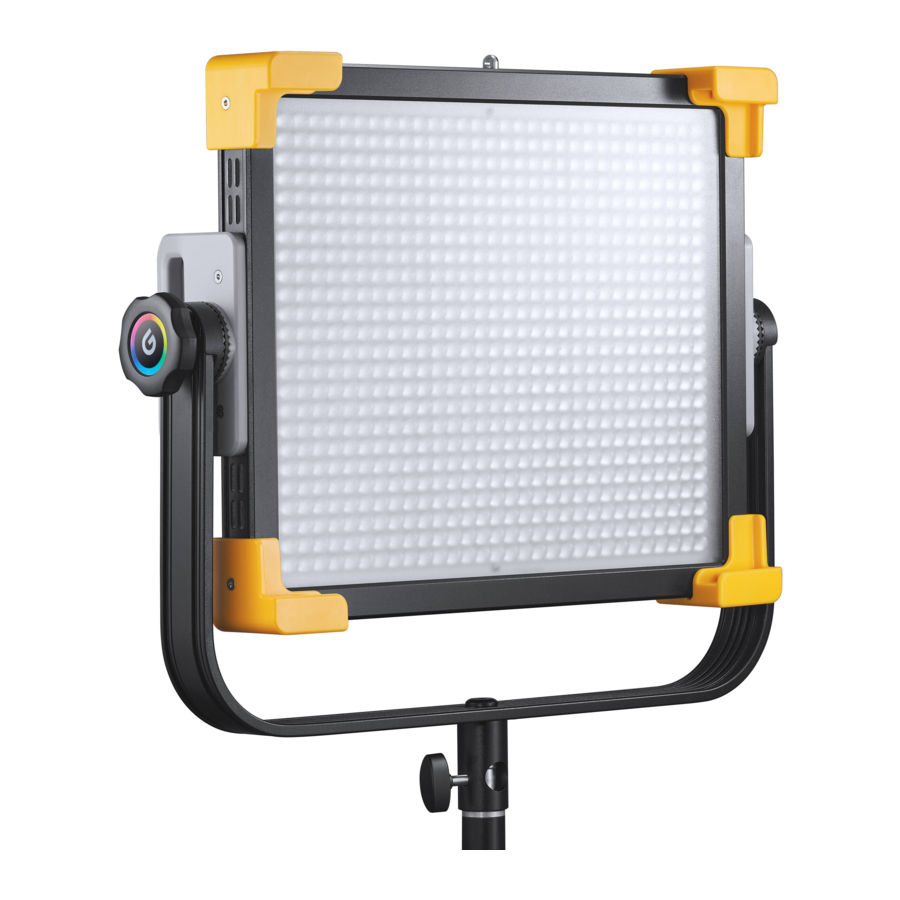
LED Video Light LD series are multifunctional RGB LED lights with adjustable brightness, color temperature, hue and FX light effects. It provides lighting for product, journalist and portrait shooting, live broadcast and video recording with compact body, easy operation and great portability.
Main Features:
- Freely adjust light brightness, color temperature, multi colors and 39 kinds of light effects.
- Can be remote controlled by 2.4G, smartphone APP and DMX.
- Support custom setting functions and parameters with great convenience.
- Without noise and interference in silent mode.
- Support USB firmware upgrade to catch up with the newest technology.
- Purchase abundant accessories to achieve more creative light effects.
- With 2.4 inches TFT LCD display.
Name of Body


- Light Body
- Control Panel
- Fixed Parts*4
- U-type Bracket
- Battery Clip
- V-port Battery Compartment
- Battery Base
- Battery Release Button
- Fan Port* 1
- Fan Port*2
- Thermovent
- Bracket Sleeve
- Screw of Sleeve
- Bracket Locking Screw
- Fixed Flat
- Four-leaf Reflector
- Mixed Light Lens
- Small Buckle
- Controller


- MENU Button
- LOCK Button
- MODE Button
- BACK Button
![]() Select Dial
Select Dial![]() Select Dial
Select Dial![]() Select Dial
Select Dial![]() Select Dial
Select Dial- Preset Button 1
- Preset Button 2
- Preset Button 3


- Preset Button 4
- DC Power Socket
- DXM OUT Five-Core XLR Port
- DXM IN Five-Core XLR Port
- DXM OUT RJ45 Port
- DXM IN RJ45 Port
- Type-A USB Port
- MIC Hole
- Power Switch
What's in the Box

Optional Accessory
The product can be used in combination with the following optional accessories so as to achieve best photography effects: RC-R9 Remote control, Softbox, Honeycomb Sheet.

Power Supply
There are two charging ways:
DC Adapter Power Supply

Insert the output end of the adapter into the DC power socket and connect the light to power source with power cord.
V-port Battery Power Supply (Optional)
 - Step 1")
Install V-port battery: Press and hold the push button of the battery holder, push the V-port battery to the base of the left battery contact pin, release the push button of the battery holder, and turn on the power switch button to use it.
Remove V-port Battery: Press and hold the battery holder and push the V-port battery to the right to remove it.
Note: LD75R apply to 14.8V battery. LD150R and LD150RS apply to 26V battery.
 - Step 2")
Operation
- Power switch:
Turn on/off the power switch to power on or off the LED light.
![]()
- MODE button:
Press MODE button and enter Mode selection interface choose CCT mode, RGB mode, HSI mode, R-GEL and L-GEL mode and FX light effects modes. Turn the![]() select dial to switch different modes and short press
select dial to switch different modes and short press ![]() select dial to enter the adjustable interface.
select dial to enter the adjustable interface.
Note: the LED light will auto enter MODE interface when being turned on.


CCT Mode
- Color Temperature: enter CCT interface and turn the
![]() select dial to adjust color temperature from 2500K to 8500K. Turn the select dial leftwards to decrease the value while rightwards to increase. Short press the
select dial to adjust color temperature from 2500K to 8500K. Turn the select dial leftwards to decrease the value while rightwards to increase. Short press the![]() select dial to choose color temperature from 7 levels in recycle: 2500K/3300K/4200K/5600K/6500K/7500K/ 8500K. Adjust the value in each level: adjust 100 values in normal operation while 1000 values in quick operation.
select dial to choose color temperature from 7 levels in recycle: 2500K/3300K/4200K/5600K/6500K/7500K/ 8500K. Adjust the value in each level: adjust 100 values in normal operation while 1000 values in quick operation.

- Hue adjustment: in CCT interface, turn the
![]() select dial to adjust hue value from -50 to 0 to 50. Turn GM select dial to the left to increase magenta, and turn GM select dial to the right to increase green. Short press
select dial to adjust hue value from -50 to 0 to 50. Turn GM select dial to the left to increase magenta, and turn GM select dial to the right to increase green. Short press ![]() select dial to quickly set the hue value to 0. Adjust the value in each level: adjust 1 value in normal operation while 5 values in quick operation. 1000 values in quick operation.
select dial to quickly set the hue value to 0. Adjust the value in each level: adjust 1 value in normal operation while 5 values in quick operation. 1000 values in quick operation.

- Brightness adjustment: in CCT interface, turn the
![]() select dial to adjust brightness from 0% to 100%. Turn the select dial leftwards to decrease the value while rightwards to increase. Short press the
select dial to adjust brightness from 0% to 100%. Turn the select dial leftwards to decrease the value while rightwards to increase. Short press the ![]() select dial to turn off the brightness and press it again to recover the former brightness value. Adjust the value in each level: adjust 1 value in normal operation while 10 values in quick operation.
select dial to turn off the brightness and press it again to recover the former brightness value. Adjust the value in each level: adjust 1 value in normal operation while 10 values in quick operation.


RGB Mode Setting

- In RGB interface, turn the
![]() select dial to adjust R value from 0 to 255. Turn the select dial leftwards to decrease the value while rightwards to increase.
select dial to adjust R value from 0 to 255. Turn the select dial leftwards to decrease the value while rightwards to increase. - Turn the
![]() select dial to adjust G value from 0 to 255. Turn the select dial leftwards to decrease the value while rightwards to increase.
select dial to adjust G value from 0 to 255. Turn the select dial leftwards to decrease the value while rightwards to increase. - Turn the
![]() select dial to adjust B value from 0 to 255. Turn the select dial leftwards to decrease the value while rightwards to increase.
select dial to adjust B value from 0 to 255. Turn the select dial leftwards to decrease the value while rightwards to increase. - Turn the
![]() select dial to adjust W value (saturation) from 0 to 255. Then, short press the select dial to adjust I value (brightness) from 0 to 100.
select dial to adjust W value (saturation) from 0 to 255. Then, short press the select dial to adjust I value (brightness) from 0 to 100.
After setting all these parameters, press MODE or BACK button to back to the MODE interface.
 select dial to adjust R value from 0 to 255. Turn the select dial leftwards to decrease the value while rightwards to increase.
 select dial to adjust G value from 0 to 255. Turn the select dial leftwards to decrease the value while rightwards to increase.
 select dial to adjust B value from 0 to 255. Turn the select dial leftwards to decrease the value while rightwards to increase.
HSI Mode

- In HSI interface, turn the
![]() select dial to adjust hue value from 0 to 360 0 . Turn the select dial leftwards to decrease the value while rightwards to increase.
select dial to adjust hue value from 0 to 360 0 . Turn the select dial leftwards to decrease the value while rightwards to increase. - Turn the
![]() select dial to adjust S value (saturation) from 0% to 100%. Turn the select dial leftwards to decrease the value while rightwards to increase. Turn the
select dial to adjust S value (saturation) from 0% to 100%. Turn the select dial leftwards to decrease the value while rightwards to increase. Turn the ![]() select dial to adjust I value (brightness) from 0 to 100. After setting all these parameters, press MODE or BACK button to back to the MODE interface.
select dial to adjust I value (brightness) from 0 to 100. After setting all these parameters, press MODE or BACK button to back to the MODE interface.
Adjust the value in each level: adjust 1 value in normal operation while 10 values in quick operation.
R-GEL & L-GEL Mode
- R-GEL selection: enter R-GEL interface and turn the
![]() select dial to choose from 20 gels in recycle.
select dial to choose from 20 gels in recycle.
Brightness Adjustment: Turn![]() select dial to adjust brightness from 0% to 100%.
select dial to adjust brightness from 0% to 100%.
![]()
- L-GEL selection: enter L-GEL interface and turn the
![]() select dial to choose from 20 gels in recycle.
select dial to choose from 20 gels in recycle.
Brightness Adjustment: Turn![]() select dial to adjust brightness from 0% to 100%.
select dial to adjust brightness from 0% to 100%.
After setting all these parameters, press MODE or BACK button to back to the MODE interface.
![]()


FX Light Effect Modes

- Enter FX interface and turn the
![]() select dial to choose light effects modes from 1 to 14 categories.
select dial to choose light effects modes from 1 to 14 categories.
Brightness Adjustment: Turn![]() select dial to adjust brightness from 0% to 100%.
select dial to adjust brightness from 0% to 100%. - After selecting the category, press the
![]() select dial to choose the modes from l, Il and Ill, which will be displayed in recycle.
select dial to choose the modes from l, Il and Ill, which will be displayed in recycle.
Choose light effects from 14 categories which are divided into 39 kinds according to different requirements.
| No. | Display | Scene | Display I | Display Il | Display Ill |
| 1 |  | RGB cycle | Slow speed | Medium speed | Quick speed |
| 2 |  | Flash | Flash | Press conference | Paparazzi |
| 3 |  | Laser | Birthday party | KTV | Disco |
| 4 |  | Lightning | Discontinuous | Frequent | Sustainable |
| 5 |  | Broken bulb | Discontinuous | Frequent | Sustainable |
| 6 |  | TV | Slow speed | Medium speed | Quick speed |
| 7 |  | Candle | Discontinuous | Frequent | Sustainable |
| 8 |  | Fire | Firewood | Campfire | Fire hazard |
| 9 |  | Firework | Brief | Continuous | Show |
| 10 |  | Police car | Strong flash | Frequent flash | Quick flash |
| 11 |  | Fire truck | Strong flash | Frequent flash | Quick flash |
| 12 |  | Ambulance | Strong flash | Frequent flash | Quick flash |
| 13 |  | Music | Mode 1 | Mode 2 | |
| 14 |  | SOS |
Preset Function
Preset button 1, 2, 3 and 4: long press the button for 3 seconds to save the current mode set parameter or recover the preset values. Short press the button to change the preset parameters quickly.

Control Mode Selection
Bluetooth Control/2.4G Wireless Control/DMX Control

Press the MENU button to enter MENU interface. Turn the  select dial to choose control mode from wireless, Bluetooth and DMX. After setting all the modes, press the MODE button or BACK button to back to the MENU interface.
2.4G Wireless Setting
With 2.4G wireless system, LD series LED video light has remote grouping and control function. It is recommended to purchase RC-A6 remote control(optional) to achieve wireless control. Up to 16 groups of LED lights can be controlled, 32channels and 99 IDs are available with strong anti-interference capability.
Note:
- 1. Please make LED light's channel (CH), group (GR) and ID to the same as remote control's.
- 2. The wireless signals can only be received in the situation that the LED light is powered on.

Choose wireless mode and short press  select dial to enter wireless setting interface. Then, short press the button to choose wireless power switch, channel CH, group GR and ID.
- 2.4G Wireless power switch: choose wireless and turn the
![]() select dial to turn on or off the wireless.
select dial to turn on or off the wireless. - CH channel adjustment: choose channel and turn the
![]() select dial to choose channel value from 01 to 32.
select dial to choose channel value from 01 to 32. - GR Group adjustment: choose group and turn the
![]() select dial to choose group value from A, B, C, D, E and 0 to 9.
select dial to choose group value from A, B, C, D, E and 0 to 9. - ID Setting: choose ID and turn the
![]() select dial to choose ID value from 01 to 99/OFF.
select dial to choose ID value from 01 to 99/OFF.
Bluetooth Setting
In MENU interface, choose Bluetooth and short press button to enter Bluetooth interface.
- Bluetooth Power Switch: turn the
![]() button to turn on or off the Bluetooth.
button to turn on or off the Bluetooth.

- Scan the QR code to download the "Godox Light" smartphone APP (can be used by Android and Apple system). For more smartphone APP operations, please open the "help" in APP to gain detailed guidance.

![]()
- Bluetooth reset function: in Bluetooth interface, short press
![]() button to choose reset. Then, turn the select dial to
button to choose reset. Then, turn the select dial to ![]() choose "Yes".
choose "Yes".
Note: the APP can be used directly on the firstly installed device (smartphone or iPad). When change to other mobile device (smartphone or iPad), the light shall be reset before the normal connection of APP.


DMX Control Mode
Choose DMX and short press the select dial to enter DMX interface.
- Turn the
![]() select dial and set the light to FOLLOW mode.
select dial and set the light to FOLLOW mode. - Short press the
![]() select dial button to choose 512 addresses (ADD) from OFF and 001 to 512. When off is selected, it is not controlled by the console.
select dial button to choose 512 addresses (ADD) from OFF and 001 to 512. When off is selected, it is not controlled by the console.
After setting the ADD, insert the one end of DMX connect cord into the controller's DMX output port and the other end into the light's DMX input port.
Please refer to the data sent by control center as follows:
| ADD Code\Operation mode | CCT | HSI | RGBW | FX | Filters | Note |
| n | 0-51 | 52-103 | 104-155 | 156-207 | 208-255 | |
| n+1 | DMX*(100 /255) Integer 0-100% Brightness adjustment | DMX*(100 /255) Integer 0-100% Brightness adjustment | 0-255 | DMX*(100 /255) Integer 0-100% Brightness adjustment | DMX*(100 /255) Integer 0-100% Brightness adjustment | |
| n+2 | DMX*(Max. color temperaturemin. color temperature) /100)/255) Integer | DMX*(360 /255) Integer Hue Selection | 0-255 Intensity of red light | DMX*(Total quantity of light effects /255) | 0-127: L-GEL 128-255: R-GEL |
|
| n+3 | DMX*(100 /255) Integer G/M Setting | DMX*(100 /255) Saturation setting | 0-255 Intensity of green light | 0-85:I 86-171:II 172-255:III | DMX*( Total quantity of gels/255) Integer |
|
| n+4 | 0-255 Intensity of blue light | |||||
| n+5 | 0-255 Intensity of white light | |||||
| n+6 | ||||||
| n+7 |
DMX Port LEAD and FOLLOW Mode
- The default address is OFF, you can directly set a lamp as the master mode (LEAD).
- Set other lights as FOLLOW modes (no needs to set ADD).
- Connect the lights with DMX connect cable.
- The lights in FOLLOW modes will automatically synchronize the light in LEAD mode.
Note: When using LEAD and FOLLOW modes through DMX port, the quantity of lights in FOLLOW modes cannot be over 18.


Silent Mode
In MENU interface, turn the select dial to choose fan and short press it to enter fan interface. Then, turn the select dial to choose turn on or off.  Icon will be displayed once turned off the fan and silent mode will be achieved. When the silent mode is turned on, the adjustable range of brightness is 0%-50%.

Locking function
Long press the LOCK button for 2 seconds to lock or unlock the operation interface.  Icon will be displayed when being locked.
Note: The locking function only locks the control panel function; the 2.4G wireless remote control, Bluetooth control and the remote control of the DMX are not affected.
Bluetooth Reset
In the MENU interface, turn the select dial to select Bluetooth, and then press the dial briefly to enter the Bluetooth interface. Then turn the select dial to select "Bluetooth" or "reset", short press the dial to select reset, finally turn the select dial to select "yes", and the "Done" dialog box will be displayed.

Reset
In MENU interface, rotate the select dial to select to restore factory setting, and then press the dial to enter the recovery factory setting interface. Then rotate the select dial to select " yes", and the display will display the "Done" dialog box and load it into the initial startup interface automatically.

Custom Setting Function
- Press MENU button to enter the menu interface and turn the
![]() select dial to choose the custom function icon.
select dial to choose the custom function icon. - Short press the
![]() select dial once and turn it to choose custom functions.
select dial once and turn it to choose custom functions. - Press MENU button to back to the main interface.
| Custom Function Selection | Setting | Setting & Description | Restrictions in Usage | |
| Wireless | Wireless | Off | ||
| On | ||||
| Channel | 1-32 | Choose any figure from 1 to 32 | ||
| Group | A,B,C,D,E,F/0~9 | Choose any letter or figure from A,B,C,D,E,F and 0 to 9 | ||
| ID | OFF | Off | ||
| 01-99 | Choose any figure from 1 to 99 | |||
| Bluetooth | Bluetooth | Off | ||
| On | ||||
| Reset | No | |||
| Yes | Start resetting | |||
| DMX | Mode | FOLLOW | FOLLOW mode | Needed to be set in FOLLOW mode |
| LEAD | LEAD mode | |||
| Address | 001-512 | Choose any figure from 001 to 512 | It can be selected only in follow mode | |
| OFF | Off | When off is selected, it is not controlled b the console | ||
| Fan Setting | Off | Silent Mode | ||
| On | ||||
| Screen Brightness | 1-3 | Three gears are adjustable | ||
| Language | Simplified Chinese | Chinese | ||
| ENGLISH | English | |||
| Restore Factory Setting | No | |||
| Yes | ||||
| Screen Sleep | 15 min. | Scree will enter sleep if there is no operation after 15 minutes | ||
| 30 min. | Scree will enter sleep if there is no operation after 30 minutes | |||
| Never | By default | |||
USB Upgrade Port
- Download the new firmware into U disk from official website http://www.godox.com.cn/Downloads.html.
- Turn off the LED light. Insert the U disk with new firmware into the USB upgrade port.
- Turn on the LED light, and it will automatically enter the upgrading interface.
- The LED light will automatically back to the main interface.
Note:
- The newest firmware must be the official website and stored in the root directory of U disk. And there can only be one BIN document.
- The USB port can only support firmware upgrade function.
Technical Data
| Model | LD75R | LD150R | LDI 50RS |
| Out ut Power | 75W | 150W | 150W |
| DC Ada ter Power Su | 16.8V 7.OA 7.OA | 24.0\/: 8.33A | |
| V- ort Batte o tional | 14.8V | 26V | 26V |
| Color Temperature | 2500K-8500K | ||
| Channel CH | 32: 1~32 | ||
| Group GR | 16: A,B,C,D,E,F/0~9 | ||
| 99: OFF/01~99 | |||
| FX Mode | 14 Categories (39 kinds) | ||
| Brightness Range | 0%~100% | ||
| Tone Range | -50~0~ +50 | ||
| Hue Range | 0-3600 | ||
| Saturation Range | 0%-100% | ||
| Beam Angle | 600 | ||
| Silent Mode | Yes | ||
| 100% Illuminance (LUX) (darkroom, 1 -meter distance) | Max.~9320 | Max.~17500 | Max.~18500 |
| CRI |  296 296 | ||
| TLCI | 97 | ||
| Control Method | Smartphone APP/2.4G wireless remote control/DMX control/operate panel | ||
| Bluetooth Transmission Distance | ~30m | ||
| BT Frequency Range | 2402.0-2480.0MHz | ||
| Max. Transmitting Power | 5dbm | ||
| 2.4G Wireless Transmission Distance | ~50m | ||
| Working Temperature | -10~400C | ||
| Dimension | 441 107.5mm | 748*430*107.5mm | 542*513*107.5mm |
| Net Weight | ~3.5Kg | ~6.3kg | ~5.1 kg |
* Product design and specifications are subject to change without notice.
Troubleshooting
- If
![warning]() icon appeared and blinking and * icon is also appeared on the display:
icon appeared and blinking and * icon is also appeared on the display:
It might be the fan failure. Please contact with customer service. - If
![warning]() icon appeared and blinking and icon is also appeared on the display:
icon appeared and blinking and icon is also appeared on the display: - If the icons are displayed in cool-light state (just being turned on or for a little while), it might be probe failure. Please contact with customer service.
- If the icons are displayed in hot-light state (being turned on for a long while), it might be caused by long-time usage and over temperature. Please turn off the light and turn it on after the light is cooled down.
Maintenance
This product, except consumables e.g. adapter and power cable, is supported with a one-year warranty.
Maintenance of the flash must be performed by our authorized maintenance department which can provide original accessories.
Unauthorized service will void the warranty.
If the product breaks down or gets wet, please do not use it until repaired by a professionals.
If there is anything abnormal during LED light's working, please turn it off immediately and identify the reasons.
Changes made to the specifications or designs may not be reflected in This manual.
Warning
 Always keep This product dry. Do not put it in high-temperature or in damp conditions.
Built-in over-temperature protection functions, This product will enter protection status when the temperature is too high and back to normal after the temperature decreased.
Do not touch the product with wet hands. As This product do not have waterproof function, please take measures of waterproof in rainy or damp environment.
GODOX Photo Equipment co., Ltd.
Add: Building 2, Yaochuan Industrial Zone, Tangwei Community, Fuhai Street, Bao'an District, Shenzhen, China
Tel: +86-755-29609320(8062)
Fax: +86-755-25723423
E-mail: godox@godox.com
godox.com


Documents / Resources
References
Download manual
Here you can download full pdf version of manual, it may contain additional safety instructions, warranty information, FCC rules, etc.
Download Godox LD75R, LD150R, LD150RS - LED VIDEO LIGHT MANUAL
Advertisement


Need help?
Do you have a question about the LD75R and is the answer not in the manual?
Questions and answers