Godox LC500R - RGB LED Light Stick Manual
- Instruction manual (12 pages) ,
- Instruction manual (13 pages)
Advertisement
Foreword
Thank you for purchasing this Godox Product!
This RGB LED Light Stick LC500R is a continuous light with high light brightness, wireless adjustment and multiple modes. Suitable for almost all shooting occasions e.g. live, camping, make up, portrait shooting, make up, video, wedding, children photography, etc. It's portable and easy to be operated.
Features:
- Freely switch LED bicolor mode, colorful light mode and 39 situational special effects modes
- Easy to adjust color temperature, light brightness, hue and color saturation
- Blink and change colors with the rhythm of music
- With a display to clearly show the parameters
- With easy operation and wide application

 Always keep this product dry. Do not use in rain or in damp conditions. Do not disassemble. Should repairs become necessary, this product must be sent to an authorized maintenance center.
Keep out of reach of children.
As this product do not have waterproof function, please take measures of waterproof in rainy or damp environment.
Do not use the flash unit in the presence of flammable gases, chemicals and other similar materials. In certain circumstance, these materials may be sensitive to the strong light emitting from this flash unit and fire or electromagnetic interference may result.
As this product has built-in lithium battery, do not disassemble, impact, squeeze or put it into fire. If serious bulge occurs, please do not use. Do not use or store the product if the ambient temperature reads over 50°C. Please charge the product with specialized charger and correctly operate it within the defined voltage and working temperate according to the instruction manual.
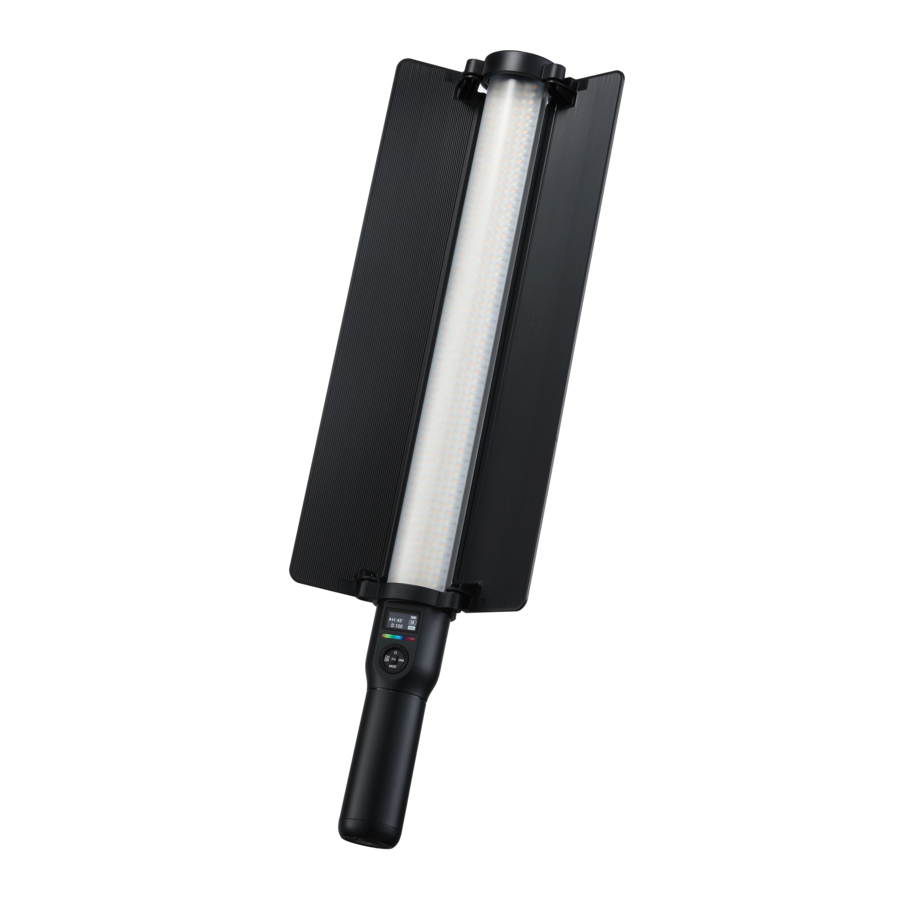
Parts
Body

- LED Beads
- Handle
- DC Power Jack
- Bracket Mounting Hole
- Reset Button
- Reflector
- Control Panel
- Power Switch
- CH/GR Button
- MOD Button
- FN Multifunctional Select Dial
- DIM Button
- Color Gamut
- MIC Hole
- LCD Panel
LCD Panel

CCT: Bicolor Modes

HSI: Colorful Light Modes

FX: Situational Special Effects Modes
Included Items

Battery Management
Power Supply
With built-in Li-polymer battery which can offer about 1.5 hours'lighting in 100% brightness once got fully charged.
Charge
The whole charging takes about 2.5 hours. The charge indicator turns to red in charging while green once got fully charged.
Attaching Reflector
Installation: Choose the side which needs reflector and adjust the reflector's direction. Match the ridge in the reflector's handle ring with the groove on the handle(as shown) and slip the reflector over the LED ice light and push in. Extend the reflector for shooting.

Detachment: Hold the handle and push the reflector from the bottom up to detach.

Operation
Setting
- Power On/Off
Long press the![]() to power on/off the LED light and the current information will be displayed on the LCD panel.
to power on/off the LED light and the current information will be displayed on the LCD panel.

- Mode Selection: Bicolor Mode/Colorful Mode/Situational Special Effects Mode. Press MOD button to switch different modes: CCT displayed on the screen means bicolor mode, HIS displayed on the screen means colorful mode and FX means situational special effects mode.

 to power on/off the LED light and the current information will be displayed on the LCD panel.

Wireless Remote Control
With 2.4G wireless system, this product has remote grouping and control function. Up to 6 groups of LED light stick can be controlled. 16 channels are available with strong anti-interference capability.
Please set the channels and groups of LED ice light to the same as those of remote control before usage.
Channel/Group/ID Setting: Press CH/GR to enter the setting interface.
Note: Remote control purchased separately
- Channel setting: press the FN button to choose CH and turn the select dial to choose channel value from 1 to 32.

- Group setting: press the FN button to choose GR and turn the select dial to choose group value from A to F.

- ID setting: press the FN button to choose ID and turn the select dial to choose ID from 1 to 99.

- Turn on/off the wireless: press the FN button to choose and turn the select dial to turn on or off the wireless.


Bicolor Mode
- Color temperature adjustment: turn the FN multifunctional select dial to adjust the color temperature from 2500K to 8500K.

- Light brightness adjustment: press the DIM button and the brightness value will be blinking. Turn the select dial to adjust the value from 0 to 100%.

- P mode: press the FN button and P will be displayed on the LCD panel, which means P mode. In P mode, the brightness will be change with the color temperature and reach the maximum value when color temperature is 4500K. In general mode, the brightness will keep the same when adjusting the color temperature.


Colorful Mode
Press MOD button to enter setting interface.
- Adjust hue H: press the FN multifunction select dial and H is selected. Turn the FN multifunctional select dial to adjust the hue from 0 to 360°.

- 4.2 Adjust saturation S: press the FN multifunction select dial and S is selected. Turn the FN multifunctional select dial leftwards or rightwards to adjust the saturation from 0 to 100.

- Adjust light brightness: press the DIM button and turn the select dial to adjust the brightness from 0~100%.


FX Situational Special Effects Mode(39 kinds)
- Turn the select dial to choose different special effects modes from 1 to 14. And the modes will display circularly by turning the select dial.

- After choosing the current mode, press down the FN multifunctional select dial from I, II and III. And the modes will display circularly when keeping pressing the FN multifunctional select dial.

- Adjust light brightness: turn the light brightness select dial to adjust from 0 to 100%.

- There're 39 kinds of situational special effects mode which are divided into 14 categories for your choice.


| No. | Display | Situation | Display | Display II | Display III |
| 1 |  | Colorful lights recycle | Slow speed | Medium speed | Quick speed |
| 2 |  | Flash | Flash | Press conference | Paparazzi |
| 3 |  | Laser colorful lights | Birthday party | KTV | Disco |
| 4 |  | Lightning | Discontinuous | Frequent | Sustainable |
| 5 |  | Broken bulb | Discontinuous | Frequent | Sustainable |
| 6 |  | TV | Slow speed | Medium speed | Quick speed |
| 7 |  | Candle | Discontinuous | Frequent | Sustainable |
| 8 |  | Fire | Firewood | Campfire | Fire hazard |
| 9 |  | Firework | Brief | Continuous | Show |
| 10 |  | Police car | Strong flash | Frequent flash | Quick flash |
| 11 |  | Fire truck | Strong flash | Frequent flash | Quick flash |
| 12 |  | Ambulance | Strong flash | Frequent flash | Quick flash |
| 13 |  | Music | Music I | Music II | |
| 14 |  | SOS |
Technical Data
| Model | LC500R |
| Built-in Lithium Battery | 14.4V/2600mAh lithium battery |
| Power | Max. 23W |
| Channel | 32 |
| Group | 6(A B C D E F) |
| Color Temperature Range | 2500K~8500K |
| Light Brightness Range | 0%~100% |
| RGB Color Gamut | 0~360° |
| 100% Light Brightness(LUX) | Max. 5800 |
CRI( ) ) | 96 |
| TLCI() | 98 |
| Duration(continuous output in 100% full power)( ) | Approx. 90 minutes |
| Operation Temperature | -10~40°C |
| Dimension (without reflector) | 616*56*56mm |
| Net Weight (without reflector) | 0.81Kg |
* Product design and specifications are subject to change without notice.

Documents / ResourcesDownload manual
Here you can download full pdf version of manual, it may contain additional safety instructions, warranty information, FCC rules, etc.
Advertisement


Need help?
Do you have a question about the LC500R and is the answer not in the manual?
Questions and answers