
Related Manuals for National Instruments NI cRIO-9039


Summary of Contents for National Instruments NI cRIO-9039
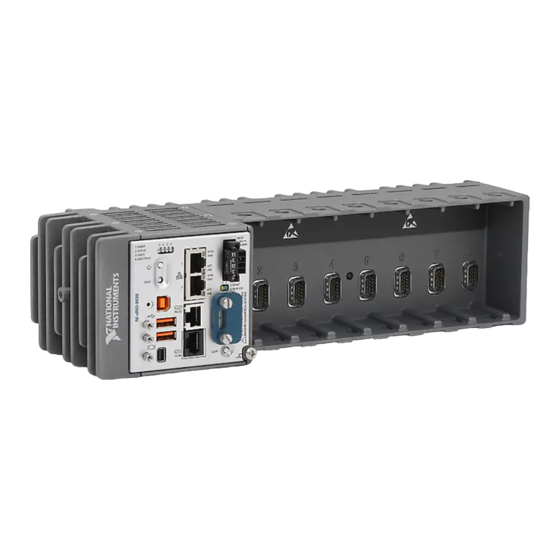
- Page 1 (217) 352-9330 | Click HERE Find the National Instruments cRIO-9039 at our website:...
- Page 2 This document describes the features of the NI cRIO-9039 and NI cRIO-9039 Sync and contains information about mounting and operating the device. In this document, the NI cRIO-9039 and NI cRIO-9039 Sync are inclusively referred to as the cRIO-9039. For more information about timing and synchronization capabilities of NI cRIO-9039 Sync, visit ni.com/info...
-
Page 3: Table Of Contents
USB device port. NI recommends using the USB device port for configuration, debug, and maintenance. 2 | ni.com | NI cRIO-9039 User Manual Artisan Technology Group - Quality Instrumentation ... Guaranteed | (888) 88-SOURCE | www.artisantg.com... -
Page 4: Connecting The Crio-9039 To The Host Computer Or Network Using Ethernet
Click Start»Control Panel»Network and Sharing Center. Select the primary network connection, which may appear as Local Area Connection or something similar. NI cRIO-9039 User Manual | © National Instruments | 3 Artisan Technology Group - Quality Instrumentation ... Guaranteed | (888) 88-SOURCE | www.artisantg.com... -
Page 5: Configuring Startup Options
Select the Startup Settings tab to configure the startup settings. cRIO-9039 Startup Options You can configure the following cRIO-9039 startup options. 4 | ni.com | NI cRIO-9039 User Manual Artisan Technology Group - Quality Instrumentation ... Guaranteed | (888) 88-SOURCE | www.artisantg.com... - Page 6 For more information, refer to the Using the Embedded UI to Access RT Target VIs topic in the LabVIEW Help. NI cRIO-9039 User Manual | © National Instruments | 5 Artisan Technology Group - Quality Instrumentation ... Guaranteed | (888) 88-SOURCE | www.artisantg.com...
-
Page 7: Crio-9039 Features
IP address automatically. The Ethernet ports can be configured in MAX. The following table shows the pinout for the RJ-45 Gigabit Ethernet ports. 6 | ni.com | NI cRIO-9039 User Manual Artisan Technology Group - Quality Instrumentation ... Guaranteed | (888) 88-SOURCE | www.artisantg.com... - Page 8 The cRIO-9039 has a power connector to which you can connect a primary and secondary power supply. The following table shows the pinout for the power connector. NI cRIO-9039 User Manual | © National Instruments | 7 Artisan Technology Group - Quality Instrumentation ... Guaranteed | (888) 88-SOURCE | www.artisantg.com...
- Page 9 SD Card Removable Storage The cRIO-9039 provides an SD card slot that can read from and write to NI-approved SD cards. 8 | ni.com | NI cRIO-9039 User Manual Artisan Technology Group - Quality Instrumentation ... Guaranteed | (888) 88-SOURCE | www.artisantg.com...
- Page 10 Console Out startup option is enabled. The following table shows the pinout for the RS-232 serial port. NI cRIO-9039 User Manual | © National Instruments | 9 Artisan Technology Group - Quality Instrumentation ... Guaranteed | (888) 88-SOURCE | www.artisantg.com...
- Page 11 NI Example Finder. The NI Example Finder is located on the Help menu in the LabVIEW Help. The following table shows the pinout for the RS-485/422 (DTE) serial port. 10 | ni.com | NI cRIO-9039 User Manual Artisan Technology Group - Quality Instrumentation ... Guaranteed | (888) 88-SOURCE | www.artisantg.com...
- Page 12 The following table shows the pinout for the Mini DisplayPort. NI cRIO-9039 User Manual | © National Instruments | 11 Artisan Technology Group - Quality Instrumentation ... Guaranteed | (888) 88-SOURCE | www.artisantg.com...
- Page 13 USB devices without affecting operation. The following table shows the pinout for the USB host ports. 12 | ni.com | NI cRIO-9039 User Manual Artisan Technology Group - Quality Instrumentation ... Guaranteed | (888) 88-SOURCE | www.artisantg.com...
- Page 14 Install the ferrite on the USB cables, as shown in the following figure. Figure 2. Installing a Ferrite on the USB Cables NI cRIO-9039 User Manual | © National Instruments | 13 Artisan Technology Group - Quality Instrumentation ... Guaranteed | (888) 88-SOURCE | www.artisantg.com...
-
Page 15: Buttons
The cRIO-9039 provides the following buttons. Figure 3. cRIO-9039 Buttons 1. Power Button 3. USER1 Button 2. RESET Button 4. CMOS Reset Button 14 | ni.com | NI cRIO-9039 User Manual Artisan Technology Group - Quality Instrumentation ... Guaranteed | (888) 88-SOURCE | www.artisantg.com... - Page 16 • RT Startup App disabled • FPGA Startup App disabled Press and hold RESET button for ≥ 5 s NI cRIO-9039 User Manual | © National Instruments | 15 Artisan Technology Group - Quality Instrumentation ... Guaranteed | (888) 88-SOURCE | www.artisantg.com...
-
Page 17: Leds
The cRIO-9039 is powered from the V1 input. Yellow Solid The cRIO-9039 is powered from the V2 input. — The cRIO-9039 is powered off. 16 | ni.com | NI cRIO-9039 User Manual Artisan Technology Group - Quality Instrumentation ... Guaranteed | (888) 88-SOURCE | www.artisantg.com... - Page 18 If the problem persists, contact NI. — The cRIO-9039 is in run mode. Software is installed and the operating system is running. NI cRIO-9039 User Manual | © National Instruments | 17 Artisan Technology Group - Quality Instrumentation ... Guaranteed | (888) 88-SOURCE | www.artisantg.com...
- Page 19 The cRIO-9039 has two LEDs that indicate the SD card drive mount status and activity. The following table lists SD LED indicators. 18 | ni.com | NI cRIO-9039 User Manual Artisan Technology Group - Quality Instrumentation ... Guaranteed | (888) 88-SOURCE | www.artisantg.com...
-
Page 20: Chassis Grounding Screw
1.31 mm (16 AWG) or larger wire. Attach a ring lug to the wire and attach the wire NI cRIO-9039 User Manual | © National Instruments | 19 Artisan Technology Group - Quality Instrumentation ... Guaranteed | (888) 88-SOURCE | www.artisantg.com... -
Page 21: Fpga Dram
To prevent any file corruption to external storage devices, verify that any file IO operations with the specific drive finish before removing the device. Refer to the LabVIEW Help for more information. 20 | ni.com | NI cRIO-9039 User Manual Artisan Technology Group - Quality Instrumentation ... Guaranteed | (888) 88-SOURCE | www.artisantg.com... -
Page 22: Installing The Module Immobilization Accessory
Torx T10H and T20H. Use the tamper-resistant set to help prevent unintended modification of the system. NI cRIO-9039 User Manual | © National Instruments | 21 Artisan Technology Group - Quality Instrumentation ... Guaranteed | (888) 88-SOURCE | www.artisantg.com... -
Page 23: Module Immobilization Accessory Dimensions
Module Immobilization Accessory Dimensions The following figure shows the Module Immobilization accessory dimensions for the cRIO-9039. 22 | ni.com | NI cRIO-9039 User Manual Artisan Technology Group - Quality Instrumentation ... Guaranteed | (888) 88-SOURCE | www.artisantg.com... -
Page 24: Mounting The Crio-9039
C Series module accuracy. Observe the following guidelines to mount the cRIO-9039 in the reference mounting configuration. NI cRIO-9039 User Manual | © National Instruments | 23 Artisan Technology Group - Quality Instrumentation ... Guaranteed | (888) 88-SOURCE | www.artisantg.com... - Page 25 MAX. You will be unable to read the serial number after you mount the cRIO-9039. 24 | ni.com | NI cRIO-9039 User Manual Artisan Technology Group - Quality Instrumentation ... Guaranteed | (888) 88-SOURCE | www.artisantg.com...
-
Page 26: Mounting Requirements
38.1 mm (1.50 in.) forward from the rear of the cRIO-9039, as shown in the following figure. NI cRIO-9039 User Manual | © National Instruments | 25 Artisan Technology Group - Quality Instrumentation ... Guaranteed | (888) 88-SOURCE | www.artisantg.com... -
Page 27: Dimensions
107.0 mm (4.21 in.) 107.0 mm (4.21 in.) 88.1 mm (3.47 in.) 226.6 mm (8.92 in.) 8.6 mm (0.34 in.) 26 | ni.com | NI cRIO-9039 User Manual Artisan Technology Group - Quality Instrumentation ... Guaranteed | (888) 88-SOURCE | www.artisantg.com... -
Page 28: Mounting The Device Directly On A Flat Surface
What to Do Complete the following steps to mount the cRIO-9039 directly on a flat surface. NI cRIO-9039 User Manual | © National Instruments | 27 Artisan Technology Group - Quality Instrumentation ... Guaranteed | (888) 88-SOURCE | www.artisantg.com... - Page 29 20.3 mm (0.80 in.) 3× 23.7 mm (0.94 in.) 9× ISO M4 × 0.7 Thread 8 mm Maximum Insertion Depth 28 | ni.com | NI cRIO-9039 User Manual Artisan Technology Group - Quality Instrumentation ... Guaranteed | (888) 88-SOURCE | www.artisantg.com...
-
Page 30: Mounting The Crio-9039 On A Panel
The maximum screw size is M5 or number 10. Panel Mounting Dimensions The following figure shows the panel mounting dimensions for the cRIO-9039. NI cRIO-9039 User Manual | © National Instruments | 29 Artisan Technology Group - Quality Instrumentation ... Guaranteed | (888) 88-SOURCE | www.artisantg.com... -
Page 31: Alternate Mounting Configurations
M4 × 10 screws (x3) What to Do Complete the following steps to mount the cRIO-9039 on a DIN rail. 30 | ni.com | NI cRIO-9039 User Manual Artisan Technology Group - Quality Instrumentation ... Guaranteed | (888) 88-SOURCE | www.artisantg.com... - Page 32 Ensure that no C Series modules are in the cRIO-9039 before removing it from the DIN rail. NI cRIO-9039 User Manual | © National Instruments | 31 Artisan Technology Group - Quality Instrumentation ... Guaranteed | (888) 88-SOURCE | www.artisantg.com...
- Page 33 – Desktop mounting brackets (x2) What to Do Complete the following steps to mount the cRIO-9039 on a desktop. 32 | ni.com | NI cRIO-9039 User Manual Artisan Technology Group - Quality Instrumentation ... Guaranteed | (888) 88-SOURCE | www.artisantg.com...
-
Page 34: Bios Configuration
Additionally, the BIOS optimizes boot time by saving specific system information to memory backed up by a battery (CMOS). NI cRIO-9039 User Manual | © National Instruments | 33 Artisan Technology Group - Quality Instrumentation ... Guaranteed | (888) 88-SOURCE | www.artisantg.com... -
Page 35: Power-On Self Test Warning Messages
The Main setup menu is displayed when you first enter the BIOS setup utility. BIOS Setup Utility Keyboard Navigation Use the following keys to navigate through the BIOS setup utility: 34 | ni.com | NI cRIO-9039 User Manual Artisan Technology Group - Quality Instrumentation ... Guaranteed | (888) 88-SOURCE | www.artisantg.com... -
Page 36: Main Setup Menu
Most operating systems also include a way to change this setting. Use <+> and <-> in conjunction with <Enter> and <Tab> to change these values. NI cRIO-9039 User Manual | © National Instruments | 35 Artisan Technology Group - Quality Instrumentation ... Guaranteed | (888) 88-SOURCE | www.artisantg.com... -
Page 37: Advanced Setup Menu
The default value is Enabled. • Onboard Storage—This item displays the onboard drive detected in the system. 36 | ni.com | NI cRIO-9039 User Manual Artisan Technology Group - Quality Instrumentation ... Guaranteed | (888) 88-SOURCE | www.artisantg.com... -
Page 38: Boot Setup Menu
Boot Option Priorities—These settings specify the order in which the BIOS checks for bootable devices, including the local hard disk drive, removable devices such as USB NI cRIO-9039 User Manual | © National Instruments | 37 Artisan Technology Group - Quality Instrumentation ... Guaranteed | (888) 88-SOURCE | www.artisantg.com... - Page 39 Floppy Drive BBS Priorities Submenu The Floppy Drive BBS Priorities submenu specifies the boot priority of floppy drive devices. 38 | ni.com | NI cRIO-9039 User Manual Artisan Technology Group - Quality Instrumentation ... Guaranteed | (888) 88-SOURCE | www.artisantg.com...
-
Page 40: Save & Exit Menu
If BIOS setup options have been changed and saved, a reboot will be required and the boot override selection will not be valid. NI cRIO-9039 User Manual | © National Instruments | 39 Artisan Technology Group - Quality Instrumentation ... Guaranteed | (888) 88-SOURCE | www.artisantg.com... -
Page 41: Worldwide Support And Services
NI trademarks. Other product and company names mentioned herein are trademarks or trade names of their respective companies. For patents covering NI products/technology, refer to the appropriate location: Help»Patents in your software, the file on your media, or the National Instruments Patent Notice at . You can find patents.txt ni.com/patents...
Need help?
Do you have a question about the NI cRIO-9039 and is the answer not in the manual?
Questions and answers