Table of Contents
Advertisement
Quick Links
GETTING STARTED GUIDE
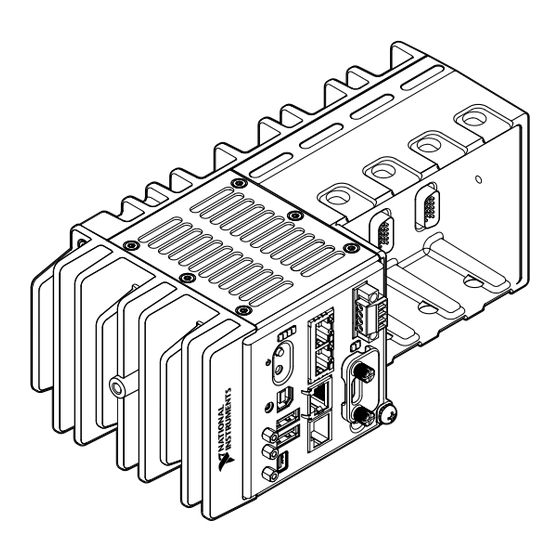
NI cRIO-9033
Embedded CompactRIO Controller with Real-Time Processor and
Reconfigurable FPGA
This document describes how to begin using the National Instruments cRIO-9033.
Safety Guidelines
Caution
Product misuse can result in a hazard. You can compromise the safety protection
built into the product if the product is damaged in any way. If the product is
damaged, return it to NI for repair.
Safety Guidelines for Hazardous Locations
The cRIO-9033 is suitable for use in Class I, Division 2, Groups A, B, C, D, T4 hazardous
locations; Class I, Zone 2, AEx nA IIC T4 and Ex nA IIC T4 hazardous locations; and
nonhazardous locations only. Follow these guidelines if you are installing the cRIO-9033 in a
potentially explosive environment. Not following these guidelines may result in serious injury
or death.
Do not operate the cRIO-9033 in a manner not specified in this document.
Advertisement
Table of Contents

Subscribe to Our Youtube Channel
Related Manuals for National Instruments NI cRIO-9033


Summary of Contents for National Instruments NI cRIO-9033
- Page 1 GETTING STARTED GUIDE NI cRIO-9033 Embedded CompactRIO Controller with Real-Time Processor and Reconfigurable FPGA This document describes how to begin using the National Instruments cRIO-9033. Safety Guidelines Caution Do not operate the cRIO-9033 in a manner not specified in this document.
-
Page 2: Special Conditions For Hazardous Locations Use In Europe And Internationally
You must make sure that transient disturbances do not exceed 140% of the rated voltage. Caution The system shall only be used in an area of not more than Pollution Degree 2, as defined in IEC 60664-1. 2 | ni.com | NI cRIO-9033 Getting Started Guide... -
Page 3: Electromagnetic Compatibility Guidelines
Refer to the following sections for more information. Related Information Connecting the cRIO-9033 to Ground on page 7 Connecting the cRIO-9033 to Power on page 8 NI cRIO-9033 Getting Started Guide | © National Instruments | 3... -
Page 4: Special Conditions For Marine Applications
Do not install a device if it appears damaged in any way. Unpack any other items and documentation from the kit. Store the device in the antistatic package when the device is not in use. 4 | ni.com | NI cRIO-9033 Getting Started Guide... -
Page 5: Verifying The Kit Contents
Complete the following steps to install a C Series module. LabVIEW FPGA Module is not required when using Scan Interface mode. To program the user- accessible FPGA on the cRIO-9033, LabVIEW FPGA Module is required. NI cRIO-9033 Getting Started Guide | © National Instruments | 5... -
Page 6: Removing C Series Modules
If the system is in a nonhazardous location, the cRIO-9033 can be powered on when you remove modules. Connecting the cRIO-9033 The cRIO-9033 has the following connectors, LEDs, and buttons. 6 | ni.com | NI cRIO-9033 Getting Started Guide... - Page 7 Tighten the grounding screw to 0.5 N · m (4.4 lb · in.) of torque. Attach the other end of the wire to the grounding electrode system of your facility using a method that is appropriate for your application. NI cRIO-9033 Getting Started Guide | © National Instruments | 7...
- Page 8 Primary power supply, 9 V to 30 V, 40 W minimum • (Optional) Secondary power supply, 9 V to 30 V, 40 W minimum NI recommends the power supplies listed in the following table for the cRIO-9033. 8 | ni.com | NI cRIO-9033 Getting Started Guide...
- Page 9 Do not tighten or loosen the terminal screws on the power connector while the cRIO-9033 is powered on. Connect the primary power supply and optional secondary power supply to the power connector, as shown in the following figure. NI cRIO-9033 Getting Started Guide | © National Instruments | 9...
- Page 10 Connect the cRIO-9033 to the host computer using the USB A-to-B cable. Caution NI requires the use of a locking USB cable (157788-01) to meet the shock and vibration specifications. Refer to the specifications on ni.com/ manuals for shock and vibration specifications. 10 | ni.com | NI cRIO-9033 Getting Started Guide...
-
Page 11: Setting A System Password
11. Click OK to confirm you are changing the password. Caution NI cannot recover lost system passwords. If you forget the password, you must contact NI and reformat the controller. NI cRIO-9033 Getting Started Guide | © National Instruments | 11... - Page 12 The USB driver creates a virtual network interface card and assigns an IP address to the cRIO-9033 in the format of 172.22.11. In MAX, expand your system under Remote Systems. 12 | ni.com | NI cRIO-9033 Getting Started Guide...
-
Page 13: Verify The System Ip Configuration
Add an exception for MAX to your network firewall or other security software by completing the following steps: On Windows 7, select Start»Control Panel»System and Security»Windows Firewall»Allow a program through Windows Firewall. Click Allow another program. Select Measurement & Automation. NI cRIO-9033 Getting Started Guide | © National Instruments | 13... -
Page 14: System Reset
Safe Mode • RT Startup App disabled • FPGA Startup App disabled Press and hold RESET button for ≥ 5 s STATUS LED Indicators The following table describes the STATUS LED indicators. 14 | ni.com | NI cRIO-9033 Getting Started Guide... - Page 15 Remove any shorts and cycle power the cRIO-9033. If the problem persists, contact NI. — The cRIO-9033 is in run mode. Software is installed and the operating system is running. NI cRIO-9033 Getting Started Guide | © National Instruments | 15...
-
Page 16: Where To Go Next
Worldwide Support and Services The National Instruments website is your complete resource for technical support. At ni.com/ support, you have access to everything from troubleshooting and application development self-help resources to email and phone assistance from NI Application Engineers. - Page 17 National Instruments corporate headquarters is located at 11500 North Mopac Expressway, Austin, Texas, 78759-3504. National Instruments also has offices located around the world. For telephone support in the United States, create your service request at ni.com/support dial 1 866 ASK MYNI (275 6964). For telephone support outside the United States, visit the Worldwide Offices section of ni.com/niglobal...
- Page 18 Other product and company names mentioned herein are trademarks or trade names of their respective companies. For patents covering National Instruments products/technology, refer to the appropriate location: Help»Patents in your software, the file on your media, or the National Instruments Patent Notice at .
Need help?
Do you have a question about the NI cRIO-9033 and is the answer not in the manual?
Questions and answers