
Related Manuals for HealthCare International motoMax


Summary of Contents for HealthCare International motoMax
- Page 1 OWNER’S MANUAL HealthCare International, Inc. PO Box 1509, Langley, WA 98260 www.HCIFitness.com – sales@hcifitness.com P: (206) 739-5400 or (800) 398-9121...
-
Page 3: Table Of Contents
Contents Safety Precautions ....................... 4 Warranty Information ......................5 Assembly Instructions ......................6 Accessories ......................... 9 Wheelchair Straps ....................9 Hand Grip Accessory ..................... 9 Leg Stabilizer Accessory ..................10 Tilt Adjustment ........................10 Handle & Pedal Length Adjustment ................... 11 Display .......................... -
Page 4: Safety Precautions
Safety Precautions This exercise equipment was designed and built for optimum safety. However, certain precautions apply whenever you operate a piece of exercise equipment. Be sure to read the entire manual before assembly and operation of this machine. Also, please note the following safety precautions: 1. -
Page 5: Warranty Information
Dear Valued Customer, Thank you for your recent purchase of the motoMax from HCI Fitness. We believe that you have purchased one of the highest quality and affordable active and passive trainers on the market today. Prior to using your new motoMax please review the operator’s manual and product tips to maximize your workout experience. -
Page 6: Assembly Instructions
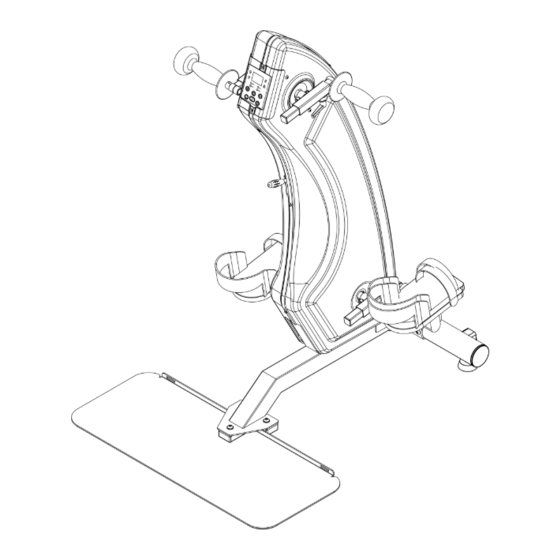
Assembly Instructions Assembly Parts List ITEM Description Main frame set Front stabilizer Stabilization Platform Handrail set (left) Handrail set (right) Pedal board (left) Pedal board (right) Tool Set ITEM Description 15mm Opening wrench 5mm x 30mm x 120mm L-shaped hex wrench... - Page 7 Step 1 Unscrew the two screws from the front stabilizer (B). Then place the screws through the main frame (A) and tighten the screws into the front stabilizer (B). Step 2 Unscrew the 3 screws from the stabilization platform (C). Then place the screws through the main frame (A) and tighten the screws into the stabilization...
- Page 8 1.1.1. Step 3 Attach the handles and pedals to the motoMax. Please note that the pedals are labeled for the left and right sides. The left side handle and pedal have reverse threads so, turn counterclockwise to tighten the left side handle and pedal.
-
Page 9: Accessories
STEP 2 Attach to the wheelchair straps to the mounts on the Bring the wheelchair into position stabilization platform, then secure the wheelchair with to use the motoMax. the straps. Hand Grip Accessory Universal hand grip allows users to secure their hands to handles. -
Page 10: Leg Stabilizer Accessory
Tilt Adjustment 1. Press down on the tilt adjust lever. 2. While holding down the lever use your other hand to change the angle of the motoMax. 3. Release the tilt adjust lever to lock the motoMax in place. -
Page 11: Handle & Pedal Length Adjustment
Handle & Pedal Length Adjustment 1. Turn the locking knob counterclockwise to loosen the handle or pedal. 2. Then adjust the extension handle or pedal to the proper position. 3. Secure the handle or pedal in place by tightening down the locking knob. -
Page 12: Display
Display... -
Page 13: Key Function
Key function Button instruction Icon Purpose Operation Start or Stop Press the Start/Stop Button to begin your workout. Press Button the Start/Stop Button again to stop your workout. The default setting is passive mode (AUTO) indicated by Change between LED light on the display. Active (MANUAL) During operation press the Start/Stop button then press the and Passive... -
Page 14: Quick Start Guide
Quick Start Guide 1. Plug in the motoMax and turn the power switch to the on position. 2. You will hear a Beep sound and see CHECK on the screen. 3. The data on the screen will be 0 and...
Need help?
Do you have a question about the motoMax and is the answer not in the manual?
Questions and answers