
Related Manuals for HealthCare International PhysioStep LXT


Summary of Contents for HealthCare International PhysioStep LXT
- Page 1 Owner’s Manual V.4 Stabilization Kit Now Available! Order Form on the Back Page. HealthCare International, Inc. PO Box 1509, Langley, WA 98260 www.HCIFitness.com – sales@hcifitness.com P: (206) 739-5400 or (800) 398-9121...
-
Page 3: Table Of Contents
Seat Adjustments....................7 Quick Start ......................7 Heart Rate ......................7 USB Workout Summary Report ................ 7 PhysioStep LXT Display Console ................. 8 Button Functions ....................9 Quick Start –Sit, Start, & Step! ................10 Select a Workout Program ................. 10 Setup your Workout Programs ................ -
Page 4: Safety Precautions
9. Keep hands and feet away from any moving parts. Do not insert any objects into any openings. 10. Keep clothes, jewelry and loose items away from moving parts. NOTE: MAXIMUM WEIGHT CAPACITY FOR THE PHYSIOSTEP LXT IS 400 LBS. (182 KGS) WARNING: BEFORE BEGINNING ANY EXERCISE PROGRAM CONSULT YOUR PHYSICIAN. -
Page 5: Warranty Information
Dear Valued Customer, Thank you for your recent purchase of the PhysioStep LXT from HCI Fitness. We believe that you have purchased one of the highest quality and affordable recumbent cross trainers on the market today. Prior to using your new PhysioStep LXT please review the operator’s manual and product tips to... -
Page 6: Assembly Instructions
Assembly Instructions STEP 1: Pull the seat recline knob (78) to release the Back Cushion Support (44) and place it in an upright position. Make sure the Knob (78) is then fixed firmly back in place to secure the Back Cushion Support (44). STEP 2: Assemble the Back Cushion (86) by using the Hexagonal Bolt (65) to secure the Back Cushion Support (44). - Page 7 STEP 3: 1. Install Moving Handle R (47) to Moving Handle Axis R (33) by using the Hexagonal Bolt (66),Spring Washer SW8 (15) and Curved Washer (58). Make sure the bolts are securely tightened. 2. Install Moving Handle L (48) to Moving Handle Axis L (33b) by using the Hexagonal Bolt (66),Spring Washer SW8 (15) and Curved Washer (58).
-
Page 8: Quick Tips
Remove the screws from the back of the Computer (96). Then connect the Control Wire coming from the display tube (101) to the computer (A). Congratulations on Setting up Your New PhysioStep LXT! Please Note: Connect the power adaptor to the unit first and then plug the adapter into the... -
Page 9: Ac Adaptor
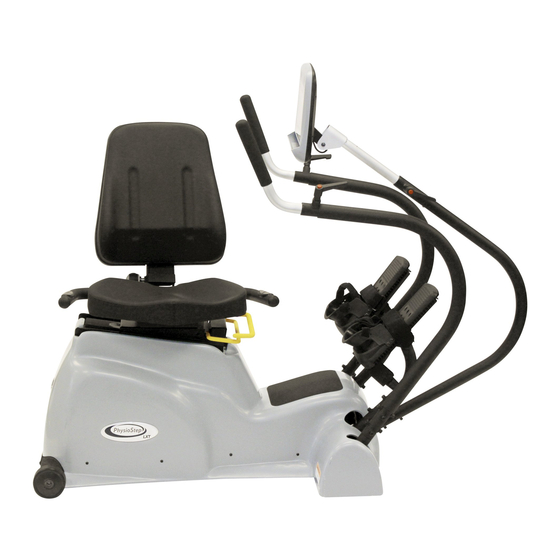
The handle on the left of the seat allows the seat to swivel for easy access. In addition you can adjust the tilt of the PhysioStep LXT seat back by pulling the knob located on the back cushion support. -
Page 10: Physiostep Lxt Display Console
PhysioStep LXT Display Console... -
Page 11: Button Functions
Button Functions 1. QUICK START BUTTON 1.1. Pressing the QUICK START button starts a manual workout. 2. ENTER BUTTON 2.1. The ENTER button selects programs and confirms data entry. 3. [+] / UP BUTTON 3.1. Press the [+] button to increase values. 3.2. -
Page 12: Quick Start -Sit, Start, & Step
Quick Start –Sit, Start, & Step! 1. Adjust your seat, display and handles to a comfortable position allowing your legs and arms to use the full range of motion. 2. Press the QUICK START button. 3. Start Stepping! You can use [+] / [-] buttons to adjust the resistance level at any time during your workout. -
Page 13: Setup Your Workout Programs
Setup your Workout Programs Before starting your workout make sure that your seat is comfortably adjusted. NOTE: Use the WORKOUTS button to cycle through programs. Press the WORKOUTS button again to view the next workout. Press ENTER to select your desired workout. -
Page 14: Basic Programs
Basic Programs Manual, Warm Up, Interval, Valley, Ramp, Mountain, Rolling, Climb, Random, Hill, Fat Burn, Cardio, and Strength. 1.1. User Setup - You will be prompted gender, age, weight, and time. Use the PAUSE button to return to the previous step when entering user info. 1.2. -
Page 15: Heart Rate Programs (Hr 65% / Hr 85%)
Heart Rate Programs (HR 65% / HR 85%) *Requires Contact Heart Rate or Heart Rate Monitor 2.1. User Setup - You will be prompted gender, age, weight, time, & HR. Use the PAUSE button to return to the previous step when entering user info. 2.1.1. -
Page 16: Constant Programs (Isokinetic / Watts)
Constant Programs (Isokinetic / WATTS) 3.1. User Setup - You will be prompted gender, age, weight, time & constant. Use the PAUSE button to return to the previous step when entering user info. 3.1.1. Set Time: Use the [+] / [-] buttons to set workout time. (Counting Down) 3.1.1.1. -
Page 17: Goal Set Programs (Calories / Distance)
Goal Set Programs (Calories / Distance) 4.1. User Setup - You will be prompted gender, age, weight, time, & goal. Use the PAUSE button to return to the previous step when entering user info. 4.1.1. Set Time: Use the [+] / [-] buttons to set workout time. (Counting Down) 4.1.1.1. -
Page 18: Cool Down Mode
Custom User Programs (User 1) Create a custom protocol with user selected watt resistance levels with up to 20 equally timed stages. Set Time Interval for Stages Total Time Individual Stage Time 10 Minutes 30 Seconds 20 Minutes 1 Minute 1.1. -
Page 19: Workout Summary Mode
Workout Summary Mode * After cool down mode, the display shows workout summary* 1. The workout summary mode displays your personal data as shown below: Total Time, Distance, Calories and Steps; as well as Average/Peak METs, WATTS, Steps per Minute (SPM) and Pulse. Export Workout Summary to USB –Pause, Reset, Report *USB Slot Located on Back of Display* 1. -
Page 20: Sleep Mode
8. Once the date is completed, the display will show the messages “Export” and “Press Enter to Export Data”. Press the ENTER button to export your workout summary report to USB. Saving your workout summary will take a few seconds. 9. -
Page 21: Using Optional Heart Rate Monitors
3. When the recovery is completed, the screen will display: Excellent (F1.0), Very Good (F2.0), Good (F3.0), Satisfactory (F4.0), Sufficient (F5.0) or Fail (F6.0) based on the rate of recovery. 4. P0 = the user’s heart rate when the recovery mode was initiated. P1 = the user’s heart rate after completing the recovery mode. -
Page 22: General Display Information
General Display Information 1. Gender 1.1. Men are MALE, Women are FEMALE (preset value is MALE). 1.2. The display shows [M] / [F] when setting. 2. Age 2.1. The age range is between 10 and 99, preset value is 60 years old. 2.2. -
Page 23: Display Settings - Engineering Mode
Display Settings – Engineering Mode To enter the Engineering Mode first make sure you are on the home screen by pressing RESET twice. Then press and hold ENTER, QUICK START, and [+] button at the same time. Once in the Engineering Mode press ENTER to view settings and [+] / [-] buttons to cycle settings. -
Page 24: Exploded Diagram
Exploded Diagram... -
Page 25: Parts List
Parts List Description Qty No. Description Front Frame 34 Moving Handle Axis (L) Main Frame 35 Moving Pedal Set (R) Belt Pulley 36 Moving Pedal Set (L) Pulley Axle 37 Pedal Foot (R) Ball Bearing 6204ZZ 38 Pedal Foot (L) Hexagonal Bolt M6*15L 39 Change pipe Lock Nut M6... - Page 26 Description Qty No. Description 67 Nylon Nut M8 100 Power inlet 68 Hexagonal Bolt φ10* 50L 101 Control Wire 69 Rear Leg Wheel 102 Adapter Adjustment Fix Cushion 103 Back Cushion Cover (28*11) 71 Socket Cover 104 "+" Bolt ST5*30L 72 Input Socket 105 Ankle Support Bolt 73 Screw M5*8L...
-
Page 27: Service Notes
Service Notes Date Service Performed Company Phone... - Page 28 . E-Mail: Phone: ( Method of Payment: Check Payable to: HealthCare International Credit Card Credit Card #: CVC Code: (3 or 4 Numbers) Exp Date: Signature: Mail Order Form To: HealthCare International PO Box 1509 Langley, WA 98260...
Need help?
Do you have a question about the PhysioStep LXT and is the answer not in the manual?
Questions and answers