Advertisement
Quick Links
Advertisement

Subscribe to Our Youtube Channel
Related Manuals for TMG TMG-MSC2020


Summary of Contents for TMG TMG-MSC2020
- Page 1 W W W . T M G I N D U S T R I A L . C O M P 0 / 1 4 T o l l F r e e : 1 - 8 7 7 - 7 6 1 - 2 8 1 9...
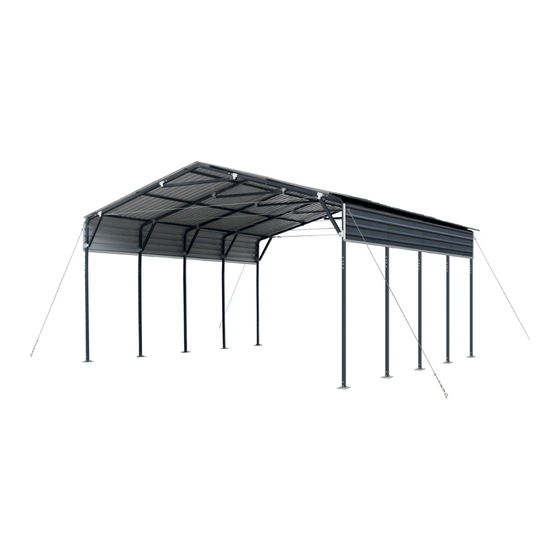
- Page 2 Main specifications : • Assembly size : W6 x L6 x H3.8 (m) / 19.7 x 19.7 x 12.5 (ft) • Width : 6m / 19.7 ft • Length : 6m / 19.7 ft • Ridge Peak Height : 3.8 m / 12.5 ft •...
- Page 3 Frame structure diagram W W W . T M G I N D U S T R I A L . C O M P 2 / 1 4 T o l l F r e e : 1 - 8 7 7 - 7 6 1 - 2 8 1 9...
- Page 4 TMG-MSC2020 Part List Parts Graphical Description Length Code Peak arch tube L1668mm L1880mm Middle rafter tube Shoulder tube L1188mm L1188mm Shoulder tube Sidewall tube L1924mm L198mm Short casing Baseplate W150xL200mm Side edge crossbar L1570mm (front and rear truss) Side edge crossbar...
- Page 5 Reinforced tube L100mm mounting plate Metal sheet W870xL1620mm Metal sheet W870xL1600mm L600mm Edge protector Edge protector(top) L1600mm Eyebolt M10x90mm Anchor hook φ16x120mm Steel cable L3.9m Steel cable Expansion bolt φ16 x 150mm Drill φ3.5mm Hex bolt M10x70mm #12x30mm Self tapping screw Blind rivet φ3x10mm Corner protector...
- Page 6 Step 1 : Baseplate positioning and installation. • The diagonal X and Y must be equal. • Installation diagram of expansion bolt. Part W W W . T M G I N D U S T R I A L . C O M P 5 / 1 4 T o l l F r e e : 1 - 8 7 7 - 7 6 1 - 2 8 1 9...
- Page 7 Step 2 : Install all trusses. • Install front and rear trusses. Part Part 34x2 W W W . T M G I N D U S T R I A L . C O M P 6 / 1 4 T o l l F r e e : 1 - 8 7 7 - 7 6 1 - 2 8 1 9...
- Page 8 • Install other trusses. (3 trusses) Part Part 34x3 W W W . T M G I N D U S T R I A L . C O M P 7 / 1 4 T o l l F r e e : 1 - 8 7 7 - 7 6 1 - 2 8 1 9...
- Page 9 Step 3 : Put up the all trusses, install the wire rope. Part W W W . T M G I N D U S T R I A L . C O M P 8 / 1 4 T o l l F r e e : 1 - 8 7 7 - 7 6 1 - 2 8 1 9...
- Page 10 Step 4 : Install top cross bar. Part Part W W W . T M G I N D U S T R I A L . C O M P 9 / 1 4 T o l l F r e e : 1 - 8 7 7 - 7 6 1 - 2 8 1 9...
- Page 11 Step 5 : Install side panels. Part Part W W W . T M G I N D U S T R I A L . C O M P 1 0 / 1 4 T o l l F r e e : 1 - 8 7 7 - 7 6 1 - 2 8 1 9...
- Page 12 Step 6 : Install the roof panels. Part W W W . T M G I N D U S T R I A L . C O M P 1 1 / 1 4 T o l l F r e e : 1 - 8 7 7 - 7 6 1 - 2 8 1 9...
- Page 13 Part Part W W W . T M G I N D U S T R I A L . C O M P 1 2 / 1 4 T o l l F r e e : 1 - 8 7 7 - 7 6 1 - 2 8 1 9...
- Page 14 Step 7 : Install the wire rope. Part Part W W W . T M G I N D U S T R I A L . C O M P 1 3 / 1 4 T o l l F r e e : 1 - 8 7 7 - 7 6 1 - 2 8 1 9...
- Page 15 After the Installation Walk around and inspect the carport periodically to make sure all components are still firmly secured and the whole carport is well supported. Check all bolts and nuts as well as all connection points to make sure they are all in good position. Check the base plates, adjust the ropes and tie downs if required and clean the cover regularly.
- Page 16 ATTENTION TO ENSURE THAT YOUR CARPORT SHED HAS BEEN SECURELY INSTALLED AND ITS WARRANTY VALIDITY, IT IS IMPORTANT TO READ THE FOLLOWING PAGES CAREFULLY.
- Page 17 As the owner of your product, it is important to take the necessary steps to ensure its stability and durability, especially in areas where heavy snow or high winds are common. Following these three steps will help prevent any damage due to snow or wind loads, and ensure that the product warranty remains valid.
Need help?
Do you have a question about the TMG-MSC2020 and is the answer not in the manual?
Questions and answers