Advertisement
Quick Links
Advertisement

Related Manuals for TMG TMG-SCE20


Summary of Contents for TMG TMG-SCE20
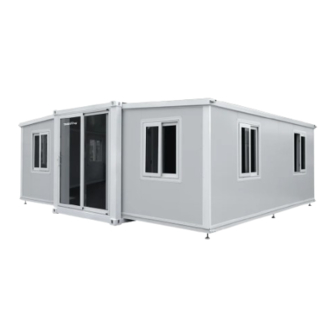
- Page 1 0/16 TOLL FREE:1-877-761-2819 ►www.tmgindustrial.com...
-
Page 2: Installation Steps
INSTALLATION STEPS PRIOR TO ASSEMBLY Please read the instructions carefully before installation. It is very important to follow your local safety regulations and industry standards during installation. Regulations may include but are not limited t o : • Safety helmets, protective eyewear, and clothing •... - Page 3 window 930x x800mm concave line 50x50x2240 x2240mm Color Steel Plate u-shaped 110x170x2240 110x170x2240m groove PVC Corner Covering 100x2300 100x2300mm Bamboo fiber angle line 80x2000mm 2000mm Bamboo fiber angle line internal angle buckle Bamboo fiber angle line external angle buckle PVC Corner end Buckle Bamboo fiber angle wire connecting buckle www.tmgindustrial.com...
- Page 4 Bamboo fiber angle wire fixing buckle Metal buckle plate 200*3000*0.8mm 200*3000*0.8mm 2-10 L type cupboard (①: Includes 1 double basin vegetable washing basin, 1 set of faucets, 2 800mm (2200 2200+1400) 2-11 long inlet pipes. Equipped 1 set *550*900mm *550*900mm with 1 set of drainage pipes.
- Page 5 Valve Movable partition wall weatherproofing sealant unfolding roof and roof = 22m White T-shaped rubber strip Circular Slit 40x2700mm 40x2700mm L=22meters L=22meters White D-shaped rubber strip L=22meters L=22meters Flat tape Slants thin Waterproof Tape L=80#x 80#x40meters (Used for: such as roof leak repair) Hexagonal self tapping screw (Used for: gable and...
- Page 6 Hexagonal self tapping screw (Used for: connecting Φ4.2 L=125mm 4.2 L=125mm the top, side walls, and gable walls) Cross Self-tapping screw 6-10 Φ4.2 L= 4.2 L=35mm (Used for: Foot guard board) Big Cap Self-tapping Nail (Used for: fixing flat 6-11 Φ4.2 L= 4.2 L=27mm aluminum strips, connecting...
-
Page 7: Step 2 : Installation Procedure
20' EXPANDABLE PREFAB CONTAINER HOUSE 2 B CONTAINER HOUSE 2 BRM STEP 2 : INSTALLATION PROCEDURE 1. Pull out the roof bolt 2. Open up the roof. After lifting the roof, there must be a upholder upholder to temporarily fix the roof. 3. - Page 8 5. Put down the floor. The floor is heavy; there must be at least 5 men to put down it! 6. Lift up Wall-B. affect the opening of Wall-A and C Adjust the legs to level the floor; it will affect 7.
- Page 9 8. PUT IN THE PARTITION WALL. 9. Fixed the partition wall. Use4L-shape corner covering to fix the the partition wall; Use at least 3 rivets on each side of the the L-shape corner covering to fix the corner covering! 6-12 10.
- Page 10 11. Use L-shape corner covering to fix Wall Wall-A & Wall-C /Wall-1 & Wall-3. Use at least 3 rivets on each side of the of the L-shape corner covering to fix the corner covering! covering! 6-12 12. Open and assemble the other side by by the same way.
- Page 11 13. Assemble the PVC corner covering. covering. 6-10 Measure the height and cut the corner covering covering into proper size! 6-10 www.tmgindustrial.com 10/16 TOLL FREE:1 TOLL FREE:1-877-761-2819 ►www.tmgindustrial.com...
- Page 12 14. Color Steel Plate u-shaped groove 15. Assemble the skirting line. NOTICE: For the corner fixed buckle, , the narrow side adjoins the wall! 6-10 www.tmgindustrial.com 11/16 TOLL FREE:1 TOLL FREE:1-877-761-2819 ►www.tmgindustrial.com...
- Page 13 16. Assemble the pinch plate. 6-11 2-10 www.tmgindustrial.com 12/16 TOLL FREE:1 TOLL FREE:1-877-761-2819 ►www.tmgindustrial.com...
- Page 14 17. Assemble the T tape inside the container container house. 18. Assemble the T tape outside the container container house. www.tmgindustrial.com 13/16 TOLL FREE:1 TOLL FREE:1-877-761-2819 ►www.tmgindustrial.com...
- Page 15 19. Fixed container house roof corner. corner. 20. Assemble the window. 1-1 / 1-2 www.tmgindustrial.com 14/16 TOLL FREE:1 TOLL FREE:1-877-761-2819 ►www.tmgindustrial.com...
- Page 16 21. Assemble the light. 1. Use 3 Ear Tapping Screws to fix the lamp holder with the roof. 1. Use 3 Ear Tapping Screws to fix the lamp holder with the roof. 2. Connect the roof wire with the lamp wire. Hold with insulating tape. 2.
-
Page 17: After The Installation
Apply the sealant on the yellow area to fix the marble countertop and breakwater. Apply the sealant on the yellow area to fix the marble countertop and breakwater. Sealant should wait for 24 Sealant should wait for 24 hours to dry and fixed 6-16 AFTER THE INSTALLATION Walk around and inspect the building periodically to make sure all components are still firmly...
Need help?
Do you have a question about the TMG-SCE20 and is the answer not in the manual?
Questions and answers