Table of Contents
Advertisement
Quick Links
Advertisement
Table of Contents

Related Manuals for KERN GAB-P Series


Summary of Contents for KERN GAB-P Series
- Page 1 Operating manual Table scales KERN GAB-P Version 1.3 GAB-P-BA-e-1613...
-
Page 2: Table Of Contents
KERN GAB-P Version 1.3 05/2016 Operating manual Table scale Contents TECHNICAL DATA ..................... 4 APPLIANCE OVERVIEW ................... 6 Overview of display ........................8 Keyboard overview ........................9 Dimensions ..........................11 BASIC INFORMATION (GENERAL) ..............11 Proper use ..........................11 Improper Use .......................... 11 Warranty .......................... - Page 3 Switching on/off ........................21 Zeroing ............................ 21 Taring ............................22 Overload warning ........................23 Weighing units switch-over ....................23 Percent weighing ........................24 Parts counting ........................25 Weighing with tolerance range ..................... 26 Manual totalizing ........................28 7.10 Automatic adding-up ......................30 7.11 Date and time setup .......................
-
Page 4: Technical Data
1 Technical data KERN GAB 6K-5P GAB 10K-4P GAB 30K-4P Weighing range (max) 6 kg 12 kg 30 kg Readability (d) 0.05 g 0.1 g 0.2 g Reproducibility 0.05 g 0.1 g 0.2 g Linearity ± 0.15 g ± 0.3 g ±... - Page 5 KERN GAB 6K-3PM GAB 10K-3PM GAB 30K-3PM Weighing range (max) 3 kg / 6 kg 6 kg / 15 kg 15 kg / 30 kg 1 g / 2 g 5 g / 10 g Readability (d) 2 g / 5 g...
-
Page 6: Appliance Overview
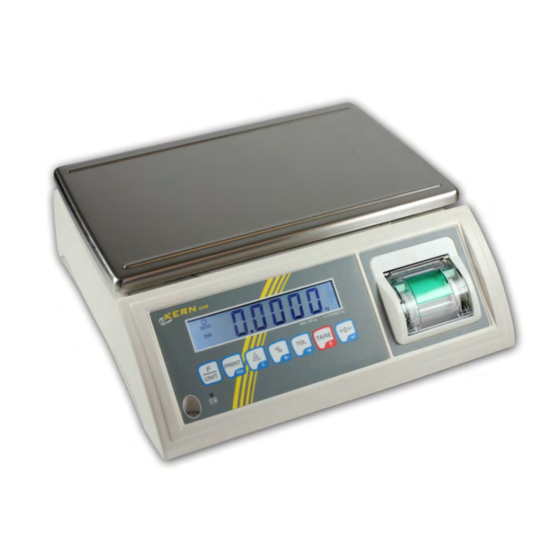
2 Appliance overview 1. Weighing pan 2. Printer 3. Buttons 4. Bubble level 5. RS 232 interface 6. Battery compartment GAB-P-BA-e-1613... - Page 7 7. Transport guard screw 8. Levelling screw 9. Connection of mains adapter 10. ON/OFF switch 11. Seal of verifiable models 12. Seal with an underneath verification switch (verifiable models) GAB-P-BA-e-1613...
-
Page 8: Overview Of Display
2.1 Overview of display Display Description Description The battery capacity appears when the capacity of the battery is display getting low Stability display Scales are in a steady state weighing units selectable Non-verifiable models: kg, t, lb, oz Verifiable models: g, kg GROSS Gross weight display Showing gross weight Net weight display... -
Page 9: Keyboard Overview
2.2 Keyboard overview 1. Bubble level Level balance with foot screws until the air bubble of the water balance is in the prescribed circle. 2. Storage battery status display Power supply connected Icon is glowing for power supply via power pack •... - Page 10 Selection Function In piece counting mode change between reference weight - item number - total weight UNIT In weighing mode: Weighing units switch-over • Data transfer via interface • Save value to memory if memory PRINT Call up menu: Press both function “automatic“, is disabled buttons at the same time •...
-
Page 11: Dimensions
The structure of the balance may not be modified. This may lead to incorrect weighing results, safety-related faults and destruction of the balance. The balance may only be used according to the described conditions. Other areas of use must be released by KERN in writing. GAB-P-BA-e-1613... -
Page 12: Warranty
The responsible user must define a suitable interval as well as type and scope of this test. In KERN's accredited DKD calibration laboratory test weights and balances may be calibrated (return to the national standard) fast and at moderate cost. -
Page 13: Basic Safety Precautions
4 Basic Safety Precautions 4.1 Pay attention to the instructions in the Operation Manual Carefully read this operation manual before setup and commissioning, even if you are already familiar with KERN balances. All language versions contain a non-binding translation. The German original document is binding. -
Page 14: Unpacking, Setup And Commissioning
6 Unpacking, Setup and Commissioning 6.1 Installation Site, Location of Use The balances are designed in a way that reliable weighing results are achieved in common conditions of use. You will work accurately and fast, if you select the right location for your balance. -
Page 15: Unpacking / Installation
6.2 Unpacking / installation Carefully remove the balance from the packaging, remove plastic cover and setup balance at the intended workstation. Make sure that all transport locking devices are removed To release the transport lock unscrew the transport screw 1 – non verifiable models or ... -
Page 16: Scope Of Delivery
6.4 Mains connection Power is supplied via the external mains adapter. The stated voltage value must be the same as the local voltage. Only use KERN original mains adapter. Using other makes requires consent by KERN. 6.5 Rechargeable battery operation The rechargeable battery is charged via the delivered power supply. -
Page 17: Adjustment
6.7 Adjustment As the acceleration value due to gravity is not the same at every location on earth, each balance must be coordinated - in compliance with the underlying physical weighing principle - to the existing acceleration due to gravity at its place of location (only if the balance has not already been adjusted to the location in the factory). -
Page 18: Non-Verifiable Models
6.8 Non-verifiable models: Switch on the balance and during the selftest press the and the button at the same time. „UnLoad“ is displayed shortly. Ensure that there are no objects on the weighing pan. „LoAd“ is displayed ... -
Page 19: Verification
Carefully place adjusting weight in the centre of the weighing plate. Wait for stability display , then press „PASS“ will be displayed shortly. After the adjustment the balance will carry out a self-test. Remove adjusting weight during selftest, the appliance will return into weighing mode automatically. -
Page 20: Position Of Seals And Adjusting Switch
6.10.1 Position of seals and adjusting switch 1. Seal of approval 2. Cover 3. Housing screw 4. Adjustment switch 6.11 Checking the balance verification settings For the adjustment, the balance must be switched over to service mode. In the service mode the parameters of the balance can be modified. The service parameters may not be modified, as this could damage the balance settings. -
Page 21: Operation
7 Operation 7.1 Switching on/off To turn on/off confirm forward at the underneath on the right of the scale and keep pressed for a little while. The balance will carry out a self-test. As soon as the weight display appears, the balance is ready for weighing. ... -
Page 22: Taring
7.3 Taring Deposit weighing receptacles (example) After successful standstill control press the button. The zero display and „NET“ will appear. The weight of the weighing container is now internally saved. Place material to be weighed and read weight value (example) ... -
Page 23: Overload Warning
7.4 Overload warning Overloading exceeding the stated maximum load (max) of the balance, minus a possibly existing tare load, must be strictly avoided. This could cause damage to the balance. Exceeding maximum load is indicated by the display of „----“ and an audio sound. Unload balance or reduce preload. -
Page 24: Percent Weighing
7.6 Percent weighing Percent weighing allows to display weight in percent, in relation to a reference weight. Switch on balance, wait for zero display Put a reference weight on the weighing plate, which corresponds to 100 %. (example) ... -
Page 25: Parts Counting
7.7 Parts counting Before the balance can count parts, it must know the average part weight (i.e. reference). Proceed by putting on a certain number of the parts to be counted. The balance determines the total weight and divides it by the number of parts (the so-called reference quantity). -
Page 26: Weighing With Tolerance Range
7.8 Weighing with tolerance range You can set an upper or lower limit when weighing with tolerance range and thus ensure that the material to be weighed remains exactly within the set limits. Exceeding or dropping below the tolerance range is indicated by an audio sound or optical signal. - Page 27 Settings: In weighing mode press , the left number flashes and the symbol „HI“ will be displayed. Enter upper limit by pressing (example) Acknowledge with The weighing scales will change to the display of the lower limit. ...
-
Page 28: Manual Totalizing
7.9 Manual totalizing This function is used to add the individual weighing values to the summation memory and to provide a printout via the installed printer, when the stability display appears and the button is pressed. (in order to set this function see chap. 8.2 „ACC on“) ... - Page 29 Display of the saved weighing data: With the weighing platform unloaded, press and the number of weighing processes, followed by the total weight will be displayed for 2 sec and afterwards printed. Delete weighing data: With the weighing platform unloaded, press The data in the summation memory are deleted.
-
Page 30: Automatic Adding-Up
7.10 Automatic adding-up This function is used to add the individual weighing values automatically into the summation memory and to provide a printout via the installed printer. To set this function, see chap. 8.2 „AU on“ Place material to be weighed A After stabilisation display has taken place, you will hear an audio sound. - Page 31 Display of the saved weighing data: With the weighing platform unloaded, press and the number of weighing processes, followed by the total weight will be displayed for 2 sec and afterwards printed. Delete weighing data: With the weighing platform unloaded, press The data in the summation memory are deleted.
-
Page 32: Date And Time Setup
7.11 Date and time setup The scale allows you to set up the date and time of the printout. For that purpose proceed in the following manner: 7.11.1 Non-verifiable models: Press buttons during the self-test, the display will show the recently entered year, e.g. “2015“. The last digit is flashing. - Page 33 Printout formats: In the weighing mode, press buttons, then keep pressing the button in the menu until the “LAb x“ menu item appears. (Example) With the button, select the required printout format and confirm it by pressing the button.
-
Page 34: Verifiable Models
7.11.2 Verifiable models: In the weighing mode, press buttons, the display will show “YY xx“. The recently set year will display, the fist digit is flashing. With buttons, enter the current year in the following manner: change the digit by pressing the button, ... - Page 35 Printout formats: During the self-test, press the button – “LAb xx“ or the recently selected format will display. With buttons enter the required printout format: (Example) change the digit by pressing the button, increase the digit by pressing the button, ...
- Page 36 Lab 03: No.2 2. Weighing 2015/09/25 18:55 Date / time 2.000kg Net weight 3.000kg Total Lab 04: Upside down: S:2015/09/25 19:07 Date / time Net weight *********************************************************************** 3.000kg GAB-P-BA-e-1613...
-
Page 37: The Menu
8 The menu 8.1 Navigation in the menu: Call up menu Press at the same time in weighing mode Menu block Using the individual menu items of the main menu Select main menu can be selected subsequently Switch over into the available menu items of the submenu Menu item Select submenu using... -
Page 38: Menu Overview
8.2 Menu overview 8.2.1 Non-verifiable models: Menu block Menu item Available settings / explanation Main menu Submenu r dUAL not documented r duAL, 12000, 15000, 3000d, 6000d, 15000d, 30000d, 60000d EL AU* EL Au Background light automatic off Background EL on Background lighting on illumination EL off... -
Page 39: Verifiable Models
bP0* bP 0 No audio sound during tolerance weighing Acoustic bP 1 Audio sound when weight is within tolerance range signal Audio sound when weight is beyond tolerance range bP 2 SPd 15* SPd 15 Display speed SPd 30 not documented SPd 7.5 oF 0* Auto off after 0, 3, 5, 15, or 30 minutes... - Page 40 beeP 0* beeP 0 No audio sound during tolerance weighing Acoustic signal beeP 11 Audio sound when weight is within tolerance range Audio sound when weight is beyond tolerance range beeP 2 SPd 15* SPd 15 Display speed SPd 30 not documented SPd 7.5 oF 0*...
-
Page 41: Printer
9 Printer 9.1 Change paper roll To open, lift green cover and pull upwards. Insert new paper roll as shown on diagram. Pull a short length of the end of the paper roll towards the front and close cover. Press evenly from both sides on the cover (See arrows). -
Page 42: Data Output Rs 232C
10 Data output RS 232C The balance is typically equipped with a RS 232C interface. 10.1 Technical data ASCII code 8 data bits no parity bit Baud rate 9600 baud 10.2 Pin allocation of the balance output socket (front view) Pin 2: Output Pin 3:... -
Page 43: Maintenance, Servicing, Removal, Error Messages
Spilled weighing goods must be removed immediately. 11.2 Servicing, maintenance The appliance may only be opened by trained service technicians who are authorized by KERN. Before opening, disconnect from power supply. 11.3 Disposal Disposal of packaging and appliance must be carried out by operator according to valid national or regional law of the location where the appliance is used.
Need help?
Do you have a question about the GAB-P Series and is the answer not in the manual?
Questions and answers