Hollyland Solidcom C1 Pro Hub User Manual
Hide thumbs
Also See for Solidcom C1 Pro Hub:
- User manual (144 pages) ,
- Manual (24 pages) ,
- Quick manual (22 pages)
Table of Contents
Advertisement
Quick Links
Advertisement
Table of Contents

Related Manuals for Hollyland Solidcom C1 Pro Hub


Summary of Contents for Hollyland Solidcom C1 Pro Hub
- Page 1 Hollyland Solidcom C1 Pro Hub User Manual V1.0.0...
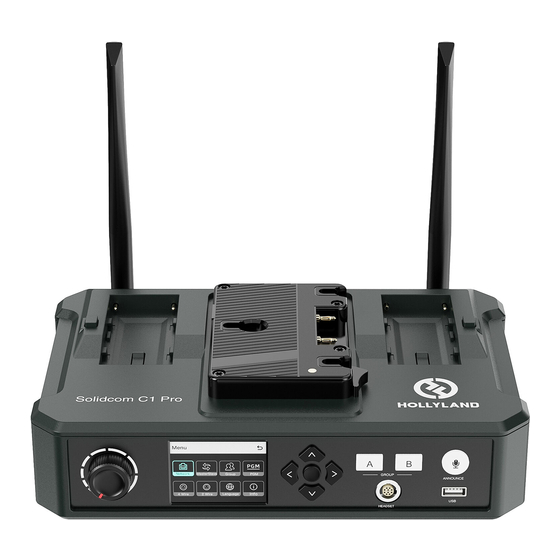
- Page 2 Interfaces A Button OFF: The wired headset user is not in group A. In this case, the user cannot be heard NP-F Battery Slot by or hear the other headset users in group A. ON in orange: The wired headset user is in group A. In this case, the user can be heard by and hear the other headset users in group A.
- Page 3 0B10 Wired Headset Interface 2-Wire Audio Input & Output Interface PIN9: MIC2+ PIN2: POWER PIN1: GND PIN8: MIC1 N- PIN1: SPK+ PIN7: MIC1 P+ PIN2: SPK- PIN6: MUTE PIN3: ENC PIN5: RGB-A PIN4: RGB-B PIN3: AUDIO PGM Audio Input Interface PIN10: GND PIN2: AUDIO IN- PIN1: GND...
- Page 4 Operation Guide Hub Display Description Master ① Hub Mode (Master/Slave) ② Hub Battery Level ③ Wired Headset Signal Strength ④ Wired Headset Battery Level (Red: Low Battery) ⑤ Wired Headset Number ⑥ Wired Headset Status TALK: The headset user can hear and talk with the other headset users. MUTE: The headset user is muted and can only hear the other headset users.
-
Page 5: Wifi Setting
Operation Guide Hub Menu Description Press and hold the Menu/Confirmation button for about 3 seconds to enter the menu interface. Menu Network Master/Slave Group 4 Wire 2 Wire Language 1. Select Network to enter the network configuration interface. 1.1 Select Wifi Setting and turn Wi-Fi on or off. After it is turned on, the IP address, SSID, and password are displayed. -
Page 6: Wired Network Setting
Operation Guide 1.2 Select Wired Network Setting to switch between automatic IP and fixed IP modes. If fixed IP mode is used, you can modify the IP address, subnet mask, and gateway as well as view the user name and password for log- ging in to the web. - Page 7 Operation Guide 2.2 Select Slave Device and then select Scan to scan the IP addresses of master devices on the network. Select the IP address of the corresponding master device in the displayed list and confirm it. Then, the hub is success- fully set as the slave device.
-
Page 8: Gain Setting
Operation Guide 3.2 Select Group Review to view group settings. Headset 1 Headset 2 Headset 3 Headset 4 Headset 5 Headset 6 Headset 7 Headset 8 4. Select PGM to set the PGM audio gain according to the input volume. Gain Setting –18dB -12dB... -
Page 9: Output Gain
Operation Guide 5.2 Select Output Gain to set the output gain according to the input volume. Output Gain -18dB -12dB -6dB 5.3 Select Line Sequence Switching to switch between Standard and Cross modes. Line Sequence Switching Standard OUT+ OUT- IN- Cross OUT+ IN+ IN- OUT-... - Page 10 Operation Guide Select 2 Wire to perform 2-wire audio settings. 6.1 Connect the hub to a 2-wire device and set the corresponding cable compensation and terminal resistance on the hub. Power on the 2-wire device and turn off or disconnect its microphone to make sure that there is no other audio transmission on the 2-wire link.
- Page 11 Operation Guide 6.4 Select Input Gain to set the input gain according to the input volume. Input Gain -18dB -12dB -6dB 6.5 Select Output Gain to set the output gain according to the input volume. Output Gain -18dB -12dB -6dB...
- Page 12 Operation Guide 7. Select to perform language Language Language Chinese English 8. Select Info to check related information about the hub. Reset Are you sure to reset? 8.1 Select Reset to restore the configured hub information to the default settings. Info Master-Slave Slave Device...
- Page 13 Operation Guide Performing Group Settings via a Computer • Select Network > Wired Network • Use a network cable to con- Setting to view the default IP ad- nect the hub to a computer dress, user name, and password via the RJ45 interface and set of the hub.
- Page 14 Operation Guide Group A & B Buttons on Headsets After group settings are performed on the hub, the A or B button on a con- nected headset will light ON. The button light status indicates which group the headset has joined. To join or exit group A or B, simply press the A or B button on the headset.
- Page 15 Operation Guide Cascaded Connection Multiple hubs can be cascaded to expand the number of headsets. The hub supports two cascade methods — 4-wire analog signal cascade and IP digital signal cascade. Generally, it is recommended to cascade two hubs using 4-wire analog signals,and cascade three or more than three hubs using IP digital signals.
- Page 16 Operation Guide 4-Wire Settings After connecting two hubs using a network cable, select 4 Wire > Line Sequence Switching on the hubs, and then select Standard on one hub and Cross on the other. Hub Display Select 4 Wire > Line Sequence Select Standard.
- Page 17 Operation Guide Master/Slave Mode Settings After connecting two hubs using a network cable, select Master/Slave on the hub to set the hub mode. On one hub, select Master Device . On the other hub, select Slave Device > Scan and then select the IP address of the corre- sponding master hub .
- Page 18 Operation Guide Three-System Cascaded Connection via the IP Network It is recommended to use the IP network connection to cascade three hubs. On one hub, select Master Device, and on the other two hubs, select Slave Device. Network cable Network cable...
- Page 19 Parameters Antenna External DC power, NP-F battery, V-mount battery, G-mount Power Supply battery Volume Adjustment Adjustment knob Power Consumption <4.5W (LxWxH): 259.9mmx180.5mmx65.5mm Dimensions (10.2”x7.1”x2.6”) Net Weight About 1300g (45.9oz) with the antennas excluded Transmission Range 1,100ft (350m) LOS Frequency Band 1.9 GHz (DECT) Bandwidth 1.728MHz...
-
Page 20: Safety Precautions
Safety Precautions Do not place the product near or inside heating devices (including but not limited to microwave ovens, induction cookers, electric ovens, electric heaters, pressure cookers, water heaters, and gas stoves) to prevent the battery from overheating and exploding. Do not use non-original charging cases, cables, and batteries with the product. - Page 21 Hollyland Support Team via the following ways: Statement All copyrights belong to Shenzhen Hollyland Technology Co., Ltd. Without the written approval of Shenzhen Hollyland Technology Co., Ltd., no organization or individual may copy or reproduce part or all of any written or illustrative content and disseminate it in any form.
-
Page 22: Fcc Requirement
FCC Requirement Any changes or modifications not expressly approved by the party responsible for compliance could void the user's authority to operate the device. This device complies with Part 15 of the FCC Rules. Operations are subject to the following two conditions: (1) This device may not cause harmful interference.
Need help?
Do you have a question about the Solidcom C1 Pro Hub and is the answer not in the manual?
Questions and answers