Table of Contents
Advertisement
Quick Links
Advertisement
Table of Contents

Related Manuals for Siemens HE519GB 6 Series


Summary of Contents for Siemens HE519GB 6 Series
- Page 1 Built-in cooker HE519GB.6 en Instruction manual...
-
Page 3: Table Of Contents
Table of contents e n I n s t r u c t i o n m a n u a l Intended use ......4 Home Connect . -
Page 4: Intended Use
Additional information on products, accessories, information replacement parts and services can be found at www.siemens-home.bsh-group.com and in the online shop www.siemens-home.bsh-group.com/eshops G eneral information I m p o r t a n t s a f e t y i n f o r m a t i o n Warning –... -
Page 5: Halogen Lamp
Important safety information Water in a hot cooking compartment may replacing the bulb, unplug the appliance from Risk of scalding! ■ create hot steam. Never pour water into the the mains or switch off the circuit breaker in hot cooking compartment. the fuse box. -
Page 6: Causes Of Damage
Causes of damage ]Causes of damage G eneral information C a u s e s o f d a m a g e Caution! Accessories, foil, greaseproof paper or ovenware on ■ the cooking compartment floor: do not place accessories on the cooking compartment floor. Do not cover the cooking compartment floor with any sort of foil or greaseproof paper. -
Page 7: Environmental Protection
Environmental protection Open the appliance door as infrequently as possible 7Environmental protection ■ when the appliance is in use. Y our new appliance is particularly energy-efficient. E n v i r o n m e n t a l p r o t e c t i o n Here you can find tips on how to save even more energy when using the appliance, and how to dispose of your appliance properly. -
Page 8: Getting To Know Your Appliance
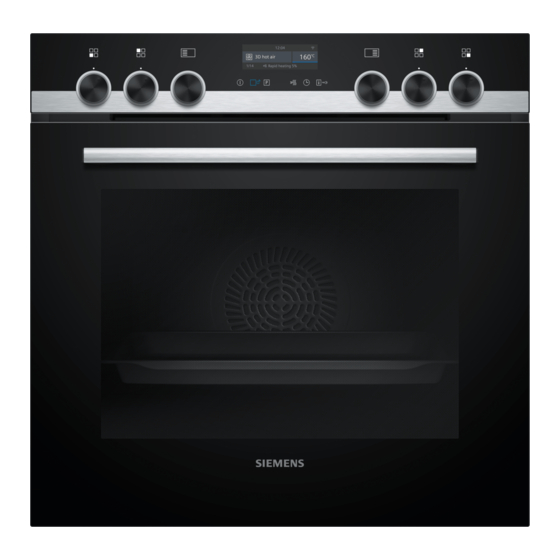
Getting to know your appliance Depending on the appliance model, individual Note: *Getting to know your details and colours may differ. appliance Control panel I n this chapter, we will explain the indicators and You can set your appliance's various functions on the G e t t i n g t o k n o w y o u r a p p l i a n c e controls. -
Page 9: Types Of Heating And Functions
Getting to know your appliance Types of heating and functions Use the function selector to set the types of heating and To make sure you always use the right type of heating other functions. to cook your food, we have explained the differences and applications below. -
Page 10: Temperature
Getting to know your appliance Other functions Your new oven has yet more functions; see below for a brief description of these. Function Rapid heating Preheats the cooking compartment rapidly without accessories. Interior lighting Switches on the interior lighting; all other functions remain off. Makes it easier to clean the cooking compartment, for example. -
Page 11: Accessories
Accessories Notes _Accessories Make sure that you always insert the accessories ■ into the cooking compartment the right way round. Always insert accessories fully into the cooking Y our appliance is accompanied by a range of ■ A c c e s s o r i e s compartment so that they do not touch the appliance accessories. -
Page 12: Optional Accessories
Accessories Combining accessories Professional pan You can insert the wire rack and the universal pan at For preparing large quantities of food. Also ideal for moussaka, for the same time to catch drops of liquid. example. When inserting the wire rack, ensure that both spacers Professional pan with wire insert ‚... -
Page 13: Before Using For The First Time
Before using for the first time Cleaning the cooking compartment and KBefore using for the first accessories time Before using the appliance to prepare food for the first time, you must clean the cooking compartment and accessories. B efore you can use your new appliance, you must B e f o r e u s i n g f o r t h e f i r s t t i m e make some settings. -
Page 14: Operating The Appliance
Operating the appliance Changing 1Operating the appliance The heating function and temperature can be changed at any time using the relevant selector. Y ou have already learnt about the controls and how If you change the heating function, the temperature will O p e r a t i n g t h e a p p l i a n c e they work. -
Page 15: Time-Setting Options
Time-setting options Use the temperature selector to set the cooking OTime-setting options time. Y our appliance has different time-setting options. T i m e - s e t t i n g o p t i o n s Time-setting option Use Cooking time Once the set cooking time has elapsed, the appliance automatically stops heating. -
Page 16: Setting The End Time
Time-setting options Setting the end time The cooking time has elapsed An audible signal sounds. The appliance stops heating. You can delay the time at which cooking is due to The time on the display is zero. finish. You can, for example, put your food in the cooking compartment in the morning and set the Once the signal stops, you can use the temperature cooking time so that it is ready at lunchtime. -
Page 17: Childproof Lock
Childproof lock AChildproof lock QBasic settings Y our appliance is equipped with a childproof lock so T here are various settings available to you in order to C h i l d p r o o f l o c k B a s i c s e t t i n g s that children cannot switch it on accidentally or change help use your appliance effectively and simply. -
Page 18: Sabbath Mode
Sabbath mode FSabbath mode Night-time dimming Switched off* Switched on (display dimmed between 10 p.m. and 5.59 a.m.) S abbath mode lets you set a cooking time of over 70 S a b b a t h m o d e hours. -
Page 19: Home Connect
Home Connect Manual registration in the home network oHome Connect You can apply the Home Connect settings when Note: you first start up the appliance or by going to the basic T his appliance is Wi-Fi-capable and can be remotely settings. -
Page 20: Home Connect Settings
Home Connect If the oven door is opened 15 minutes after the oven The login process is complete once "Connected to the ■ has stopped heating. app" is shown on the display. Twenty-four hours after remote start has been ■ activated. -
Page 21: Declaration Of Conformity
We will explain here how you should A detailed RED Declaration of Conformity can be found correctly care for and clean your appliance. online at www.siemens-home.bsh-group.com on the product page of your appliance with the additional Suitable cleaning agents documents. -
Page 22: Keeping The Appliance Clean
Cleaning Notes Door panels Hot soapy water: Slight differences in colour on the front of the ■ Clean with a dish cloth and then dry with a soft appliance are caused by the use of different cloth. materials, such as glass, plastic and metal. Do not use a glass scraper or a stainless steel Shadows on the door panels, which look like ■... -
Page 23: Rails
Rails Attaching the rails pRails The rails only fit on the right or the left side. For both rails, ensure that the curved rods are at the front. W ith good care and cleaning, your appliance will retain R a i l s First, insert the rail in the middle of the rear socket ‚, its appearance and remain fully functional for a long until the rail rests against the cooking compartment... -
Page 24: Appliance Door
Appliance door If necessary, you can remove the condensate trough qAppliance door for cleaning. To do this, open the appliance door fully (fig. Tilt the condensate trough up and remove it (fig. W ith good care and cleaning, your appliance will retain &... -
Page 25: Trouble Shooting
Trouble shooting Push the inner panel in at the top (fig. 3Trouble shooting I f a fault occurs, there is often a simple explanation. T r o u b l e s h o o t i n g Before calling the after-sales service, please refer to the fault table and attempt to correct the fault yourself. -
Page 26: Maximum Operating Time
Trouble shooting Maximum operating time Screw the glass cover back on. Depending on the appliance model, the glass cover If you do not change the settings on your appliance for may have a sealing ring. If the glass cover has a several hours, the appliance will automatically stop sealing ring, put it back in place before screwing the heating. -
Page 27: Customer Service
Customer service 4Customer service PProgrammes O ur after-sales service is there for you if your appliance Y ou can prepare food very easily using the various C u s t o m e r s e r v i c e P r o g r a m m e s needs to be repaired. -
Page 28: Programmes
Programmes Programmes The weight range is deliberately limited.For very Note: large items of food, there is often no suitable cookware When the roast is ready, it can be left to rest for an available, meaning that the cooking result would not be additional 10 minutes in the cooking compartment with what was expected. - Page 29 Programmes Program Food Cookware Add liquid Shelf posi- Set weight Notes tion Whole fish Ready-to-cook Roasting dish with Cover the bottom of Weight of the The fish does not need fish, seasoned lid, suitable for tem- the roasting dish food to be seared before- peratures of up to with liquid...
- Page 30 Programmes Program Food Cookware Add liquid Shelf posi- Set weight Notes tion b Boned leg of lamb, well Boned leg of Roasting dish with Cover the bottom of Meat weight The meat does not done lamb, seasoned lid, suitable for tem- the roasting dish need to be seared peratures of up to...
-
Page 31: Setting A Programme
Tested for you in our cooking studio Program Food Cookware Add liquid Shelf posi- Set weight Notes tion b Pork tenderloin steak Seasoned Roasting dish with Cover the bottom of Meat weight The meat does not glass lid, suitable the roasting dish need to be seared for temperatures of with liquid, and add... -
Page 32: Cakes And Pastries
Tested for you in our cooking studio Baking on two or more levels Greaseproof paper Only use greaseproof paper that is suitable for the Use hot air. Items that are placed in the oven on baking selected temperature. Always cut greaseproof paper to trays or in baking tins/dishes at the same time will not size. - Page 33 Tested for you in our cooking studio Cakes on trays Dish Accessories/cookware Shelf posi- Heating Tempera- Cooking tion function ture in °C time in mins Sponge cake with topping Baking tray 160-180 20-45 Sponge cake, 2 levels Universal pan + baking tray 140-160 30-55 Shortcrust tart with dry topping...
- Page 34 Tested for you in our cooking studio Dish Accessories/cookware Shelf posi- Heating Tempera- Cooking tion function ture in °C time in mins Macaroons, 2 levels Universal pan + baking tray 90-110 20-35 Macaroons, 3 levels Baking trays + universal pan 5+3+1 90-110 30-40...
-
Page 35: Bakes And Gratins
Tested for you in our cooking studio Small baked items stick to one There should be a gap of approx. 2 cm around each item. This gives enough space for the baked items to another during baking. expand well and brown on all sides. The baked item is too dry. - Page 36 Tested for you in our cooking studio meat thermometer in the corresponding chapter. There, Roasting in cookware you can find notes on inserting the meat thermometer, the possible heating types and additional information. Warning – Risk of injury caused by shattering glass! Recommended setting values Place hot glass cookware on a dry mat after cooking.
- Page 37 Tested for you in our cooking studio liquid. A covering approx. 1-2 cm deep should be Placing half a potato or a small oven-proof container in applied to the base of the cookware. the stomach cavity of the fish will provide stability. You can tell when the fish is cooked because the dorsal Fish fin can be removed easily.
-
Page 38: Vegetables And Side Dishes
Tested for you in our cooking studio Fish Dish Accessories/cookware Shelf posi- Heating Tempera- Cooking tion function ture in °C time in mins Fish, grilled, whole, 300 g, e.g. trout Wire rack 160-180 20-30 Fish, grilled, whole, 1.5 kg, e.g. salmon Wire rack 170-190 30-40**... -
Page 39: Acrylamide In Foodstuffs
Tested for you in our cooking studio Dish Accessories/cookware Shelf posi- Heating Tempera- Cooking tion function ture in °C time in mins Yoghurt Individual moulds 40-45 8-9h Soufflé in individual moulds Individual moulds 160-180 35-45 Acrylamide in foodstuffs crisps, chips, sliced bread, bread rolls, bread or fine baked goods (biscuits, gingerbread, spiced biscuit). -
Page 40: Drying
Tested for you in our cooking studio Dish Accessories/cookware Shelf posi- Heating Searing time Tempera- Cooking tion function in mins ture in °C time in mins Fillet of beef, 4-6 cm thick, 1 kg Cookware, uncovered 90-150 Sirloin, 5-6 cm thick, 1.5 kg Cookware, uncovered 120-180 Beef medallions/rump steak, 4 cm thick... -
Page 41: Prove Dough
Tested for you in our cooking studio jars are bubbling. Remove the jars from the cooking Preparing fruit and vegetables Only use fruit and vegetables that are in good condition. compartment after the indicated residual heating time. Wash them thoroughly. Vegetables: After a short while, small bubbles will form Peel, core and chop fruit and vegetables appropriate to at short intervals. -
Page 42: Defrosting
Tested for you in our cooking studio Dish Accessories/cookware Shelf posi- Heating Step Tempera- Cooking tion function ture in °C time in mins Yeast dough, light Bowl 35-40 25-30 Universal pan or loaf tin 35-40 10-20 Yeast dough, heavy and rich Bowl 35-40 60-75... -
Page 43: Test Dishes
Tested for you in our cooking studio Test dishes These tables have been produced for test institutes to facilitate appliance testing. As per EN 60350-1. Baking Items that are placed in the oven on baking trays or in baking tins/dishes at the same time will not necessarily be ready at the same time. - Page 44 *9001343594* 9001343594 970925...
Need help?
Do you have a question about the HE519GB 6 Series and is the answer not in the manual?
Questions and answers