Table of Contents
Advertisement
Available languages
Available languages
Advertisement
Chapters
Table of Contents

Related Manuals for Inter-m R300 PLUS


Summary of Contents for Inter-m R300 PLUS
- Page 1 Operation Manual Reference Amplifier R150 PLUS/300 PLUS/500 PLUS * Rack mount products in the Western Hemisphere(North America, South America, and the Caribbean) do not have handles installed due to customer preference.
-
Page 2: Table Of Contents
REFERENCE AMPLIFIER Contents Contents Welcome Warning ............................1 Unpacking............................2 Short Form Instructions........................2 Installation Environment............................3 Important Safety Instructions......................3 Description ............................4 Features ............................4 Accessories.............................4 Front Panel ............................5 Rear Panel ............................6 Mounting in a Rack ........................7 Applications Stereo Installation..........................8 Bridge Mono Installation ........................9 Linked Installation..........................10 Connections ...........................11 Block Diagram... -
Page 3: Warning
A personal welcome to you from the management and employees of Inter-M All of the co-workers here at Inter-M are dedicated to providing excellent products with inherently good value, and we are delighted you have purchased one of our products. -
Page 4: Unpacking
REFERENCE AMPLIFIER Unpacking Please take a few minutes to read this manual to familiarize yourself with important information regarding installation, product features, and operation. As with most electronic devices, ORIGINAL PACKAGING (OR EQUAL) IS REQUIRED in the unlikely event that the product needs to be returned for servicing. -
Page 5: Installation
REFERENCE AMPLIFIER Installation Installation Environment Never place this product in an environment which could alter its performance or reduce its service life. Such environments usually include high levels of heat, dust, moisture, and vibration. IMPORTANT SAFETY INSTRUCTIONS 1. Read these instructions. 2. -
Page 6: Description
Description - R150 PLUS A 2U rack space, 2 channel amplifier capable of 150W into 8Ω load (bridged mono). - R300 PLUS A 2U rack space, 2 channel amplifier capable of 300W into 8Ω load (bridged mono). - R500 PLUS A 2U rack space, 2 channel amplifier capable of 500W into 8Ω... -
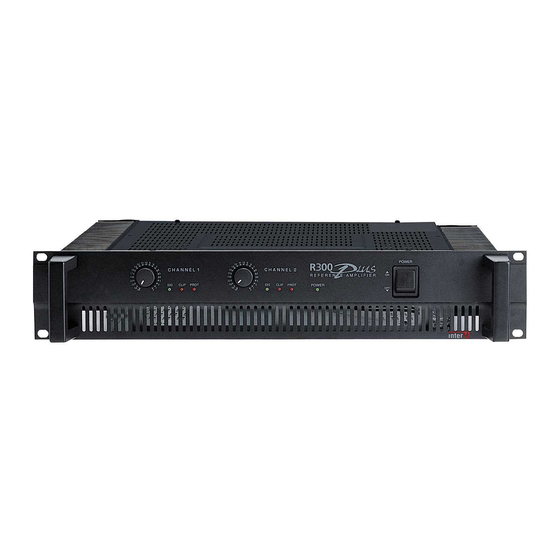
Page 7: Front Panel
REFERENCE AMPLIFIER Front Panel Front Panel POWER POWER R E F E R E N C E A M P L I F I E R CLIP PROT CLIP PROT POWER 1. LEVEL CONTROL This determines the level of the input signal for each channel. In stereo mode the knobs will determine the signal level independently for each channel. -
Page 8: Rear Panel
REFERENCE AMPLIFIER Rear Panel Rear Panel 1. BALANCED INPUT CONNECTORS Each input channel is equipped with a 1/4" TRS and an XLR connector. Standard rules of interconnect apply. 2. MODE SELECTOR SWITCH Move this switch to select either the STEREO or BRIDGED MONO position as needed for the application. The Stereo mode is most common. -
Page 9: Mounting In A Rack
REFERENCE AMPLIFIER Mounting in a Rack Mounting in a Rack If multiple high-power amplifiers are mounted in a rack with poor ventilation, the heat from the amplifiers will cause the interior of the rack (and the amplifiers) to become very hot, which may cause problems with amplifier performance. -
Page 10: Stereo Installation
REFERENCE AMPLIFIER Applications-1 Applications-1 STEREO INSTALLATION R150 PLUS/300 PLUS/500 PLUS... -
Page 11: Bridge Mono Installation
REFERENCE AMPLIFIER Applications-2 Applications-2 BRIDGED MONO INSTALLATION R150 PLUS/300 PLUS/500 PLUS... -
Page 12: Linked Installation
REFERENCE AMPLIFIER Applications-3 Applications-3 LINKED INSTALLATION Linking works with stereo or bridged mono operation R150 PLUS/300 PLUS/500 PLUS... -
Page 13: Connections
REFERENCE AMPLIFIER Connections Connections Inter-M products are wired to reflect accepted wiring practices used throughout the world. Balanced XLR connectors are wired as described: Pin #1 Shield Pin #2 Positive Pine #3 Negative Balanced 1/4" TRS connectors are wired as described:... - Page 14 REFERENCE AMPLIFIER Stereo operation uses one positive and one negative terminal from the same channel. STEREO CONNECTION OUTPUT CHANNEL 2 CHANNEL 1 BRIDGED MONO (8 ~16 ) Negative Negative Positive Positive AMP OUTPUT CH1/CH2 Locking Speaker Connector Pin set #1 Negative Wiring Diagram Positive...
-
Page 15: Block Diagram
REFERENCE AMPLIFIER Block Diagram Block Diagram R150 PLUS/300 PLUS/500 PLUS... -
Page 16: Specifications
REFERENCE AMPLIFIER Specifications ......Specifications 0dB=0.775 Vrms, Half Power=1/2 Power Output Level (Rated Power) R150 PLUS R300 PLUS R500 PLUS Power Output Level STEREO 8Ω(T.H.D 0.5%) 100W 170W 4Ω(T.H.D 0.5%) 150W 250W BRIDGED MONO 8Ω(T.H.D 0.05%) 150W 300W 460W 8Ω(T.H.D 0.5%) -
Page 17: Service
To obtain specific warranty information and available service locations contact Inter-M directly or the authorized Inter-M Distributor for your specific country or region. - Page 18 Manual d'Utilisation Amplificateur Professionnel R150 PLUS/300 PLUS/500 PLUS...
- Page 19 AMPLIFICATEUR PROFESSIONNEL Sommaire Sommaire Felicitations Précautions ...........................19 Emballage ............................20 Les Premières Instructions .......................20 Installation Mise en place ..........................21 Sécurité ............................21 Description .............................22 Caractéristiques ..........................22 Accessoires...........................22 Face Avant .............................23 Face Arriere ...........................24 Montage en Rack .........................25 Applications Configuration Mode Stéréo ......................26 Configuration Mode Mono/Bridge ....................27 Configuration Mode «chaînage»...
-
Page 20: Précautions
Nous sommes sincèrement persuadés que ce produit vous apportera entière satisfaction car il est le résultat d’années d’expérience et de savoir-faire au service du domaine de l’Audio professionnel. Alors, bienvenue dans le monde d’INTER-M et encore tous nos remerciements pour votre contribution à élargir à travers le monde, la grande famille d’INTER-M. -
Page 21: Les Premières Instructions
AMPLIFICATEUR PROFESSIONNEL Emballage Nous vous conseillons de prendre un peu de votre temps pour étudier ce manuel afin que vous puissiez vous familiariser avec l’ensemble des données techniques au sujet de son installation, de ses caractéristiques et de son mode d’utilisation. Veillez à... -
Page 22: Installation
AMPLIFICATEUR PROFESSIONNEL Installation Installation Mise en place Ne jamais placer votre amplificateur dans un endroit qui pourrait altérer son bon fonctionnement et ses performances comme : des lieux où la chaleur est excessive (chaleur d’un radiateur, exposition directe au soleil), humide, poussiéreux, ou encore subissant des vibrations importantes. -
Page 23: Description
- R150 PLUS 2 Unités au format RACK 19”. Amplificateur 2 canaux, développant 150 WATTS sous 8 OHMS (MONO BRIDGE). - R300 PLUS 2 Unités au format RACK 19”. Amplificateur 2 canaux, développant 300 WATTS sous 8 OHMS (MONO BRIDGE). -
Page 24: Face Avant
AMPLIFICATEUR PROFESSIONNEL Face Avant Face Avant POWER POWER R E F E R E N C E A M P L I F I E R CLIP PROT CLIP PROT POWER 1. CONTRÔLES DES NIVEAUX DES CANAUX 1 ET 2 Contrôles de niveau du signal d’entrée pour chaque canal. -
Page 25: Face Arriere
AMPLIFICATEUR PROFESSIONNEL Face Arriere Face Arriere 1. CONNECTEURS D’ENTREE SYMETRIQUE Chaque canal d’entrée est équipé d’une entrée spéciale qui est compatible soit avec un JACK 6.35mm ou un connecteur XLR. Les règles de branchement en vigueur s’appliquent bien évidemment à cette «double connexion». 2. -
Page 26: Montage En Rack
AMPLIFICATEUR PROFESSIONNEL Montage en Rack Montage en Rack Si plusieurs amplificateurs doivent-être montés en rack PEU ou PAS DU TOUT ventilé, les radiateurs latéraux de l’amplificateur ainsi que l’intérieur de l’amplificateur deviendront très chaud et pourront causer certains problèmes au niveau des performances et de la fiabilité. -
Page 27: Configuration Mode Stéréo
AMPLIFICATEUR PROFESSIONNEL Applications-1 Applications-1 CONFIGURATION MODE STÉRÉO R150 PLUS/300 PLUS/500 PLUS... -
Page 28: Configuration Mode Mono/Bridge
AMPLIFICATEUR PROFESSIONNEL Applications-2 Applications-2 CONFIGURATION MODE MONO/BRIDGE R150 PLUS/300 PLUS/500 PLUS... -
Page 29: Configuration Mode "Chaînage
AMPLIFICATEUR PROFESSIONNEL Applications-3 Applications-3 CONFIGURATION MODE «CHAÎNAGE» Ce cas de figure peut être utilisé soit en mode stéréo ou mono. R150 PLUS/300 PLUS/500 PLUS... -
Page 30: Connectique
AMPLIFICATEUR PROFESSIONNEL Connectique Connectique Les produits INTER-M sont câblés aux normes agréées par les professionnels et suivant les pratiques généralement utilisées dans le monde entier. CONNECTEURS SYMETRIQUES TYPE XLR : Les connecteurs XLR sont configurés comme suit : - Broche 1 = Ground = Masse... - Page 31 AMPLIFICATEUR PROFESSIONNEL Mode stéréo utilisant une borne (+) et une borne (-) du même canal. CONNEXION STÉRÉO Mode mono utilisant les 2 bornes (+) des 2 canaux. Les bornes négatives (-) ne sont pas utilisées. ATTENTION : En mode mono l’impédance est limité à 8 Ohms. CONNEXION MONO BRIDGE OUTPUT CHANNEL 2...
-
Page 32: Synoptique
AMPLIFICATEUR PROFESSIONNEL Synoptique Synoptique R150 PLUS/300 PLUS/500 PLUS... -
Page 33: Specifications Techniques
AMPLIFICATEUR PROFESSIONNEL Specifications Techniques ... Specifications Techniques 0dB=0.775 Vrms, Mi Puissance=1/2 de la puissance (mesurée) R150 PLUS R300 PLUS R500 PLUS Puissance RMS STEREO 8Ω(T.H.D 0.05%) 100W 170W 4Ω(T.H.D 0.05%) 150W 250W MONO-BRIDGE 8Ω(T.H.D 0.05%) 150W 300W 460W 8Ω(T.H.D 0.5%) -
Page 34: Maintenance
AMPLIFICATEUR PROFESSIONNEL Maintenance Maintenance Procédures Reprenez étape par étape afin de vous assurer que le problème ne soit pas lié à l’opérateur (câblage, autre appareil pouvant causer un dysfonctionnement du système). Ces informations fournies doivent vous aider à localiser un problème mais en aucun cas vous permettre de dépanner votre appareil. - Page 35 Inter-M, Ltd. (Korea) began operations in 1983. Since then, Inter-M has grown to become one of the largest manufacturers of professional audio and commercial sound electronics equipment in the world. Inter-M has gained worldwide recognition for its own branded products, as well as private label manufacturing of electronics sold under other names (OEM).
Need help?
Do you have a question about the R300 PLUS and is the answer not in the manual?
Questions and answers