Table of Contents
Advertisement
Advertisement
Table of Contents

Related Manuals for Instant POT PRO PLUS


Summary of Contents for Instant POT PRO PLUS
- Page 1 INSTANT POT PRO PLUS ® USER MANUAL...
- Page 2 Pro Plus multi-cooker can help you cook healthy, ® delicious meals more easily and in less time. We hope you fall in love with Instant Pot cooking and enjoy it in your kitchen for years to come! Get started with your new Instant Pot Pro Plus!
-
Page 3: Table Of Contents
CONTENTS Important safeguards What’s in the box Using your Instant Pot Pro Plus Initial set up Using the lid About pressure cooking Pressure Cook Rice Steam Slow Cook Sauté Sous Vide Bake Yogurt Keep Warm NutriBoost ™ Delay Start Timer... -
Page 4: Important Safeguards
Failure to adhere to safety instructions may result in personal injury and/or property damage and may void your warranty. READ ALL INSTRUCTIONS Before using your Instant Pot Pro, please read all instructions, including the Safety Information below. Keep this manual for reference. - Page 5 Failure to adhere to safety instructions may result in personal injury and/or property damage and may void your warranty. DO use only the Instant Pot lid that came with this cooker base. Using any other pressure cooker lids may cause personal injury and/or property damage.
- Page 6 DO NOT remove the pressure cooking lid with unprotected hands. DO NOT attempt to force the lid off the Instant Pot cooker base. DO NOT move the appliance when it is under pressure.
- Page 7 DO use only an authorized stainless-steel Instant Pot inner cooking pot to reduce the risk of pressure leakage. DO only replace the sealing ring with an authorized Instant Pot sealing ring to prevent personal injury, property damage, and damage to the appliance.
- Page 8 This appliance has a 3-prong grounding plug. To reduce the risk of electric shock: ONLY plug the power cord into a grounded electrical outlet. DO NOT remove ground. DO NOT use extension cord. If the unit includes a detachable power cord: To connect, always attach the power cord to the appliance first, then plug the power cord into the wall outlet.
- Page 9 DO NOT use the appliance in electrical systems other than 120 V ~ 60 Hz for North America. DO NOT clean the appliance by rinsing it under a faucet. SAVE THESE INSTRUCTIONS Failure to adhere to safety instructions may result in personal injury and/or property damage and may void your warranty.
-
Page 10: What's In The Box
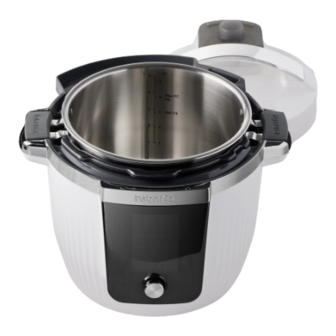
WHAT’S IN THE BOX Lid (top) Steam release vents Steam release cover Lid fin Handle Lid position marker Lid (bottom) Float valve Sealing ring rack Steam release valve and Anti-Block shield Sealing ring Illustrations are for reference only and may differ from the actual product. User Manual... - Page 11 Cooking Pot Max fill Half full Cooker Base Condensation collector (rear) Lid holder Condensation rim Cooker handle Heating element (inside) Control panel Illustrations are for reference only and may differ from the actual product. User Manual...
- Page 12 Accessories Steam rack Extra sealing ring Condensation collector Remember to recycle! We designed this packaging with sustainability in mind. Please recycle everything that can be recycled where you live. User Manual...
-
Page 13: Using Your Instant Pot Pro Plus
USING YOUR INSTANT POT PRO PLUS Control panel We’ve designed the control panel to be simple to use and easy to read. Pressure Indicator 7. Temperature When lit, indicates pressure Choose High, Low or Custom in the multicooker 8. Venting Options 2. - Page 14 Turning the sound On/Off You set the alert sounds to either ON or OFF. When the Message Bar shows Ready, press and hold Delay Start and the Control Dial for 5 seconds. The Message Bar shows Sound On or Sound Off. Repeat as needed.
- Page 15 Reset Smart Programs to original settings You can erase all of the memorized settings and reset them to the original settings. Reset Individual Smart Programs • When the Message Bar shows Ready, press and hold one Smart Program button for over 3 seconds until the Smart Program flashes twice and the multi-cooker returns to Ready mode.
-
Page 16: Initial Set Up
INITIAL SET UP Clean and assemble before use Hand wash the cooking pot, lid and sealing ring in warm water with soap. Rinse and use a soft cloth to dry the outside. Or you can wash the cooking pot in the dishwasher. Wipe the heating element inside the multi-cooker base with a soft cloth to ensure there are no stray packaging particles. - Page 17 Test run Setting up your new Instant Pot Pro Plus for a test run is a great way to familiarize yourself with how the multi-cooker works before you actually cook a meal. To perform a test run: Add 3 cups water to the cooking pot.
-
Page 18: Using The Lid
Carefully lift the lid up and off the multi-cooker base. How to release steam Instant Pot Pro Plus can release steam in 3 different ways. Use the one that best fits the type of food you’re cooking. Natural steam release Releases steam gradually over time (up to 40 minutes or more) after cooking stops. - Page 19 Pulse steam release Releases steam in bursts after cooking stops. Use for: Foods like rice and grains. In the venting field, press Pulse. Pulse stays lit. Steam is released in short bursts. When all steam is released, the Pressure Indicator light turns off. Quick steam release Quickly releases steam after cooking stops.
-
Page 20: About Pressure Cooking
Pressure cooking uses pressure to raise the temperature in the cooking pot, allowing you to cook food much faster than normal. When pressure cooking, the Instant Pot Pro Plus goes through 3 stages. Pre-heating While the multi-cooker pre-heats, it heats the liquid to create steam. -
Page 21: Pressure Cook
PRESSURE COOK Pressure cooking uses pressurized steam to quickly and evenly cook foods. You can adjust the settings as your recipe directs. Choose from these settings in the Pressure Cook Smart Program. The program uses the default settings or the settings you selected the last time you used the Pressure Cook program. - Page 22 Press the venting field to toggle between Natural, Pulse and Quick pressure release options. If you want to activate NutriBoost, press the NutriBoost field to turn it ON. If you want to delay cooking, press Delay Start, then press the hours field, then minutes field to activate them, then turn the Control Dial to select the delay time.
- Page 23 USDA’s Complete Guide to Home Canning. • CAUTION: If you live in a high-altitude area (above 6,600 ft), the altitude affects the ability of your Instant Pot to build up pressure. DO NOT use your Instant Pot to can in high-altitude areas. User Manual...
-
Page 24: Rice
RICE The Rice Smart Program uses pressurized steam to cook rice quickly and evenly. You can adjust the settings as your recipe directs. Choose from these settings in the Rice Smart Program. The program uses the default settings or the settings you selected the last time you used the Rice program. - Page 25 If you want to delay cooking, press Delay Start, then press the hours field, then minutes field to activate them, then turn the Control Dial to select the delay time. If you don’t want to use Keep Warm, press Keep Warm to turn it OFF. Press Start.
-
Page 26: Steam
STEAM Use Steam as you would a regular stovetop steamer, boiling liquid to cook food with hot steam. The Steam Smart Program does not use pressure to cook. Choose from these settings in the Steam Smart Program. The program uses the default settings or the settings you selected the last time you used the Steam program. - Page 27 Press Start. The progress bar and Message Bar show Preheating. It can take 10-15 minutes to reach the temperature for cooking. Frozen foods increase the preheating time. Cook When the temperature is ready, the Progress Bar shows Cooking. The cooking timer starts counting down. You can press Cancel to stop cooking at any time.
-
Page 28: Slow Cook
SLOW COOK Slow Cook lets you make your favorite simmering and stewing recipes, just as you would in a slow cooker. This Smart Program does not use pressure to cook food. Choose from these settings in the Slow Cook Smart Program. The program uses the default settings or the settings you selected the last time you used the Slow Cook program. - Page 29 If you want to delay cooking, press Delay Start, then press the hours field, then minutes field to activate them, then turn the Control Dial to select the delay time. Press Start. The Progress Bar shows Cooking. The cooking timer starts counting down. You can press Cancel to stop cooking at any time.
-
Page 30: Sauté
SAUTÉ Use Sauté in place of a frying or saucepan. Sautéing can deepen the flavors of your food, or can simmer, thicken or reduce sauces. Choose from these settings in the Sauté Smart Program. The program uses the default settings or the settings you selected the last time you used the Sauté... - Page 31 Press Sauté. Press the temperature field to toggle between Low, High and Custom temperature options. If you selected Custom, turn the Control Dial to select the temperature level. Press the hours field, then minutes field to activate them, then turn the Control Dial to select the time. Press Start.
-
Page 32: Sous Vide
SOUS VIDE Sous Vide cooks food underwater in an air-tight, food-safe bag, for a long period of time. Food cooks in its own juices and comes out delicious and very tender. This Smart Program does not use pressure to cook food. Choose from these settings for the Sous Vide Smart Program. - Page 33 Preheat Fill the cooking pot with water to the [1/2] mark. Place the cooking pot into the multi-cooker base. Place the lid on top of the multi-cooker base and lock the lid. Press Sous Vide. Press the hours field, then minutes field to activate them, then turn the Control Dial to select the time.
-
Page 34: Bake
BAKE You can use Bake for breads, cakes and pastries, with the Instant Pot Pro Plus acting like your own “mini oven”. Choose from these settings in the Bake Smart Program. The program uses the default settings or the settings you selected the last time you used the Bake program. - Page 35 Press Bake. To change the pressure settings, press Pressure to toggle between Low and High pressure levels. To change the cooking time, press the hours field, then minutes field to activate them, then turn the Control Dial to select the time. To change the pressure release method, press the Venting options to select Natural, Pulse or Quick release methods.
-
Page 36: Yogurt
YOGURT You can use your Instant Pot Pro Plus to easily make delicious, fermented dairy and non-dairy yogurt. Choose from these settings in the Yogurt Smart Program: Step Temperature Default Time Min Time Max Time Pasteurization 85ºC (185ºF) 30 minutes... - Page 37 Add a starter culture to the milk according to package instructions. If using plain yogurt as a starter, ensure that it contains an active culture. Mix in 2 tbsp (30 mL) of yogurt per 1 gallon (3.7 L) of milk or follow a trusted recipe.
-
Page 38: Keep Warm
KEEP WARM The Keep Warm setting turns on automatically after cooking on the Pressure Cook, Rice and Slow Cook Smart Programs. You can also use Keep Warm to reheat food. Choose from these settings in the Keep Warm Smart Program. The program uses the default settings or the settings you selected the last time you used the Keep Warm program. - Page 39 Press Keep Warm. Press the hours field, then minutes field to activate them, then turn the Control Dial to select the time. Press the temperature field to toggle to High, Low or Custom. If you chose Custom temperature, turn the Control Dial to select a temperature.
-
Page 40: Nutriboost
NUTRIBOOST™ NutriBoost is a special setting that you can use during the Pressure Cook and Rice Smart Programs. It creates a boiling motion in the cooking pot that mimics the action of stirring. Just like stirring, this helps to enhance flavors, and improve textures. It’s amazing for rich bone broth and creamy risotto! To use NutriBoost •... -
Page 41: Delay Start
DELAY START You can set a Delay Start timer for a minimum of 10 minutes or a maximum of 24 hours (the default is 8 hours). Delay Start is not available with the Sauté, Yogurt or Sous Vide Smart Programs. Delay the start of cooking Select a Smart Program, adjust the settings as you want, then press Delay Start. -
Page 42: Timer
TIMER Even when you’re not using your Instant Pot Pro Plus for cooking, you can set a timer for a minimum of 1 minute or a maximum of 1 hour (the default is 10 minutes). Set a timer (without cooking) When the Message Bar shows Ready, press Delay Start. -
Page 43: Maintenance
MAINTENANCE Your Instant Pot Pro Plus includes parts that enable pressure cooking. These parts must be installed for pressure cooking to work properly and either cleaned or replaced regularly. Failure to adhere to safety instructions may result in personal injury and/or property damage and may void your warranty. - Page 44 Remove the Sealing Ring Grip the edge of the sealing ring and pull it out from behind the sealing ring rack. Inspect the rack to ensure it is secured, centered, and an even height all the way around the lid. If the sealing ring rack is deformed, do not try to repair it.
- Page 45 Steam release cover When the multi-cooker releases pressure, steam ejects from the top of the steam release cover. The steam release cover and steam release valve are integral to product safety and necessary for pressure cooking. The cover and valve both must be installed before use and cleaned regularly.
- Page 46 Install the steam release assembly Place the steam release valve on the steam release pipe and press down firmly. Insert the tabs on the steam release cover into the holes on the lid and press down on the opposite side until the cover is seated. When installed properly, the steam release assembly is firmly attached to the lid.
-
Page 47: Cleaning
CLEANING Clean your Instant Pot Pro Plus after each use. Always unplug the unit and let all parts cool to room temperature before cleaning. Before use or storing, make sure all surfaces are dry. Part Cleaning instructions Accessories • Wash after each use •... -
Page 48: Troubleshooting
TROUBLESHOOTING Problem Cause Solution Difficulty closing lid Sealing ring not properly Reposition sealing ring, installed ensure it is snug behind sealing ring rack. Float valve is stuck in the Gently press the float valve popped-up position downward with a long utensil. - Page 49 Problem Cause Solution Display remains blank after Bad power connection or Inspect power cord for connecting the power cord no power damage. If damage is noticed, contact Consumer Care. Check outlet to ensure it is powered. Cooker’s electrical fuse has Contact Consumer Care.
-
Page 50: Error Codes
ERROR CODES If the control panel shows an error code from this list, there is an issue with the Instant Pot Pro Plus. Here are the actions you should take to fix the problem. Problem Cause Solution Faulty sensor Contact Consumer Care. -
Page 51: Replacement Parts
REPLACEMENT PARTS We offer genuine replacement parts for your Pro Plus Multi-cooker, if you need them. Visit www.instanthome.com to order. Part Part number Sealing Ring 211-0001-01 Inner Cooking Pot 212-0401-01 Anti Block Shield 310-0006-01 Steam Release Valve 310-0011-01 Manual 399-1256-03US User Manual... -
Page 52: Learn More
LEARN MORE There’s a whole world of Instant Pot information and help just waiting for you. Here are some of the most helpful resources. Register your product Instanthome.com/register Contact Consumer Care In the Instant Brands Connect App Instanthome.com/customer-care-center support@instanthome.com Instant Brands Connect App with 1000+ recipes ®... -
Page 53: Warranty
Warranty on the replacement appliance will expire twelve (12) months from the date of receipt. Failure to register your product will not reduce your warranty rights. The liability of Instant Brands, if any, for any allegedly defective appliance or part will not exceed the purchase price of a comparable replacement appliance. - Page 54 You can also create a support ticket online at www.instanthome.com. If we are unable to resolve the problem, you may be asked to send your appliance to the Service Department for quality inspection. Instant Brands is not responsible for shipping costs related to warranty service. When returning your...
- Page 55 NOTES User Manual...
- Page 56 Ottawa, ON K1Z 8R1 In U.S., distributed by Instant Brands LLC 3025 Highland Parkway, Suite 700 Downers Grove, IL 60515 U.S. instanthome.com © 2023 Instant Brands 112-5678-01 Art release date 03/20/2023 INSTANT, INSTANT POT and INSTANT BRANDS are registered trademarks...
Need help?
Do you have a question about the POT PRO PLUS and is the answer not in the manual?
Questions and answers