Table of Contents
Advertisement
Advertisement
Table of Contents

Related Manuals for Instant MFM-2000


Summary of Contents for Instant MFM-2000
- Page 1 INSTANT FROTHER STATION ™ USER MANUAL...
- Page 2 Get started with your Frother Station Before using your Instant™ Frother Station, read all instructions, including the Safety Information starting on page 2. Failure to follow the safeguards and instructions may result in personal injury...
-
Page 3: Table Of Contents
CONTENTS Important safeguards What’s in the box Before you froth Using your Instant™ Frother Station Frothing milk Care, Cleaning and Storage Troubleshooting Learn more Warranty... -
Page 4: Important Safeguards
SAFEGUARDS SAFEGUARDS Safety Instructions At Instant™, we want you to feel comfortable using our products. This Instant™ Frother Station was designed with you and your safety in mind. When using electrical appliances, basic safety precautions should always be followed to reduce the risk of fire, electric shock, personal injury/or property damage. - Page 5 Care and Storage • DO unplug from outlet when not in use before cleaning. Allow the appliance to cool before putting on or taking off parts, and before cleaning the appliance. • DO NOT store any materials in the frother jug when not in use. Power Cord A short power-supply cord is used to reduce the risk resulting from it being grabbed by children, becoming entangled in, or tripping over...
- Page 6 • To disconnect, turn any controls to the OFF position and remove plug from power source. Always unplug when not in use, as well as before adding or removing parts or accessories, and before cleaning. To unplug, grasp the plug and pull from the outlet. Never pull from the power cord.
-
Page 7: What's In The Box
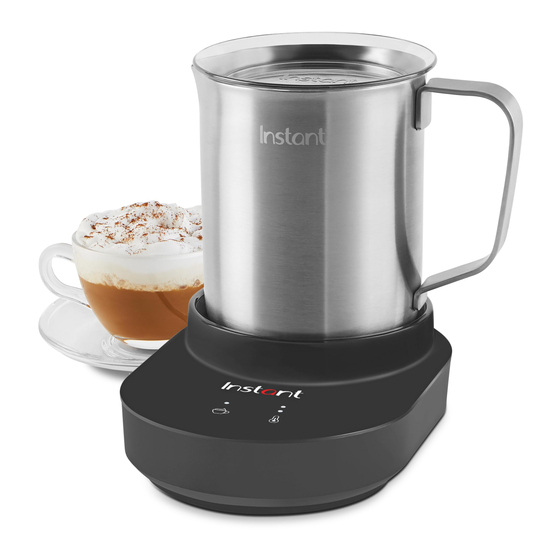
WHAT’S IN THE BOX Instant™ Frother Station Frothing Whisk Stay-cool Jug Handle Stainless Steel Jug Power Cord Control Panel Frothing Base Illustrations are for reference only and may differ from the actual product. Remember to recycle! We designed this packaging with sustainability in mind. Please recycle everything that can be recycled where you live. -
Page 8: Before You Froth
BEFORE YOU FROTH Initial set up Pull the Instant™ Frother Station and all parts out of the box. Remove all packaging materials from within and around the frother. Place your frother on a dry, stable, level surface. Initial washing Wash the frothing whisk, jug and lid in warm soapy water, then rinse and dry thoroughly. -
Page 9: Using Your Instant™ Frother Station
USING YOUR INSTANT™ FROTHER STATION Control panel Your Instant Frother Station was designed with an easy-to-use control ™ panel and 4 simple buttons. Cancel 4. Temperature level • Cool (Heat OFF) 2. Start • Warm 3. Foam options • Hot •... - Page 10 Plugging in your Instant™ Frother Station Once you’ve followed the initial setup and washing instructions, plug the frother base power cord into an outlet. • The control panel buttons will light up then enter Ready mode. Default settings for Foam and Temperature levels will light up.
- Page 11 Temperature and Foam Settings Your Instant Frother Station has been designed to help you personalise ™ your foam at the touch of a button. The 3 temperature settings and 3 foam settings can be combined to create up to 9 different programs for your perfect froth.
- Page 12 Foam level With adjustable foam settings, you can froth up a little foam or a lot, or turn foaming off to gently stir ingredients into heated milk. To set or change the foam level before frothing, press the button to cycle through the three options: Extra Foam, Foam,...
-
Page 13: Frothing Milk
Enjoy your beverage! The frothing jug must always be in place on the frother base for your Instant™ Frother Station to operate. Removing it at any time before or during use will automatically stop frothing and the frother returns to Ready mode. - Page 14 Be careful: Frothing causes liquids to reach high temperatures. DO NOT touch the frother jug or frother base during or immediately after the brewing process as both will be very hot. Touching hot surfaces may result in burns, other personal injury and/or property damage. Milk Measurements Milk Level Marking Components...
- Page 15 Frothing Tips Details Cold milk is best • Using the coldest, freshest milk will almost always produce the best foam. • When frothing, millions of tiny air bubbles are introduced into the liquid. The longer it takes to heat up, the more air can be infused into the liquid. The end result is silky rich foam and less chance of scalding.
- Page 16 Types of Milk As you begin using your Instant Frother Station you will discover ™ that different milk types and brands produce different types of foam. Depending on your personal taste and desired results, you can experiment with dairy, nut and plant-based milks.
- Page 17 Recipes to try with your Instant™ Frother Station Latte Pour a single shot of espresso and 2/3 cup of heated milk, then add a layer of rich milk foam on the top. Hot chocolate Blend chipped/melted chocolate or cocoa powder with heated milk, then add sugar or water at your preference.
-
Page 18: Care, Cleaning And Storage
CARE, CLEANING AND STORAGE Your Instant Frother Station jug and whisk should be cleaned after ™ each use to avoid any residue buildup. Unplug the frother’s power cord from the power outlet and let it cool to room temperature before cleaning. Never use metal scouring pads, abrasive powders, or harsh chemical detergents on any of the frother’s parts. -
Page 19: Troubleshooting
TROUBLESHOOTING Problem Possible Cause Solution Milk is not The frothing whisk is not • Remove the liquid from frothing installed correctly. the jug. • Position the square end of the frother whisk over the rod at the bottom of the jug and push down until it is secure. - Page 20 Problem Possible Cause Solution Ingredients are Ingredients were added • For best results, warm milk not melting before the milk was heated. to desired temperature then add ingredients/ chocolate. Ingredients were too large • Keep the ingredients cut to melt. into small pieces —...
-
Page 21: Learn More
LEARN MORE There’s a whole world of Instant Frother Station information and help ™ just waiting for you. Here are some of the most helpful resources. Register your product instantbrands.com.au/pages/product-registration Contact Consumer Care instantbrands.com.au support.au@instantbrands.com 1800 251 643 or +61 2 9317 1000 Download the Instant Brands Connect App •... -
Page 22: Warranty
Provide a description of the appliance you believe has malfunctioned due to defective parts or workmanship. If it is necessary for the appliance to be sent to Instant Brands Australia for repair or replacement, Instant Brands Australia will send you a pre-paid shipping label and you must send the appliance and your dated sales receipt to Instant Brands Australia along with the appliance. - Page 23 WARRANTY Limitation and Exclusions To the maximum extent permitted by law, the maximum liability of Instant Brands Australia, if any, for any allegedly defective appliance or part shall in no circumstances exceed the purchase price of a comparable replacement appliance or part of the same age.
- Page 24 NOTES User Manual...
- Page 25 NOTES User Manual...
- Page 26 ©2024 Instant Brands (Australia) Pty Ltd. Sydney Corporate Park Level 1, 182-184 Bourke Road, Alexandria NSW 2015, Australia. instantbrands.com.au © 2024 Instant Brands LLC. INSTANT and INSTANT BRANDS are registered trademarks of Instant Brands Holdings Inc.
Need help?
Do you have a question about the MFM-2000 and is the answer not in the manual?
Questions and answers