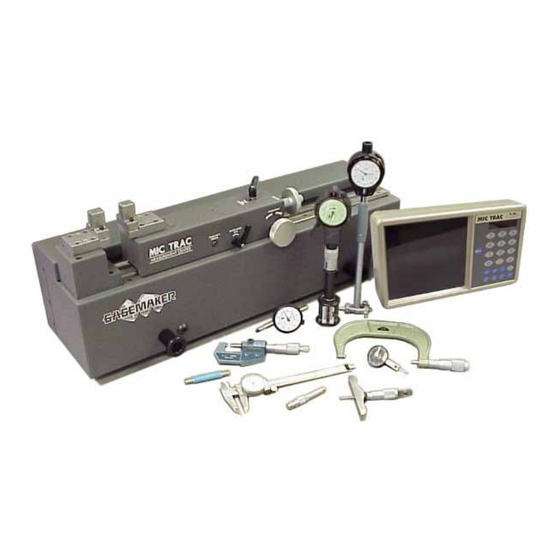
GAGEMAKER MIC TRAC MT-3000 Manual
Tf-dg depth micrometer fixture
Hide thumbs
Also See for MIC TRAC MT-3000:
- Operation manual (32 pages) ,
- Manual (12 pages) ,
- Operation manual (36 pages)

Related Manuals for GAGEMAKER MIC TRAC MT-3000


Summary of Contents for GAGEMAKER MIC TRAC MT-3000
- Page 2 MIC TRAC MT-3000 ã 2010 Gagemaker, LP RCDMMT300010-10...
- Page 3 Setup Materials Needed: · · MIC TRAC MT-3000 base unit and CPU readout 5/32" hex wrench · · Depth micrometer 50 in/lb torque wrench · · Depth gage fixture (TF-DG) and cap screws Cloth · · Flat face anvil (TF-1F Block) cap screws and washers ZEP I.D.
- Page 4 ZEP I.D. Red cleaner. 8. Place the depth gage fixture against the right receiver pad shoulder with the thumb screws facing to the right. Insert the cap screws. MIC TRAC MT-3000 ã 2010 Gagemaker, LP RCDMMT300010-10...
- Page 5 5/32" hex wrench to slightly tighten the screws. 10. Use a 50 in/lb torque wrench to secure the cap screws. 11. Clean the depth micrometer using the cloth and ZEP I.D. Red cleaner. MIC TRAC MT-3000 ã 2010 Gagemaker, LP RCDMMT300010-10...
- Page 6 13. Retract the thumb screws on the depth gage fixture enough to fit the depth micrometer. 14. Mount the depth micrometer in the depth gage fixture, aligning the depth micrometer’s rod with the center of the flat face anvil. MIC TRAC MT-3000 ã 2010 Gagemaker, LP RCDMMT300010-10...
- Page 7 17. Apply slight pressure until the in the axis display lights up. The display will read 0.00000 and the gaging force will be preset to 2.0 lbs of force. MIC TRAC MT-3000 ã 2010 Gagemaker, LP RCDMMT300010-10...
- Page 8 If using a computer with Calibration the MT-3000, go to page 11. Materials Needed: · · MIC TRAC MT-3000 base unit and CPU readout 5/32" hex wrench · · Seiko printer (optional) Lightweight gage oil · · Depth Micrometer Gage Calibration Record 1.
- Page 9 Adjust the height of the depth gage support to hold the end of the depth rod, so it does not bend during calibration. Tighten the thumb screw. MIC TRAC MT-3000 ã 2010 Gagemaker, LP RCDMMT300010-10...
- Page 10 15. After calibrating all depth micrometers, be sure to remove the depth gage fixture and flat face anvil from the MT-3000. Oil the fixture and anvil and return them to the storage case. MIC TRAC MT-3000 ã 2010 Gagemaker, LP RCDMMT300010-10...
- Page 11 Calibration If using a computer with the MT-3000, begin here. Materials Needed: · · MIC TRAC MT-3000 base unit and CPU readout Depth Micrometer · · Computer 5/32" hex wrench · · CERTIFI software Lightweight gage oil · · MT-4-USB Digital Data Acquisition Card Brother P-Touch Label Printer (optional) 1.
- Page 12 8. You can enter additional master values by right clicking your mouse over an existing master value. Select Insert to insert a new line. Then type in the new master value in that line. MIC TRAC MT-3000 ã 2010 Gagemaker, LP RCDMMT300010-10...
- Page 13 Zero button twice. 12. Turn the X axis adjust knob clockwise and pull out. 13. Turn the Y axis adjust knob counterclockwise until the depth micrometer contacts the flat face anvil. MIC TRAC MT-3000 ã 2010 Gagemaker, LP RCDMMT300010-10...
- Page 14 15. Adjust the depth micrometer to the first calibration value. Note: If you pass the calibration value, turn the spindle back and approach the value again, from the same direction. This practice will increase the accuracy of the calibration. MIC TRAC MT-3000 ã 2010 Gagemaker, LP RCDMMT300010-10...
- Page 15 19. Locate the depth gage support. With the thumbscrew facing forward, slide the support over the left flat face anvil. 20. Remove the depth rod from the depth micrometer and insert the next depth rod. MIC TRAC MT-3000 ã 2010 Gagemaker, LP RCDMMT300010-10...
- Page 16 Click the Add Value button. · Continue calibrating the remaining depth rods as in the previous five steps. 25. Change the Next Calibration Date, if necessary, by typing over the displayed date. MIC TRAC MT-3000 ã 2010 Gagemaker, LP RCDMMT300010-10...
- Page 17 Preferences box. Select the NIST tab to enter new information. 26. Click the Save button. Note: CERTIFI automatically assigns a filename to each calibration. DO NOT change the filename to avoid problems with the CERTIFI database. MIC TRAC MT-3000 ã 2010 Gagemaker, LP RCDMMT300010-10...
- Page 18 30. After calibrating all depth micrometers, be sure to remove the depth gage fixture and flat face anvil from the MT-3000. Oil the fixture and anvil and return them to the storage case. MIC TRAC MT-3000 ã 2010 Gagemaker, LP RCDMMT300010-10...
- Page 19 Notes: MIC TRAC MT-3000 ã 2010 Gagemaker, LP RCDMMT300010-10...
- Page 20 Gagemaker, LP, P.O. Box 87709, Houston, Texas 77287-7709 710 East Southmore Ave., Pasadena, Texas 77502 Phone: 713-472-7360 Fax: 713-472-7241 Website: www.gagemaker.com...
Need help?
Do you have a question about the MIC TRAC MT-3000 and is the answer not in the manual?
Questions and answers