Table of Contents
Advertisement
Quick Links
Advertisement
Table of Contents

Subscribe to Our Youtube Channel
Related Manuals for GAGEMAKER MRP-1500


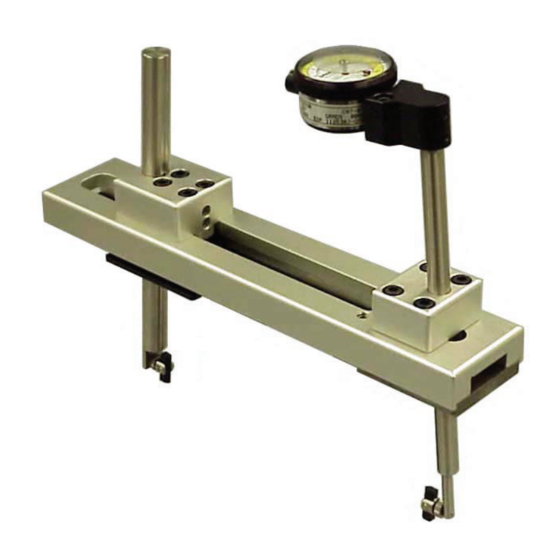
Summary of Contents for GAGEMAKER MRP-1500
- Page 1 M R P P itch Diam eter Gage M odels 1500/ 2500/ 3500 OP ER ATI ON M ANUAL...
- Page 2 Pitch Diameter Gage Operation Manual Models MRP 1500/2500/3500 ©2018 Gagemaker, LP MRP and Gagemaker are registered trademarks of Gagemaker, LP. All rights reserved OMMRP15005-18 Copyright © 2018 Gagemaker. All rights reserved...
-
Page 3: Table Of Contents
MRP Inspection Tolerance Guidelines MRP Accuracy Measurement Factors Thread Addendum Measurements Standoff vs. Pitch Diameter Change Setting Standard Calculations Rod Style Setting Standard Dimensions Rod Style Setting Standard Correction Factors MIC TRAC Setting Standard Dimensions Copyright © 2018 Gagemaker. All rights reserved... - Page 4 API STC Connections - 4½” to 20” API LTC Connections - 4½” to 20” API Buttress Connections - 4½” to 13⅜” API Buttress Connections – 16” to 20” Care and Maintenance Maintenance Tips Warranty Information Copyright © 2018 Gagemaker. All rights reserved...
-
Page 5: Introduction
Pitch Diameter Gage Operation Manual Models MRP 1500/2500/3500 Congratulations! Your decision to purchase a Gagemaker product above all others on the market demonstrates your confidence in our quality and workmanship. To insure the high performance and operation of our product, we urge you to use the included reference materials. -
Page 6: Parts List
Length, 1.00” Special Length) Lower Wear Pad 3/16” hex wrench 2500/3500 Internal Upper Arm 7/64” hex wrench (Standard, 7” Reach, 10” Reach) 2500/3500 External Upper Arm 1/8” hex wrench (Standard, 7” Reach, 10” Reach) Copyright © 2018 Gagemaker. All rights reserved... -
Page 7: Mrp Gage Setup
A (MIN) A (MAX) B (MAX) C (MAX) C (MIN) MRP External Setup– Dimensional Limits C (MAX) C (MIN) A (MIN) B (MIN) A (MAX) B (MAX) MRP Internal Setup – Dimensional Limits Copyright © 2018 Gagemaker. All rights reserved... -
Page 8: Setup Procedures For External Measurements
MRP-2522 Internal 3.75 / 17.50 3.75 / 16.375 .312 / 6.25 MRP-3511 External 5.75 / 21.00 4.75 / 19.75 .625 / 6.25 MRP-3512 Internal 7.50 / 22.375 6.50 / 21.375 .312 / 6.25 Copyright © 2018 Gagemaker. All rights reserved... -
Page 9: Setting Up The Mrp Gage For External Measurements
If the arms slant outward, the gage is set for internal measurements and must be changed by following the steps below. 2. Using a 3/16” hex wrench, loosen the set screws in the upper block. Copyright © 2018 Gagemaker. All rights reserved... - Page 10 Note: The wear pad is not interchangeable between MRP 2500 bodies. Each wear pad is specifically manufactured to the gage body with which it is supplied. Copyright © 2018 Gagemaker. All rights reserved...
- Page 11 12. Thread one pivot shoe into the indicator stem in the upper arm. 13. Thread the other pivot shoe into the hole in the lower arm. Copyright © 2018 Gagemaker. All rights reserved...
- Page 12 15. Gently tighten the binder nut with pliers to secure. Be careful not to over-tighten the binder nut, which may cause damage to the indicator. Groove 16. Move each pivot shoe back and forth to make sure it pivots freely. Copyright © 2018 Gagemaker. All rights reserved...
-
Page 13: Zeroing The Mrp Gage For External Measurements Using Rod Standards
MRP’s wear pad and each pivot shoe. 2. Using the 1/8” hex wrench, loosen the two set screws on the lower block until the arm slides up and down freely. Repeat with the upper block. Copyright © 2018 Gagemaker. All rights reserved... - Page 14 7. Place the A standard between the pivot shoes. Adjust the lower arm so the pivot shoes contact the A standard. 8. Slide the lower block approximately .050” closer to the upper block to give the MRP gage the proper preload. Copyright © 2018 Gagemaker. All rights reserved...
- Page 15 9. Using the 3/16” hex wrench, tighten the set screws on the lower block. 10. Turn the indicator dial on the MRP gage to align the needle with zero. 11. Tighten the indicator clamp. Copyright © 2018 Gagemaker. All rights reserved...
- Page 16 13. Remove the standard from the gage. 14. Set a frequency for verifying the zero setting of all gages. As a minimum, the MRP gage should be zeroed on a standard once during each shift to ensure accurate readings. Copyright © 2018 Gagemaker. All rights reserved...
-
Page 17: Zeroing The Mrp Gage For External Measurements Using Frame Standards
2. Using a 3/16” hex wrench, loosen the set screws in the lower block. 3. Place the MRP gage on the frame setting standard so the pivot shoes are positioned on the outside of the setting standard. Copyright © 2018 Gagemaker. All rights reserved... - Page 18 5. Position both pivot shoes in the center of the smooth area of the frame setting standard. 6. Tighten the two set screws on the upper block to secure the arm. Repeat with the lower block. Copyright © 2018 Gagemaker. All rights reserved...
- Page 19 9. While holding the lower block securely against the right side of the standard, sweep the upper block back and forth to obtain the smallest indicator reading. Copyright © 2018 Gagemaker. All rights reserved...
- Page 20 13. Set a frequency for verifying the zero setting of all gages. As a minimum, the MRP gage should be zeroed on a standard once during each shift to ensure accurate readings. Copyright © 2018 Gagemaker. All rights reserved...
-
Page 21: Zeroing The Mrp Gage For External Measurements Using The Mic Trac
5. While applying pressure toward the receiver pad shoulder, use a 5/32" hex wrench to tighten the screws. 6. Repeat this process with other taper block. Copyright © 2018 Gagemaker. All rights reserved... - Page 22 8. Press the Reference Pulse pad on the CPU to change to external measurement mode. 9. Press the ZERO pad on the CPU to zero the MIC TRAC. Copyright © 2018 Gagemaker. All rights reserved...
- Page 23 14. Secure the coarse adjust lock. 15. Turn the fine adjust knob until the CPU displays the exact setting dimension. 16. Secure the fine adjust lock. Copyright © 2018 Gagemaker. All rights reserved...
- Page 24 Wear Pad During inspection, the pivot shoes should rest on full form threads, not black crested threads. If necessary, re-adjust the location of the pivot shoe until the gage measures only full form threads. Copyright © 2018 Gagemaker. All rights reserved...
- Page 25 25. Place the MRP gage on the MIC TRAC so the pivot shoes are positioned on the outside of the taper blocks. 26. Position both pivot shoes in the center of the smooth area of the taper blocks. Copyright © 2018 Gagemaker. All rights reserved...
- Page 26 29. While holding the lower block securely against the right taper block, sweep the upper block back and forth to obtain the smallest indicator reading. Copyright © 2018 Gagemaker. All rights reserved...
- Page 27 32. Remove the gage from the taper blocks. 33. Set a frequency for verifying the zero setting of all gages. As a minimum, the MRP gage should be zeroed on a standard once during each shift to ensure accurate readings. Copyright © 2018 Gagemaker. All rights reserved...
-
Page 28: Operating Procedures For External Measurements
2. Ensure that the pivot shoes on the MRP gage are properly positioned on the threads of the part. Copyright © 2018 Gagemaker. All rights reserved... - Page 29 Note: Be sure that the small revolution counter on the indicator is pointing to the same number as when the gage was zeroed. Refer to the number previously recorded on the back of the indicator. Copyright © 2018 Gagemaker. All rights reserved...
- Page 30 Gage at the back of this manual. 4. Record any deviations on an inspection or calibration report. 5. During the inspection process, periodically place the MRP on the setting standard to verify the gage’s repeatability. Copyright © 2018 Gagemaker. All rights reserved...
-
Page 31: Setup Procedures For Internal Measurements
MRP-2522 Internal 3.75 / 17.50 3.75 / 16.375 .312 / 6.25 MRP-3511 External 5.75 / 21.00 4.75 / 19.75 .625 / 6.25 MRP-3512 Internal 7.50 / 22.375 6.50 / 21.375 .312 / 6.25 Copyright © 2018 Gagemaker. All rights reserved... -
Page 32: Setting Up The Mrp Gage For Internal Measurements
If the arms slant inward, the gage is set for external measurements and must be changed by following the steps below. 2. Using a 3/16” hex wrench, loosen the set screws in the upper block. Copyright © 2018 Gagemaker. All rights reserved... - Page 33 8. Partially tighten the set screws in the lower block to secure the wear pad, but allow the lower block to slide back and forth. Copyright © 2018 Gagemaker. All rights reserved...
- Page 34 11. Using a 7/64” hex wrench, tighten the set screw in the upper arm to secure the indicator. 12. Thread each pivot shoe into the upper and lower arms of the MRP. Copyright © 2018 Gagemaker. All rights reserved...
- Page 35 14. Gently tighten the binder nut with pliers to secure. Be careful not to over-tighten the binder nut. Groove 15. Move each pivot shoe back and forth to make sure it pivots freely. Copyright © 2018 Gagemaker. All rights reserved...
-
Page 36: Zeroing The Mrp Gage For Internal Measurements Using Rod Standards
MRP’s wear pad and each pivot shoe. 2. Using the 1/8” hex wrench, loosen the two set screws on the lower block until the arm slides up and down freely. Repeat with the upper block. Copyright © 2018 Gagemaker. All rights reserved... - Page 37 Adjust the lower arm so the pivot shoes contact the A standard. 8. Slide the lower block approximately .050” away from the upper block to give the MRP gage the proper preload. Copyright © 2018 Gagemaker. All rights reserved...
- Page 38 9. Using the 3/16” hex wrench, tighten the set screws on the lower block. 10. Turn the indicator dial on the MRP gage to align the needle with zero. 11. Tighten the indicator clamp. Copyright © 2018 Gagemaker. All rights reserved...
- Page 39 13. Remove the standard from the gage. 14. Set a frequency for verifying the zero setting of all gages. As a minimum, the MRP gage should be zeroed on a standard once during each shift to ensure accurate readings. Copyright © 2018 Gagemaker. All rights reserved...
-
Page 40: Zeroing The Mrp Gage For Internal Measurements Using Frame Standards
2. Using a 3/16” hex wrench, loosen the set screws in the lower block. 3. Place the MRP gage on the frame setting standard so the pivot shoes are positioned on the inside of the setting standard. Copyright © 2018 Gagemaker. All rights reserved... - Page 41 5. Position both pivot shoes in the center of the smooth area of the frame setting standard. 6. Tighten the two set screws on the upper block to secure the arm. Repeat with the lower block. Copyright © 2018 Gagemaker. All rights reserved...
- Page 42 9. While holding the lower block securely against the right side of the standard, sweep the upper block back and forth to obtain the smallest indicator reading. Copyright © 2018 Gagemaker. All rights reserved...
- Page 43 13. Set a frequency for verifying the zero setting of all gages. As a minimum, the MRP gage should be zeroed on a standard once during each shift to ensure accurate readings. Copyright © 2018 Gagemaker. All rights reserved...
-
Page 44: Zeroing The Mrp Gage For Internal Measurements Using The Mic Trac
5. While applying pressure toward the receiver pad shoulder, use a 5/32" hex wrench to tighten the screws. 6. Repeat this process with other taper block. Copyright © 2018 Gagemaker. All rights reserved... - Page 45 Need verification for name of button 8. Press the INT pad on the CPU to change to internal measurement mode. 9. Press the ZERO pad on the CPU to zero the MIC TRAC. Copyright © 2018 Gagemaker. All rights reserved...
- Page 46 14. Secure the coarse adjust lock. 15. Turn the fine adjust knob until the CPU displays the exact setting dimension. 16. Secure the fine adjust lock. Copyright © 2018 Gagemaker. All rights reserved...
- Page 47 During inspection, the pivot shoes should rest on full form threads, not black crested Pipe Size Distance from threads. If necessary, re-adjust the location Wear Pad of the pivot shoe until the gage measures only full form threads. Copyright © 2018 Gagemaker. All rights reserved...
- Page 48 .050”. Then, slide the lower block back until it contacts the right taper block, to give the MRP the proper preload. Slide lower block back to contact taper block Copyright © 2018 Gagemaker. All rights reserved...
- Page 49 24. While holding the lower block securely against the right taper block, sweep the upper block back and forth to obtain the smallest indicator reading. 25. Turn the indicator dial on the MRP gage to align the needle with zero. Copyright © 2018 Gagemaker. All rights reserved...
- Page 50 27. Remove the gage from the taper blocks. 28. Set a frequency for verifying the zero setting of all gages. As a minimum, the MRP gage should be zeroed on a standard once during each shift to ensure accurate readings. Copyright © 2018 Gagemaker. All rights reserved...
-
Page 51: Operating Procedures For Internal Measurements
During inspection, the pivot shoes should rest on full form threads, not black crested threads. If necessary, re-adjust the location of the pivot shoe until the gage measures only full form threads. Copyright © 2018 Gagemaker. All rights reserved... - Page 52 Note: Be sure that the small revolution counter on the indicator is pointing to the same number as when the gage was zeroed. Refer to the number previously recorded on the back of the indicator. Copyright © 2018 Gagemaker. All rights reserved...
- Page 53 Gage at the back of this manual. 3. Record any deviations on an inspection or calibration report. 4. During the inspection process, periodically place the MRP on the setting standard to verify the gage’s repeatability. Copyright © 2018 Gagemaker. All rights reserved...
-
Page 54: Inspection Criteria
Ovality readings are always positive (no sign attached). Largest Diameter - Smallest Diameter = Ovality Example: Largest Diameter Smallest Diameter Ovality Reading Reading +.005 -.010 .015 Copyright © 2018 Gagemaker. All rights reserved... -
Page 55: Mrp Inspection Tolerance Guidelines
+.006 / -.000 +.004 / -.000 .040 Buttress (1” TPF) (.004”/in. dia.) +.008 / -.000 +.006 / -.000 .064 18 ⅝ +.008 / -.000 +.006 / -.000 .075 +.008 / -.000 +.006 / -.000 .080 Copyright © 2018 Gagemaker. All rights reserved... -
Page 56: Mrp Accuracy Measurement Factors
Minus Addendum – Narrow Groove – Small Reading Mating part will have more standoff the thread crests P.D. Correction for Minus Addendum: Pin = Add 2 times deviation to P.D. Box = Subtract 2 times deviation from P.D. Copyright © 2018 Gagemaker. All rights reserved... -
Page 57: Standoff Vs. Pitch Diameter Change
.083 .100 .083 +.008 Example: To determine the MRP reading for a 7” LTC pin connector ring gage with a standoff of +.115: Standoff X Taper (in/in) = MRP Reading .115 .062 +.007 Copyright © 2018 Gagemaker. All rights reserved... -
Page 58: Setting Standard Calculations
Refer to Rod Style Setting Standards’ Correction Factor in this manual. Copyright © 2018 Gagemaker. All rights reserved... - Page 59 Refer to Rod Style Setting Standards’ Correction Factor in this manual. Copyright © 2018 Gagemaker. All rights reserved...
-
Page 60: Rod Style Setting Standard Correction Factors
This factor applies only to tapered thread connectors that have a step type thread form. Buttress connectors that are 16” and larger and many premium connectors require the total correction factor. The factor is added to pin calculations and subtracted from box calculations. Copyright © 2018 Gagemaker. All rights reserved... -
Page 61: Mic Trac Setting Standard Dimensions
GPr = (1.7909 – 2.046)* .0625 = -.0210 PDc = 6.90337 + .06826 = 6.97163 PDn = (6.97163) + (-.0210) = 6.9506 MTes = (6.9506 – 2.0810) + 1.5000 = 6.3697 CPU reading Copyright © 2018 Gagemaker. All rights reserved... -
Page 62: Api Line Pipe Connections - 1" To 20
(External) CPU Reading (Internal) CPU Reading Pivot Shoe 1.050 0.5619 1.315 0.8269 1.660 1.1719 1.900 1.4119 2⅜ 1.8305 1.8867 2⅞ 2.3031 2.3867 1.00 3½ 2.9125 3.0117 1.00 3.4064 3.4776 1.00 4½ 3.8966 3.9776 Copyright © 2018 Gagemaker. All rights reserved... -
Page 63: Api Eue Connections - ¾" To 4½
2.00 11¾ >P-110 11.0962 11.2196 2.00 13⅜ <P-110 12.7212 12.8485 2.00 13⅜ >P-110 12.7212 12.8446 2.00 15.3149 15.4735 2.00 18⅝ 87.50 17.9399 18.0985 2.00 <J-55, K-55 19.3149 19.4735 2.00 >J-55, K-55 19.3149 19.4796 Copyright © 2018 Gagemaker. All rights reserved... -
Page 64: Api Ltc Connections - 4½" To 20
Nominal Pipe Weight MRP Wear Pad (External) (Internal) Size Buttress Grade to Center of Per Foot Only CPU Reading CPU Reading Pivot Shoe 1.37 15.3387 15.5087 1.37 18⅝ 17.9637 18.1337 1.37 19.3387 19.5087 Copyright © 2018 Gagemaker. All rights reserved... -
Page 65: Maintenance Tips
12 months from the date of shipment. This warranty is limited to repairing, or at Gagemaker’s option, replacing any product which is proven to have been defective at the time it was shipped and/or suffered damage during shipping; provided buyer has given Gagemaker written notice of any such claimed defect within 15 days of receipt. - Page 66 Pitch Diameter Gage Operation Manual Models MRP 1500/2500/3500 Copyright © 2018 Gagemaker. All rights reserved...
- Page 68 Pitch Diameter Gage Operation Manual Models MRP 1500/2500/3500 Gagemaker, LP, P.O. Box 87709, Houston, Texas 77287-7709 712 East Southmore Ave., Pasadena, Texas 77502 Phone: 713-472-7360 Fax: 713-472-7241 Web site: www.gagemaker.com...
Need help?
Do you have a question about the MRP-1500 and is the answer not in the manual?
Questions and answers